TRENDnet TEW-431BRP driver and firmware
Drivers and firmware downloads for this TRENDnet item


Related TRENDnet TEW-431BRP Manual Pages
Download the free PDF manual for TRENDnet TEW-431BRP and other TRENDnet manuals at ManualOwl.com
Data Sheet - Page 1

...FTP, Gaming, ICQ, NetMeeting, PING, Telnet, and more Flash memory for firmware upgrade 3-Year Warranty
BENEFITS
Easy Integration: Internet Router, Access Point, and 4port 10/100Mbps Switch all in one unit. Share your broadband Internet connection with 802.11g/802.11b wireless and wired Ethernet clients.
Cost-Effectiveness: Saves on network cable installation fee and on-line charges.
Security: NAT...
User's Guide - Page 2

... Server 49 MAC Address ...51 Virtual Servers...52
CHAPTER 7 OTHER FEATURES AND SETTINGS 56 Overview ...56 Access Control ...57 Remote Management ...63 PC Database...64 Upgrade Firmware ...68 Options ...69 Security...71 Logs...73 Routing ...75
i
APPENDIX A TROUBLESHOOTING 79 Overview ...79 General Problems ...79 Internet Access...79 Wireless Access ...80
APPENDIX B ABOUT WIRELESS LANS 81 Modes...
User's Guide - Page 4

...-line manual. If any of the above items are damaged or missing, please contact your dealer immediately.
3
TEW-431BRP User Guide
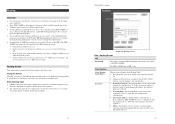
Physical Details
Front-mounted LEDs
Figure 2: Front Panel
Power LED
On - Power on. Off - No power.
Status (Red) LED
On - Error condition.
Off - Normal operation.
Blinking - This LED blinks during start up, and during a Firmware Upgrade.
LAN LEDs For each port...
User's Guide - Page 6

... detailed instructions for the required functions.
To Do this: Configure PCs on your LAN.
Check TEW-431BRP operation and Status.
Use any of the following Internet features: • Advanced Setup • Dynamic DNS • MAC Address • Virtual Servers Configure or use any of the following: • Access Control • Remote Management • PC Database • Upgrade Firmware •...
User's Guide - Page 7

... Hub ports on the TEW-431BRP) or on the same LAN segment. • The TEW-431BRP must be installed and powered ON. • If the TEW-431BRP 's default IP Address (192.168.0.1) is already used by another device, the other device must be turned OFF until the TEW-431BRP is allocated a new IP Address during configuration. Using UPnP If your Windows system supports UPnP, an icon for the TEW-431BRP...
User's Guide - Page 13

... Gateway must be set to the IP address of the TEW-431BRP • The DNS should be set to the address provided by your ISP.
If your LAN has a Router, the LAN Administrator must reconfigure the Router itself. Refer to Chapter 8 - Other Features and Operations for details.
21
TEW-431BRP4 User Guide
Checking TCP/IP Settings - Windows 9x/ME:
1. Select Control Panel - Network. You should see...
User's Guide - Page 18

...TEW-431BRP for Internet access: • Ensure that the DSL modem, Cable modem, or other permanent connection is functional. • Use the following procedure to configure your Browser to access the Internet via the LAN,
rather than by a Dial-up connection.
For Windows 9x/ME/2000 1. Select Start Menu - Settings - Control Panel - Internet Options. 2. Select the Connection tab, and click the Setup...
User's Guide - Page 19

....
Other Unix Systems
To access the Internet via the TEW-431BRP: • Ensure the "Gateway" field for your network card is set to the IP Address of the TEW-
431BRP. • Ensure your DNS (Name Server) settings are correct.
33
TEW-431BRP4 User Guide
Wireless Station Configuration
This section applies to all Wireless stations wishing to use the TEW-431BRP 's Access Point, regardless of the...
User's Guide - Page 20

... PCs on your LAN, and the IP addresses allocated to them, use the PC Database option on the Advanced menu.
System
Device Name
This displays the current name of the TEW-431BRP.
Firmware Version
The current version of the firmware installed in the TEW431BRP.
"System Data" Button
Clicking this button will open a Window which lists all system details and settings.
Buttons
Connection Details...
User's Guide - Page 29

... it is different, this device will perform a "mapping" or "translation" function, allowing the server to use one port address, while clients use a different port address.
53
TEW-431BRP User Guide
Buttons Defaults Disable All Add
Update Delete
Clear Form
This will delete any Servers you have defined, and set the predefined Servers to use their default port numbers.
This will cause...
User's Guide - Page 30

... shown when you select the "DMZ PC", "Virtual Server", or "Internet Application". This database is maintained automatically, but you can add and delete entries for PCs which use a Fixed (Static) IP Address.
Upgrade Firmware
The firmware (software) in the TEW-431BRP can be upgraded using your Web Browser.
Options
Set options for UPnP, backup DNS, and MTU (Maximum Transmission Unit...
User's Guide - Page 31

.... If required, you can also define your own Services.
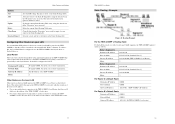
Access Control Screen
To view this screen, select the Access Control link on the Advanced menu.
Figure 36: Access Control Screen
57
TEW-431BRP User Guide
Data - Access Control Screen
Group
Group
Select the desired Group. The screen will update to display the settings for the selected Group. Groups are named "Default...
User's Guide - Page 34

... the database, and updated as required.
• By default, non-Server versions of Windows act as "DHCP Clients"; this setting is called "Obtain an IP Address automatically".
• The TEW-431BRP uses the "Hardware Address" to identify each PC, not the name or IP address. The "Hardware Address" can only change if you change the PC's network card or adapter.
• This system...
User's Guide - Page 35

... has been removed from your LAN. • The entry is incorrect.
Refresh
Update the data on screen.
Generate Report Display a read-only list showing full details of all entries in the PC database.
Advanced
View the Advanced version of the PC database screen. See below for
Administration details.
65
TEW-431BRP User Guide
PC Database (Admin)
This...
User's Guide - Page 36
... and Settings
MAC Address Buttons
Select the appropriate option
• Automatic discovery - Select this to have the TEW-431BRP contact the PC and find its MAC address. This is only possible if the PC is connected to the LAN and powered On.
• MAC is - Enter the MAC address on the PC. The MAC address is also called the "Hardware Address", "Physical Address", or "Network Adapter Address...
User's Guide - Page 37

..., this restriction only applies to users running Windows XP, who access the Properties via UPnP. (e.g. Right - click the Wireless Router in My Network Places, and select Properties)
69
TEW-431BRP User Guide
Allow Internet access to be disabled
MTU MTU size
• If checked, then UPnP users can disable Internet access via this device.
• If Disabled, UPnP users can...
User's Guide - Page 40
... to control which LAN segments use each Gateway, do NOT enable RIP (Routing Information Protocol). Configure the Static Routing table instead. (You also need to configure the other Routers.)
• If using Windows 2000 Data center Server as a software Router, enable RIP on the TEW431BRP, and ensure the following Windows 2000 settings are correct:
• Open Routing and Remote...
User's Guide - Page 41
... use the TEW-431BRP as the Default Route or Default Gateway.
Local Router
The local router is the Router installed on the same LAN segment as the TEW-431BRP. This router requires that the Default Route is the TEW-431BRP itself. Typically, routers have a special entry for the Default Route. It should be configured as follows.
Destination IP Address Network Mask Gateway IP Address Metric
Normally...
User's Guide - Page 42

... compatible with the TEW-431BRP 's default IP Address of 192.168.0.1. Also, the Network Mask should be set to 255.255.255.0 to match the TEW-431BRP. In Windows, you can check these settings by using Control PanelNetwork to check the Properties for the TCP/IP protocol.
Internet Access
Problem 1: Solution 1:
When I enter a URL or IP address I get a time out error.
A number of...
Quick Installation Guide - Page 8

... located on Desktop. 2. Click Start; click Settings and then click on Control Panel. 3. Double-Click the Network icon and the Network Properties box will appear. 4. Under the General Configuration Tab, locate and select TCP/IP with the
corresponding network card (such as TRENDnet TE100-PCIWN 10/100Mbps Network Adapter), then click on the Properties button.
5. Under the IP Address Tab, click...