Sony PEG-UX50 - Clie Handheld driver and firmware
Drivers and firmware downloads for this Sony item

Related Sony PEG-UX50 Manual Pages
Download the free PDF manual for Sony PEG-UX50 and other Sony manuals at ManualOwl.com
CLIE Handbook - Page 2

.../data stored on storage media such as "Memory Stick" media. Beaming Explains how to exchange data or applications with another CLIÉ handheld by beaming. Using the Bluetooth® function Explains how to exchange files/data with another CLIÉ handheld using the Bluetooth® function. Using the Calculator and finding records Explains how to...
CLIE Handbook - Page 3

... refer to the "Read This First (Operating Instructions)".
• Some of the accessories described in this manual (Handbook) may not be supported by your CLIÉ handheld.
• This manual supports PEG-UX50 and PEG-UX40. - The illustrations used in this manual are for PEG-UX50, unless specified otherwise. - Differences between PEG-UX50 and PEG-UX40 are specified in each corresponding section...
CLIE Handbook - Page 14

...), is called the Home screen. In your CLIÉ handheld, the CLIE 3D Launcher and the Palm OS Standard screen are installed as the Home screen. The screen specific to your CLIÉ handheld, the CLIE 3D Launcher, is displayed by default. The CLIE 3D Launcher is used in this manual as the Home screen.
CLIÉ™...
CLIE Handbook - Page 63

... your CLIÉ handheld application files/data with Palm™ Desktop for CLIÉ files/data on your computer, back up the files/data of your CLIÉ handheld on your computer, and install add-on applications.
1 Synchronizing the files/data between your CLIÉ handheld and your computer Synchronizes the data of Date Book, Address Book, To Do...
CLIE Handbook - Page 64

... the files/data between a Windows software on your computer and your CLIÉ handheld.
The compatible file formats that you can import/ export to the Palm™ Desktop for CLIÉ • Comma/Tab delimited (*.csv, *.txt, *.tab, *.tsv) • Text file (*.txt) • vCal (Date Book) file (*.vcs) • vCard (Address) file (*.vcf) • Date...
CLIE Handbook - Page 65

... perform the HotSync® operation, Palm™ Desktop for CLIÉ must be installed on your computer.
b For details on the HotSync® operation, refer to "Using your
CLIÉ™ handheld with your computer" in the "Read This First (Operating Instructions)".
Performing the HotSync® operation with the USB cable (Local HotSync®)
Performing the HotSync®...
CLIE Handbook - Page 66

..., Palm™ Desktop for CLIÉ may not finish normally.
If the HotSync® operation does not start
Make sure that (HotSync) is displayed in the Windows task tray (Notification area). If (HotSync) is not displayed in the task tray (Notification area), click [Start], select [Programs] (for Windows XP, select [All Programs]), [Sony Handheld], and click [HotSync...
CLIE Handbook - Page 67

... enter or modify schedules or address book data on your computer and export data to your CLIÉ handheld.
Starting Palm™ Desktop for CLIÉ
1 Double-click (Palm Desktop for CLIÉ) on the
Windows desktop.
You can also click [Start], select [Programs] (for Windows XP, select [All Programs]), [Sony Handheld], and click [Palm Desktop for CLIÉ]. Palm™...
CLIE Handbook - Page 68

...; operation. b For details, refer to "Installing" on page 184.
D User selector Displays the user name of the current information.
E Record pane Displays full details of the record that is selected in the List pane. The information displayed here is the same as that displayed on your CLIÉ handheld's Details screen.
Exchanging and updating files/data using the HotSync...
CLIE Handbook - Page 69

...; XP operating system When you start Palm™ Desktop for CLIÉ software on your computer, and select [Custom], [File Link], [View Log], or [Setup] from [HotSync], the configuration window may open behind Palm™ Desktop for CLIÉ window. In this case, bring the configuration window to the front by performing one of the following: - Press the...
CLIE Handbook - Page 71

... you to customize the configuration options on your CLIÉ handheld. Setting options may be added by installing new application or software for peripheral devices.
Settings Bluetooth Buttons
Connection Date & Time
Digitizer Extension
Formats General
Graffiti 2
Network Owner Phone
Power Saving ShortCuts
Details
Sets the configuration for the Bluetooth® function.
b For details, refer...
CLIE Handbook - Page 111

... file link functions and how to import data from Windows applications.
Customizing HotSync® application settings (Conduit 112
Synchronizing with external data (File Link) . . 114 Customizing HotSync® Manager startup and
HotSync® setup options 115 Performing the HotSync® operation via
a wireless LAN (for PEG-UX50 only) . . . . . 116 Performing the HotSync® operation using...
CLIE Handbook - Page 112
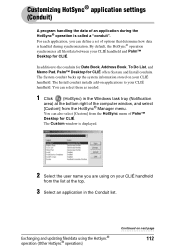
... Book, Address Book, To Do List, and Memo Pad, Palm™ Desktop for CLIÉ offers System and Install conduits. The System conduit backs up the system information stored on your CLIÉ handheld. The Install conduit installs add-on applications to your CLIÉ handheld. You can select them as needed.
1 Click
(HotSync) in the Windows task...
CLIE Handbook - Page 113
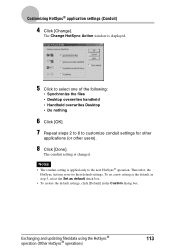
... [Change].
The Change HotSync Action window is displayed.
5 Click to select one of the following:
• Synchronize the files • Desktop overwrites handheld • Handheld overwrites Desktop • Do nothing
6 Click [OK]. 7 Repeat steps 2 to 6 to customize conduit settings for other
applications (or other users).
8 Click [Done].
The conduit setting is changed. Notes
• The conduit...
CLIE Handbook - Page 115

... when you start Palm™ Desktop for CLIÉ.
• Manual: Starts the HotSync® Manager only when you select [HotSync® Manager] from [start] in Windows.
3 Click [Local] tab and adjust the setting for the connection
between the computer and your CLIÉ handheld as needed. • Serial port: Specifies the computer port that is used for the HotSync...
CLIE Handbook - Page 116

... computer window once again,
and select [Setup] from the shortcut menu.
The Setup dialog box is displayed.
3 Click [Network] tab.
4 Click the check box next to the user name for HotSync.
5 Click [OK].
6 Connect your CLIÉ handheld to the computer by a USB
cable, and perform the Hotsync operation by tapping (HotSync).
The computer information (Primary PC name and Primary PC address...
CLIE Handbook - Page 121

... bottom right of the window on
your computer.
Tip
If (HotSync) is not displayed in the Windows task tray (Notification area), click [Start], select [Programs] (for Windows XP, select [All Programs]), [Sony Handheld], and click [HotSync Manager] to start the HotSync manager.
3 Rotate the Jog Dial™ navigator to select
(HotSync) on
the CLIE 3D Launcher and press...
CLIE Handbook - Page 123

... port supporting the IrDA
standard. • The infrared port of your computer is enabled for use with your Windows
operating system. • Check the port number allocated to the infrared port. • The infrared port number is available in the Infrared Monitor in the
Control Panel. For details on the Infrared Monitor, refer to the manual of your computer or the Windows...
CLIE Handbook - Page 126

...have network manager skills. Consult a network manager prior to setting LANSync.
You can perform the HotSync® operation via LAN between your computer and another computer connected to your CLIÉ handheld.
LANSync via LAN
LAN
Your computer
Prior to performing a LANSync operation
Check the following items: • Palm™ Desktop for CLIÉ is installed in both computers connected...
CLIE Handbook - Page 186
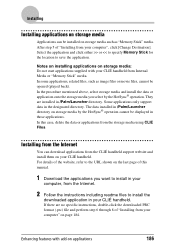
Installing
Installing applications on storage media
Applications can be installed on storage media such as "Memory Stick" media. After step 5 of "Installing from your computer", click [Change Destination]. Select the application and click either >> or