Lantronix Spider KVM Over IP Switch driver and firmware
Drivers and firmware downloads for this Lantronix item

Related Lantronix Spider KVM Over IP Switch Manual Pages
Download the free PDF manual for Lantronix Spider KVM Over IP Switch and other Lantronix manuals at ManualOwl.com
Product Brief / Brochure - Page 6
... dual Ethernet ports and a serial port, an external modem can provide redundancy in case the network goes down.
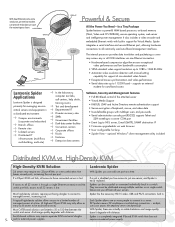
Powerful & Secure
All the Power You Need - In a Tiny Package
Spider features a powerful ARM based processor, on-board memory (Flash, Video and CPU SDRAM), secure operating system, web server and intelligent power management. It also includes a video encoder and embedded Ethernet switch...
Spider App. Note - Page 3
The Spider Network: A Guide to Maximizing Distributed KVM Installations
Introduction
As the Lantronix SecureLinx™ Spider, a KVM (keyboard, video, mouse)-over-IP solution, gains popularity in the distributed IT environment, several questions have arisen with regard to its implementation, limitations, and performance. As an ideal solution for the distributed IT/ remote branch office ...
Spider App. Note - Page 4
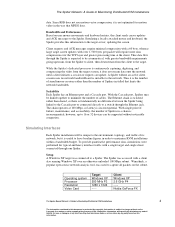
... on the subnet.
Operating system Processor Resolution Video Card
Target Windows XP 550 MHz P3 1280 x 1024 -----
Client Windows XP 2.6 GHz P4 ----Nvidia GeForce FX
The Spider-Based Network: A Guide to Maximizing Distributed KVM Installations
4
The information contained in this document is protected by copyright. Information is subject to change without notice. Lantronix, Inc. makes no claim...
Spider App. Note - Page 5
The Spider Network: A Guide to Maximizing Distributed KVM Installations
The Spider settings on firmware v2.1 are: Interfaces KVM Console Settings Transmission Encoding set to LAN (high color)
Interfaces Keyboard/Mouse Host Interface set to USB
Interfaces Video Filter set to Normal
After opening the remote console window and pressing the "...
Spider App. Note - Page 7
... requirements is to minimize the target server's screen resolution. While this simulation used a resolution of 1280x1024 pixels to show
The Spider-Based Network: A Guide to Maximizing Distributed KVM Installations
7
The information contained in this document is protected by copyright. Information is subject to change without notice. Lantronix, Inc. makes no claim regarding the accuracy of...
Spider App. Note - Page 8
... display is irrelevant to the network data rate. Selecting the slower 60 Hz setting will consume less power in both the server and the Spider.
A second method is to change the target's encoded color depth from 16 to 8 bits, cutting half the amount of data sent in every update. With firmware v2.1, navigate to Interfaces KVM Console Settings...
Compare Spiders - Page 1
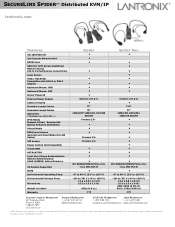
... SPIDER™ Distributed KVM/IP
lantronix.com
Features
10/100 Ethernet 2nd Cascade Ethernet Port RS232 Port USB Port (VIP Access bootstrap) Remote Access (Up to 8 simultaneous connections) Local Access Video: HD15VGA Compatible with DVI-A or DVI-I adapter Keyboard/Mouse: USB Keyboard/Mouse: PS2 Server Powered External Power Supply Cables Included Standard Length Cables Extended Length Cables...
SpiderView User Guide - Page 4

... as the client system. Other Spider devices may be manually added via their IP address.
1. Select ConfigurationFind New Devices or the icon. Newly found Spider devices are listed under the Unconfigured Devices group, listed by their MAC addresses.
2. Right-click on a Spider and select Change Connection Settings. The Device Configuration window displays.
Spider™ View User Guide
4
Quick Start Guide - Page 1

... serial cable into the Spider Duo's serial port. Plug the DB9F end into the serial (COM) port of a PC/laptop running a terminal emulation (e.g. HyperTerminal). The default serial port settings are 9600 bits per second, 8 data bits, no parity, 1 stop bit, no flow control. Plug the power adaptor into the Spider Duo's power connector. Plug an Ethernet cable connected to your network into the Ethernet...
Quick Start Guide - Page 2
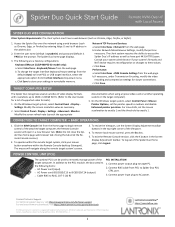
....
TARGET COMPUTER SETUP
The Spider Duo recognizes several varieties of video display formats with resolutions up to 1600 x 1200 @ 60 Hz. (Refer to the User Guide for a list of supported video formats).
1. On the Windows target system, select Control Panel › Display › Settings. Modify the screen resolution value as necessary.
2. Select Control Panel › Display › Settings...
User Guide - Page 3

... IP address; added ability to enable drive redirection, configure backup/restore, and reset factory defaults; introduced a CLI and commands.
Added Direct KVM; KVM-only mode; Spider device network web page; ability to preserve network settings for factory defaults; country code support; iGoogle gadget; instructions for using the mounting kit.
Updated to firmware version 2.2, VIP access.
Updated...
User Guide - Page 11

1: About This Guide
This guide describes how to install, configure, use, and update the Lantronix® Spider™ and SpiderDuo® distributed keyboard, video, and mouse (KVM) -over-IP devices. It describes how to remotely and securely provide monitoring and control of one target computer system by one or more remote users.
This chapter contains the following sections:
Chapter and...
User Guide - Page 27

3: Installing the Spider Device
Windows Server 1. Select Control Panel > Display > Settings. Modify the screen resolution value as required. 2. Select Control Panel > Display > Settings > Advanced > Monitor. Modify the screen
refresh rate. Because the server video card is driving the Spider device and not a monitor, a refresh rate higher than 60 Hz has no effect.
Linux Server 1. ...
User Guide - Page 28

...COM port.
Cable Connections for KVM and USB
Connections for KVM and USB are integrated into the Spider device. Do not use extension cables. Plug the Spider device directly into the ports on the host server. If using the Spider serial port, plug the cable into the COM port on the server.
The second Cascade Ethernet port can connect to the Spider device to the target computer management LAN port, or...
User Guide - Page 29
... to support this configuration. The TCP port can be changed by accessing Interfaces > Network. Lantronix recommends using Fast Ethernet connections and a switched network environment because In a LAN, traffic affects the responsiveness of the Remote Console window.
Spider Power
The Spider device consumes under 10 watts of power that it draws from the attached computer. It requires all cables to...
User Guide - Page 32

... - Power Unit Connected, AC power is passed through
5. Upon bootup, the terminal window displays the login prompt as shown in Figure 4-4.
Figure 4-4 SpiderDuo Login Window
6. To change the default IP auto-configuration settings, type config and press Enter. At the IP configuration prompt, follow the prompts as shown in Figure 4-5.
Spider™ and SpiderDuo® KVM-over-IP Device User Guide...
User Guide - Page 34

4: Installing the SpiderDuo Device
Telnet/SSH Connections to Serial Ports
Cable Connections for KVM and USB
Power Sequencing
Video Resolutions and Refresh Rates Configuration
The SpiderDuo devices recognize video resolutions on the target computer up to a maximum of 1600 x 1200 at 60 Hz. For the complete list of supported video resolutions and refresh rates, see Appendix...
User Guide - Page 36

... management-Spider View software is a standalone Windows 10 or later application that locates, manages, and accesses multiple Spider devices in an integrated view. Spider View application requires ActiveX controls enabled. Refer to the Spider View User Guide at http://www.lantronix.com/support/documentation.html for instructions on installation and operation of Spider View software.
...
User Guide - Page 70

... settings or Messaging settings require the ConsoleFlow client to be disabled and re-enabled for the changes to take effect.
To configure ConsoleFlow settings, perform the following steps.
1. Click Services > ConsoleFlow. The ConsoleFlow Settings page displays.
Figure 9-9 ConsoleFlow Settings Page
2. Modify the following fields.
Spider™ and SpiderDuo® KVM-over-IP Device User Guide...
User Guide - Page 75

...copy the file into the Spider device's local memory. When uploaded correctly, the Firmware Upload window displays the version number of the new firmware. Click the Update button to replace the old with the new, or to cancel the operation, click the Discard button. Do not interrupt power to the Spider device during the update process.
Spider™ and SpiderDuo® KVM-over-IP Device User Guide...