Intel SC5299-E driver and firmware


Related Intel SC5299-E Manual Pages
Download the free PDF manual for Intel SC5299-E and other Intel manuals at ManualOwl.com
User Guide - Page 5
..., upgrading, and repairing this server chassis. This document provides a brief overview of the features of the chassis, a list of accessories or other components you may need, troubleshooting information, and instructions on how to add and replace components on the Intel® Entry Server Chassis SC5299-E. For the latest version of this manual, see http:/ /support.intel.com/support/motherboards...
User Guide - Page 6

... items for your server:
Processor, memory FBDIMMs, hard drive, CD-ROM or DVD-ROM drive, RAID controller, operating system.
For information about which accessories, memory, processors, and third-party hardware have been tested and can be used with your server board, and for ordering information for Intel® products, see http://support.intel.com/support/motherboards/server/chassis/sc5299e/compat...
User Guide - Page 9

...17 Removing the Front Bezel Assembly 17 Installing the Front Bezel Assembly 18
Removing and Installing the Processor Air Duct 19 Removing the Processor Air Duct 19 Installing the Processor Air Duct 20
Installing or Removing a Server Board 20 Installing and Removing a Fixed Hard Drive 26
Installing a Fixed Hard Drive 26
Intel® Entry Server Chassis SC5299-E UP/DP/WS/BRP User Guide
ix
User Guide - Page 10
... 61 System References ...61
Installing a Hot Swap Hard Drive Cage with a SAS/SATA or SCSI Backplane 62 Installing a Hot Swap Hard Drive 73
Rack Mount Kit Install Instructions (optional 81
Before You Begin ...81 Tools and Supplies Needed 81 System References ...81
Setting up a Rack-configured Chassis 81
Technical Reference 93
Cable Routing ...93
Power Supply Specifications 93 420-W Single...
User Guide - Page 20

Server Chassis Features
NOTES: 1. For updated server board support, go to http://support.intel.com/support/motherboards/server/
chassis/sc5299-e/.
Table 2 summarizes the features of the Intel® Entry Server Chassis SC5299-E.
Table 2. Server Chassis Features
Feature Dimensions (pedestal) Dimensions (rack)
Hard drive cage
Description
• 17.8 in (45.2 cm) high with feet; 17.6 in (44.7 ...
User Guide - Page 28

Server Chassis Features
Note: Drives can consume up to 18.4 watts of power each. Drives must be specified to run at a maximum ambient temperature of 45C.
Note: The Intel® Entry Server Chassis SC5299-E does not support all SCSI or Serial ATA hard drives. See "Additional Information and Software" for an web link to a list of supported hardware.
Front Bezel Assembly
The front...
User Guide - Page 29

... spares and accessories available for your chassis, see:
http://support.intel.com/go/serverbuilder
Table 3. Accessories and Order Codes
Accessory
Order Code
SAS/SATA Hot Swap Drive Bay Upgrade Kit SCSI Hot Swap Drive Bay Upgrade Kit Hot Swap Conversion Kit Rack Mount Kit
AXX6SASDB AXX6SCSIDB APP3HSDBKIT APP3RACKIT
Intel® Entry Server Chassis SC5299-E UP/DP/WS/BRP User Guide
11
User Guide - Page 31

2 Hardware Installations and
Upgrades
This document provides instructions for adding and replacing chassis components. For instructions on replacing components on the server board, such as the processor and memory FBDIMMs, see the instructions provided with the server board.
Before You Begin
Before working with your server product, review the important safety information listed in Appendix A, "...
User Guide - Page 32

Hardware Installations and Upgrades
3. Disconnect the AC power cord(s). 4. If present,...installed to ensure proper cooling. 1. Slide the left side cover on the chassis and latch securely (see letter "A" in the following figure). 2. (Optional) Replace screws (see letter "B").
B A
B
TP00831
Figure 11. Installing Left Side Cover
14
Intel® Entry Server Chassis SC5299-E UP/DP/WS/BRP User Guide
User Guide - Page 33

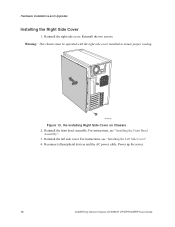
... safety and ESD precautions listed in Appendix A, "Safety Information". 2. Power down the server and unplug all peripheral devices and the AC power cable. 3. Remove the left side cover. For instructions, see "Removing the Left Side Cover" 4. Remove the front bezel assembly if it is installed. For instructions, see "Removing the
Front Bezel Assembly". 5. Remove the two screws...
User Guide - Page 34
...
Figure 13. Re-installing Right Side Cover on Chassis 2. Reinstall the front bezel assembly. For instructions, see "Installing the Front Bezel
Assembly". 3. Reinstall the left side cover. For instructions, see "Installing the Left Side Cover" 4. Reconnect all peripheral devices and the AC power cable. Power up the server.
16
Intel® Entry Server Chassis SC5299-E UP/DP/WS/BRP User Guide
User Guide - Page 35

Hardware Installations and Upgrades
Removing and Installing the Front Bezel Assembly
All configurations of the Intel® Entry Server Chassis SC5299-E ship with a two-piece front bezel assembly.
Removing the Front Bezel Assembly
1. Observe the safety and ESD precautions listed in Appendix A, "Safety Information". 2. Turn off all peripheral devices connected to the server. Turn off the server...
User Guide - Page 36

Hardware Installations and Upgrades
Installing the Front Bezel Assembly
1. Line up the... 15. Installing the Front Bezel Assembly (DP/WS/BRP configuration shown) 2. Reinstall the left side cover. For instructions, see "Installing the Left Side Cover". 3. Reconnect all peripheral devices and the AC power cable. Power up the server.
18
Intel® Entry Server Chassis SC5299-E UP/DP/WS/BRP User Guide
User Guide - Page 37

... refer to your server board User Guide for instructions on processor installation and removal. Return to these instructions to reinstall the processor air duct after you have installed your processor and heat sink.
Removing the Processor Air Duct
Note: The following procedure is not applicable to the UP configuration of the Intel® Entry Server Chassis SC5299-E. The processor air duct on the...
User Guide - Page 38

... with two mounting screws.
TP01137
Figure 17. Installing Processor Air Duct 2. Install the left side cover. For instructions, see "Installing the Left Side Cover". 3. Plug all peripheral devices and the AC power cable into the server. Power up the
server.
Installing or Removing a Server Board
Note: The type of Intel® Server Board you can install in your chassis will depend upon the model...
User Guide - Page 44

... do so could result in thermal issues within the chassis.
1 2
3 4
5 6
AF000316
Note: SAS/SATA drives illustrated. Figure 24. Drive Bay Slot Order
1. Observe the safety and ESD precautions listed in Appendix A, "Safety Information". 2. Power down the server and unplug all peripheral devices and the AC power cable.
26
Intel® Entry Server Chassis SC5299-E UP/DP/WS/BRP User Guide
User Guide - Page 49
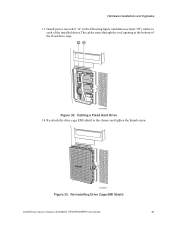
... installed drives.The cables route through the oval opening at the bottom of the fixed drive cage. AB
AF000429
Figure 32. Cabling a Fixed Hard Drive 14. Re-attach the drive cage EMI shield to the chassis and tighten the thumb screw.
AF000315
Figure 33. Re-installing Drive Cage EMI Shield
Intel® Entry Server Chassis SC5299-E UP/DP/WS/BRP User Guide...
User Guide - Page 67

... Installations and Upgrades
9. Install the left side cover. For instructions, see "Installing the Left Side Cover". 10. Plug all peripheral devices and the AC power cable into the server. Power up the
server.
Replacing a Fixed Power Supply
Warning: Hazardous conditions, power supply: Hazardous voltage, current, and energy levels are present inside the power supply. There are no user-serviceable...
User Guide - Page 79

3 Hot Swap Drive Cage Upgrade
Install Instructions (optional)
The fixed hard drive cage that ships with your Intel® Entry Server Chassis SC5299-E is upgradeable to a hot swap drive cage with a SCSI or SAS/SATA backplane. See your Intel Representative for ordering information.
Up to six hot swap hard drives can be installed in the optional hot swap drive cage. Power requirements for each ...
User Guide - Page 91

... Swap Drive Cage Upgrade Install Instructions (optional)
Installing a Hot Swap Hard Drive
Note: The following set of instructions is only applicable if you have replaced the fixed hard drive cage that shipped with your chassis with an optional hot swap SCSI or SAS/SATA hard drive cage. If you are replacing a fixed hard drive, see "Removing a Fixed Hard Drive" for instructions.
Note: The Intel®...