Vantec NST-400MX-S3R - NexStar MX driver and firmware
Related Vantec NST-400MX-S3R Manual Pages
Download the free PDF manual for Vantec NST-400MX-S3R and other Vantec manuals at ManualOwl.com
User Guide - Page 2
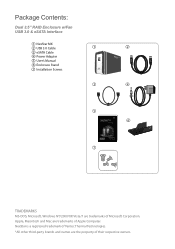

... RAID Enclosure w/Fan USB 3.0 & eSATA Interface
1 NexStar MX 2 USB 3.0 Cable
1
2
3 eSATA Cable
4 Power Adapter
5 User's Manual
6 Enclosure Stand
7 Installation Screws
3
4
5 6
7
TRADEMARKS MS-DOS, Microsoft, Windows NT/2000/XP/Vista/7 are trademarks of Microsoft Corporation. Apple, Macintosh and Mac are trademarks of Apple Computer. NexStar is a registered trademark of Vantec Thermal...
User Guide - Page 3

Table of Contents:
1. Introduction
02
2. Specifications/Features
03
3. System Requirements
04
4. Parts Layout
05
5. Installation
06
6. LED Indicator
09
7. Mode Configuration
10
8. Disconnecting the NexStar MX
14
9. Hardware Formatting Guide
15
10. Warranty
21
11. Contact
21
Table of Contents 1
User Guide - Page 5
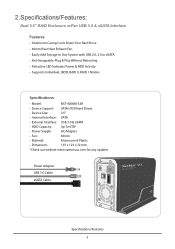

...; Attractive LED Indicates Power & HDD Activity • Supports Individual, JBOD, RAID 0, RAID 1 Modes
Specifications:
• Model:
NST-400MX-S3R
• Device Support: SATA I/II/III Hard Drives
• Device Size:
3.5"
• Internal Interface: SATA
• External Interface: USB 3.0 & eSATA
• HDD Capacity:
Up To 6TB*
• Power Supply:
AC Adapter
• Fan:
40mm...
User Guide - Page 8

5.Installation:
Dual 3.5" RAID Enclosure w/Fan USB 3.0 & eSATA Interface
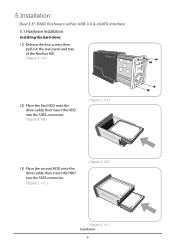
5.1.Hardware Installation: Installing the hard drive:
(1) Release the four screws then pull out the rear panel and tray of the NexStar MX. ( figure 5.1-A )
(2) Place the first HDD onto the drive caddy then insert the HDD into the SATA connector. ( figure 5.1-B )
( figure 5.1-A )
(3) Place the second HDD onto the drive ...
User Guide - Page 9

... 5.1-D)
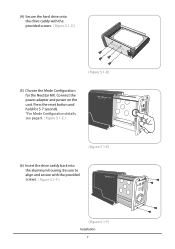
(5) Choose the Mode Configuration for the NexStar MX. Connect the power adapter and power on the unit. Press the reset button and hold for 5-7 seconds. *For Mode Configuration details, see page 9. ( figure 5.1-E )
( figure 5.1-E)
(6) Insert the drive caddy back into the aluminum housing. Be sure to align and secure with the provided screws. ( figure 5.1-F )
( figure 5.1-F) Installation
7
User Guide - Page 10
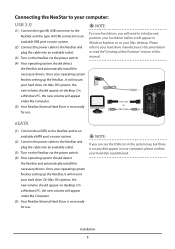

... it will appear in Windows Explorer or on your Mac desktop. Please refer to your hard drive manufacturer's documentation or read the"Creating a New Partition" section of this manual.
eSATA Cable or
USB3.0 Cable
DC 12V
USB 3.0
POWER
ON OFF eSATA
eSATA
(1) Connect the eSATA to the NexStar and to an available eSATA port on your system.
(2) Connect the power cable to the NexStar and plug the...
User Guide - Page 11
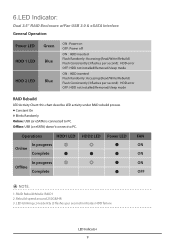

... RAID Enclosure w/Fan USB 3.0 & eSATA Interface General Operation:
Power LED HDD 1 LED HDD 2 LED
Green Blue Blue
ON : Power on OFF: Power off
ON : HDD inserted Flash Randomly: Accessing (Read/Write/Rebuild) Flash Consistently (3 flashes per second): HDD error OFF: HDD not installed/Removed/sleep mode
ON : HDD inserted Flash Randomly: Accessing (Read/Write/Rebuild) Flash Consistently (3 flashes...
User Guide - Page 16

... the NexStar MX:
Dual 3.5" RAID Enclosure w/Fan USB 3.0 & eSATA Interface
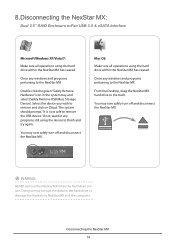
Microsoft Windows XP/Vista/7:
Make sure all operations using the hard drive within the NexStar MX has ceased.
Close any windows and programs pertaining to the NexStar MX
Double click the green "Safely Remove Hardware" icon in the system tray and select [Safely Remove USB Mass Storage Device]. Select the device you...
User Guide - Page 17
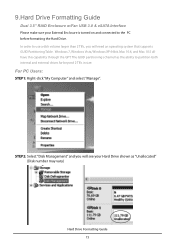

9.Hard Drive Formatting Guide
Dual 3.5" RAID Enclosure w/Fan USB 3.0 & eSATA Interface Please make sure your External Enclosure is turned on and connected to the PC before formatting the Hard Drive. In order to use a disk volume larger than 2 TB's, you will need an operating system that supports GUID Partitioning Table. Windows 7, Windows Vista, Windows XP 64bit, Mac 10.4, and Mac 10.5 all have ...
User Guide - Page 20
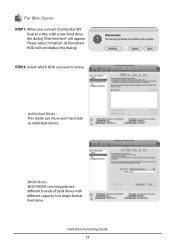

...: STEP1: When you connect the NexStar MX
Dual to a Mac with a new hard drive, the dialog "Disk Insertion" will appear. Please select "Initialize". (A formatted HDD will not display this dialog)
STEP2: Select which HDD you want to erase.
Individual Mode : This mode can show each hard disk as individual device.
JBOD Mode : JBOD MODE can integrate two different...
Datasheet - Page 2
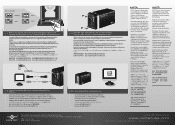

... NexStar MX est maintenant prat a etre utilise. Ihr NexStar MX ist nun einsatzbereit. Adesso NexStar MX é pronto all'uso.
NexStar MX OftflrZ.k5" iErx 9 NexStar MX 3E47, 1cAlfiElElj7 NexStar MX EMTailEfliT.
*NOTE:
NOTE: New hard drives needs to be initialized and partitioned before it will appear in Windows Explorer or Mac desktop. Please refer to "Creating a New Partition" within the manual...
Flyer - Page 1
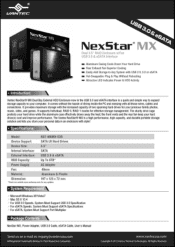

... Vantec NexStar® MX is a high performance, high capacity, and durable portable storage solution and lets you store your personal data in an enclosure with style!
• S • ecifications:
Model:
NST-400MX-S3R
Device Support:
SATA Hard Drives
Device Size:
3.5"
Internal Interface: SATA
External Interface: USB 3.0 & eSATA
HDD Capacity:
Up To 6TB*
Power Supply:
AC Adapter
Fan...

