Toshiba PA3542A-2PRP dynadock DVI driver and firmware
Drivers and firmware downloads for this Toshiba item

Related Toshiba PA3542A-2PRP dynadock DVI Manual Pages
Download the free PDF manual for Toshiba PA3542A-2PRP dynadock DVI and other Toshiba manuals at ManualOwl.com
User Manual - Page 2
... the dynadock to the Computer 13 Installing the Drivers 14
Uninstalling 22 Uninstalling - Windows Vista Operations 22 Uninstalling - Windows XP Operations 24
Using the dynadock 26 USB 2.0 Ports (Front and Back Panel 26 Ethernet Port (Back Panel 26 Serial Port (Back Panel 27 Front Panel Audio Port (Microphone 28 Front Panel Audio Port (Headphones or Speakers 28 Video Port (VGA or DVI 32...
User Manual - Page 3

... with the limits for a Class B digital device, pursuant to part 15 of the FCC rules. These limits are designed to provide reasonable protection against harmful interference in a residential installation. This equipment generates, uses and can radiate radio frequency energy and, if not installed and used in accordance with the instructions, may cause harmful interference to...
User Manual - Page 6

... mode. The video driver passes 24-bit data to the device if you have selected 32-bit color quality. This is for more efficient data transfer. When recording audio, it is recommended that you manually configure the microphone volume settings.
Precautions for Windows Vista™ only
The dynadock only supports the mirror mode for display. When the dynadock is connected, the...
User Manual - Page 7

... you to connect all of your peripherals, including six USB devices, Ethernet network, serial device, headphones, speakers and microphone plus an external monitor and digital audio equipment. It's ideal for the computers having extra connectivity demands.
The upright slim design of the dynadock saves your desktop space while the two USB ports on the front panel give you easy accessibility. The...
User Manual - Page 10
...™
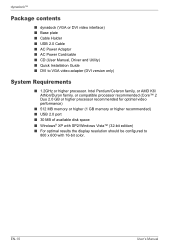
Package contents
■ dynadock (VGA or DVI video interface) ■ Base plate ■ Cable Holder ■ USB 2.0 Cable ■ AC Power Adaptor ■ AC Power Cord/cable ■ CD (User Manual, Driver and Utility) ■ Quick Installation Guide ■ DVI to VGA video adapter (DVI version only)
System Requirements
■ 1.2GHz or higher processor. Intel Pentium/Celeron family...
User Manual - Page 14

...end of the USB cable into an available USB 2.0 port on your computer.
(Sample Illustration) Connecting the USB cable to your computer
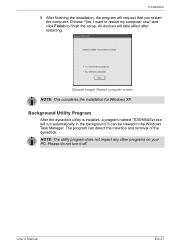
NOTE: Be sure to remember which USB port is used for the driver installation and always plug the dynadock into the same USB port, otherwise, Windows® will treat the dynadock as a new device and ask to install the drivers again. Only one dynadock can be operated...
User Manual - Page 15

...will begin installing the dynadock Utility and all drivers necessary for the dynadock device. Follow the screen directions to finish the utility installation. Step 1: When the welcome screen appears, click Next.
(Sample Image) Welcome screen
Step 2: Select "I Agree" and click Next.
(Sample Illustration) License Agreement screen
Step 3: Choose the destination folder.
User's Manual
(Sample Image...
User Manual - Page 16

dynadock™
Step 4: Click Next to start the installation. This may take several minutes.
(Sample Image) Ready to Install screen
Step 5: Click Close when the "Installation Complete" dialog box shown below appears.
(Sample Image) Finish screen
NOTE: There are slight differences in the installation between Windows Vista and Windows XP. Please follow the steps for your operating system...
User Manual - Page 17

Installation
Windows Vista Operations: 3. After the utility installation is completed, the "Video" driver will be
installed. Step 1: When the welcome screen appears, click Next.
(Sample Image) Welcome screen
Step 2: Select "I accept the terms in the License Agreement" and click Next.
(Sample Illustration) License Agreement screen
Step 3: Click Install to start the installation. This may take ...
User Manual - Page 18

... your computer and click Retry to proceed.
(Sample Image) Not detected the dynadock screen
5. After finishing the installation, the program will request you to restart the computer. Choose "Yes" and click OK to finish the setup. All devices will take effect after restarting.
(Sample Image) Restart computer screen
NOTE: This completes the installation for Windows Vista.
EN-18
User's Manual
User Manual - Page 19

.... If the dynadock is not detected, the message will appear again. Please make sure the dynadock is connected correctly. If you click Cancel, the program will exit the installation of the audio driver.
(Sample Image) Not detected the dynadock screen
NOTE: Installation of the "Audio" driver will fail if the dynadock is not connected to the PC.
User's Manual
EN-19
User Manual - Page 20

... Next.
(Sample Image) Setting selection screen
Step 2: Choose a destination location for the installation or just use the default location. Then click Next.
(Sample Image) Choose Destination Location screen
Step 3: Click Next to start copying the program files to your computer. This step may take a few minutes to install.
EN-20
(Sample Image) Installation files copying screen User's Manual
User Manual - Page 21
..., the program will request that you restart the computer. Choose "Yes, I want to restart my computer now" and click Finish to finish the setup. All devices will take effect after restarting.
(Sample Image) Restart computer screen
NOTE: This completes the installation for Windows XP.
Background Utility Program
After the dynadock utility is installed, a program named 'TOSHIBASvr.exe' will run...
User Manual - Page 22
...and the Audio driver one by one.
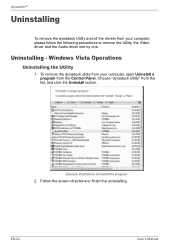
Uninstalling - Windows Vista Operations
Uninstalling the Utility
1. To remove the dynadock utility from your computer, open Uninstall a program from the Control Panel. Choose "dynadock Utility" from the list, and click the Uninstall button.
(Sample Illustration) Uninstall the program
2. Follow the screen directions to finish the uninstalling.
EN-22
User's Manual
User Manual - Page 24

...Uninstall the Audio Driver
1. To remove the Audio driver completely, open Uninstall a program from the Control Panel, then choose "TOSHIBA USB Audio" and click the Uninstall/Change button.
(Sample Illustration) Uninstall TOSHIBA USB Audio
2. Follow the screen directions to finish the uninstalling.
Uninstalling - Windows XP Operations
Uninstalling the Utility
1. To remove the dynadock utility from...
User Manual - Page 27

... settings, consult your network administrator for assistance.
(Sample Image) Local Area Connection Properties
NOTE: The LAN port does not support Wake-On-LAN.
Serial Port (Back Panel)
To connect a serial device, attach the serial cable (not provided) to the serial port on the dynadock and your serial device. Then install the software driver according to the instructions that come with the device...
User Manual - Page 28
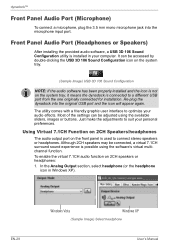
...the microphone input port.
Front Panel Audio Port (Headphones or Speakers)
After installing the provided audio software, a USB 3D 106 Sound Configuration utility is installed in your computer. It can be accessed by double-clicking the USB 3D 106 Sound Configuration icon on the system tray.
(Sample Image) USB 3D 106 Sound Configuration
NOTE: If the audio software has been properly installed and the...
User Manual - Page 32

... the software's setup or configuration panel to locate the Audio Out item).
NOTE: The above steps are for Windows XP only. In order to use the S/ PDIF function in Windows Vista, select Start > Control Panel > Hardware and Sound > Sound. In the Playback tab, set the Digital Output as default device.
Video Port (VGA or DVI)
Connection
The dynadock is available in two versions: VGA - for...
User Manual - Page 33
...)
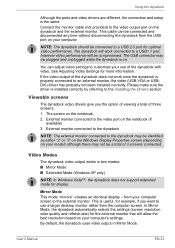
NOTE: In Windows Vista™, the dynadock does not support extended mode for display.
Mirror Mode This mode "mirrors"-creates an identical display - from your computer screen to the external monitor. This is useful, for example, if you want to use a larger desktop monitor rather than the computer screen. In Mirror Mode, the dynadock automatically selects the settings (screen resolution, color...
User Manual - Page 41

....
Opening Setting Dialog
1. Click "Start" and then click "Control panel". 2. Double-click the "TOSHIBA dynadock Utility" icon. 3. Setting dialog will appear.
NOTE: The method of opening the control panel is the same in different versions of windows. If you can not find the "TOSHIBA dynadock Utility" icon, please click "classic view" on the left of the control panel window.
User's Manual
EN-41