TP-Link Archer CR500 driver and firmware
Drivers and firmware downloads for this TP-Link item

Related TP-Link Archer CR500 Manual Pages
Download the free PDF manual for TP-Link Archer CR500 and other TP-Link manuals at ManualOwl.com
Archer CR500US V1 Quick Installation Guide - Page 1
...information about WPS, refer to the User Manual at http://www.tp-link.com.
Activate the Modem Router Enjoy the Internet
1 Get your Internet service account information and the modem router's Information Card ready. Information Card
Serial Number MAC Address Wi-Fi Password/PIN SSID
2 Make sure your computer is set to dynamically obtain an IP address.
3 Launch a web browser, and visit any website...
Archer CR500US V1 Quick Installation Guide - Page 2

... device is plugged into the USB port.
The USB ports can be used for media sharing, storage sharing and printer sharing within your local network. You can also set up an FTP server to access your files remotely through the Internet.
USB Ports for Sharing
Remote Access via FTP Server
Media Sharing
Local Storage Sharing
Printer Sharing
To learn more about the USB features, visit http://tp-link...
Archer CR500US V1 User Guide - Page 5

... or disable the corresponding entry.
More Info
• The latest software, management app and utility can be found at Download Center at http://www.tp-link.com/support.
• The Quick Installation Guide (QIG) can be found where you find this guide or inside the package of the router.
• Specifications can be found on the product page at...
Archer CR500US V1 User Guide - Page 15
... OS with a Web browser, such as Microsoft Internet Explorer, Mozilla Firefox or Apple Safari.
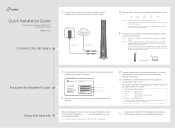
Follow the steps below to log in to your modem router.
1. If the TCP/IP Protocol on your computer is set to the static (fixed) IP address, you need to change it to obtain an IP address automatically. Refer to Appendix: Troubleshooting > T7...
Archer CR500US V1 User Guide - Page 32

...the network.
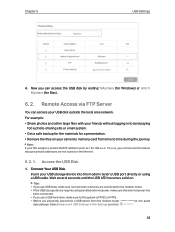
6. 1. 1. Access the USB Disk
1. Connect Your USB Disk
Insert your USB storage device into the modem router's USB port directly or using a USB cable. Wait several seconds until the USB LED becomes solid on.
Tips:
• If you use USB hubs, make sure no more than 4 devices are connected to the modem router.
• If the USB storage device requires using bundled external power...
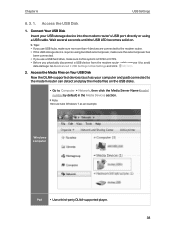
Archer CR500US V1 User Guide - Page 33
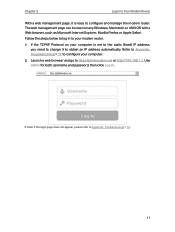
... browser (or go to Computer) and type the server address \\TP-LINK or ftp://TP-LINK in the address bar, then press Enter.
Windows computer
1 ) Select Go > Connect to Server 2 ) Type the server address smb://TP-LINK 3 ) Click Connect
Mac
4 ) When prompted, select the Guest radio box. (If you have set up a username and a password to deny anonymous access to the USB disks, you should select the...
Archer CR500US V1 User Guide - Page 35

... 6
USB Settings
Tips: The modem router can share eight volumes at most. You can click corresponding volume you do not need to share.
on the page to detach the
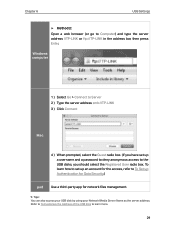
¾¾ To Set up Authentication for Data Security If you enable Authentication, network clients will be required to enter the username and password you set when accessing the USB disk...
Archer CR500US V1 User Guide - Page 36
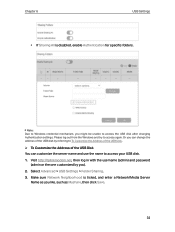
... Customize the Address of the USB Disk.
¾¾ To Customize the Address of the USB Disk You can customize the server name and use the name to access your USB disk. 1. Visit http://tplinkmodem.net, then log in with the username (admin) and password
(admin or the one customized by you). 2. Select Advanced > USB Settings > Folder Sharing. 3. Make sure Network Neighborhood...
Archer CR500US V1 User Guide - Page 37
... on your camera's memory card from time to time during the journey.
Note: If your ISP assigns a private WAN IP address (such as 192.168.x.x or 10.x.x.x), you cannot use this feature because private addresses are not routed on the Internet.
6. 2. 1. Access the USB Disk
1. Connect Your USB Disk
Insert your USB storage device into the modem router's USB port directly or using a USB cable. Wait...
Archer CR500US V1 User Guide - Page 38

...set the sharing username the same as the Windows username. Otherwise, Windows credential mechanism may cause the following problems: • If the sharing password is also the same as the Windows password, authentication will not work since the
Windows will automatically use its account information for USB access. • If the sharing password is different from the Windows password, the Windows...
Archer CR500US V1 User Guide - Page 39

Chapter 6
USB Settings
Note: Due to Windows credential mechanism, you might be unable to access the USB disk after changing Authentication settings. Please log out from the Windows and try to access again.
3. Enable the FTP (via Internet) Select the check box to enable FTP(via Internet), then click Save.
4. Access Your USB Disk via Internet Now different clients with Internet connection can ...
Archer CR500US V1 User Guide - Page 40

... name of the modem router, you can also type in ftp://: (such as ftp:// MyDomainName:21)
Computer
The Address Bar of the Windows Explorer (Windows 7)
3 ) Press Enter on the keyboard.
4 ) Access with the username and password you set in Step 2 Enable Authentication for Data Security.
Tips: You can also access the USB disk via a third-party app for network files management...
Archer CR500US V1 User Guide - Page 42
... USB Disk
Now the DLNA-supported devices (such as your computer and pad) connected to the modem router can detect and play the media files on the USB disks.
• Go to Computer > Network, then click the Media Server Name (model number by default) in the Media Devices section.
Note: Here we take Windows 7 as an example.
Windows computer
Pad
• Use a third-party DLNA-supported player...
Archer CR500US V1 User Guide - Page 44

...
The feature of Printer Sharing helps you share a printer with different computers connected to the modem router.
Note: Printers unlisted on this page may be incompatible with the modem router: http://www.tp-link.com/common/compatible/print-server/.
1. Install the Driver of the Printer Make sure you have installed the driver of the printer on each computer that needs printer service. If you do...
Archer CR500US V1 User Guide - Page 45
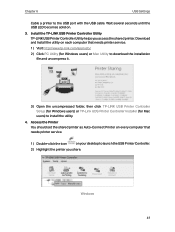
...(for Windows users) or Mac Utility to download the installation file and uncompress it.
3 ) Open the uncompressed folder, then click TP-LINK USB Printer Controller Setup (for Windows users) or TP-Link UDS Printer Controller Installer (for Mac users) to install the utility.
4. Access the Printer You should set the shared printer as Auto-Connect Printer on every computer that needs printer service...
Archer CR500US V1 User Guide - Page 46

Chapter 6
USB Settings
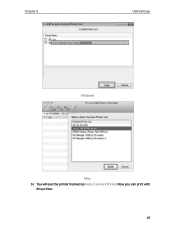
Mac 3 ) Click the Auto-Connect for printing tab to pull down a list, then select Set Auto-
Connect Printer.
Windows
Mac 4 ) Select the printer you share, then click Apply.
42
Archer CR500US V1 User Guide - Page 47
Chapter 6
USB Settings
Windows
Mac 5 ) You will see the printer marked as Auto-Connect Printer. Now you can print with
this printer. 43
Archer CR500US V1 User Guide - Page 48

Chapter 6
USB Settings
Windows
Mac
Tips: The Print Server also allows different clients to share the scan feature of MFPs (Multi-Function Printers). To scan with TP-LINK USB Printer Controller, right-click the printer and select Network Scanner. Then, a scanning window will pop up. Finish the scanning process by following the on-screen instructions.
44
Archer CR500US V1 User Guide - Page 82

... computers to access the Internet via the same account. 1. Visit http://tplinkmodem.net, and log in with the username (admin) and password
(admin or the one customized by you). 2. Go to Advanced > Network > WAN page. Locate the Connection Settings section.
• If you are using the computer with the authenticated MAC address to access the modem router, please select Use Computer MAC Address...
Archer CR500US V1 User Guide - Page 84

...; 2 ) Change the wireless Channel of the router to 1,6,or 11 to reduce interference
from other networks; 3 ) Re-install or update the driver for your wireless adapter of the computer; 4 ) Connect to wireless network.
T7. How can I change my computer's setting to obtain an IP address automatically?
To change the computer's network settings, follow the steps below. • For MAC OS X: 1 ) Click...