Sony SLV-272 driver and firmware

Related Sony SLV-272 Manual Pages
Download the free PDF manual for Sony SLV-272 and other Sony manuals at ManualOwl.com
Operating Instructions - Page 2
... (servicing) instructions in the literature accompanying the appliance.
INFORMATION This equipment generates and uses radio frequency energy and if not installed and used properly, that is, in strict accordance with the manufacturer's instructions, may cause interference to radio and television reception. It has been type tested and found to comply with the limits for a Class B computing device...
Operating Instructions - Page 4

...unit is designed for operation in a horizontal position. Do not install it in an inclined position.
• Keep the unit and...power off to conserve energy and to extend its useful life.
• Remove and store video cassettes after recording ... is present The DEW mark blinks in the display window and the unit will not operate.
'I,
-...question about this unit, contact your Sony service facility.
4
Operating Instructions - Page 6
... the currently tuned channel from the memory.
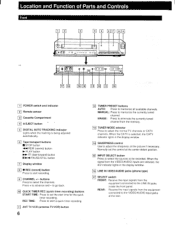
13 TUNER MODE selector Press to select the normal TV channels or CATV channels. When the CATV is selected, the CATV indicator lights in the display window.
14 SHARPNESS control Use to adjust the sharpness of the picture if necessary. Normally set the control at the center detent position.
INPUT...
Operating Instructions - Page 7

... when the signals from the AUDIO/VIDEO inputs are selected for the sources to be recorded.
151 DEW indicator 161 Channel number indicator 171 CATV indicator
1a] Clock/QTR (quick timer recording)/Tape
counter/M (memory)/INDEX/GO-TO/Tracking position indicator • Clock setting (See page 18.) • Quick timer recording (See page 35.) • Tape...
Operating Instructions - Page 8

... the VCR indicator is turned off.
1101 POWER button
1111 VOLUME +/- buttons
1121 CHANNEL +/- buttons
13 TV SCAN button
1141 INPUT SELECT button
Press to select the sources to be recorded.
1151 INDEX/GO-TO button
For index operation, press once. The INDEX indicator appears in the display window. For time search operation, press twice. The...
Operating Instructions - Page 10

... the grounding system of the building, as close to the point of cable entry as practical.
10
Caution Connections between the recorder VHF/UHF OUT connector and the antenna terminals of a TV receiver should be made only as shown in the instructions. Failure to do so may result in operation that violates the regulations...
Operating Instructions - Page 11

... INPUT
UI0 to oI rrio III
VHF/UHF OUTPUT Or 75-ohm coaxial cable (supplied)
CATV channel converter
ommammonote_ VHF/UHF
CATV channel converter
TV 00 UHF
VHF
TV
FederahCommunications Commission regarding the use and operation of rf devices. Never connect the output of the recorder to an antenna or make simultaneous (parallel) antenna and...
Operating Instructions - Page 18

... VCR is first connected to the wall outlet and the power is turned on. "88:88" will blink in the display window. You can set the date and clock on the TV screen with the Remote Commander. For example: It is September 10, 1990 9:30 PM. • Set TV/VCR on the Commander to VCR.
1 Turn on both...
Operating Instructions - Page 19

... or time (14th month for example), "?- will appear on the TV screen.
When "88:88- blinks in the display window If the VCR is disconnected from the wall outlet. or if there has been a power interruption. "88:88" will blink when the power is fed to the VCR again. Set the date and clock again.
19
Operating Instructions - Page 21

...00 C:1 0 0 0
0 0
=
0
0
0 00 00
00
00
4=1
3
CHANNEL +/TV SCAN
2
1 Set TV/VCR to VCR. 2 Press INPUT SELECT, if the A/V indicator lights in the
display window.
3 Press ANT TV/VCR. The VCR indicator is displayed.
4 Select the tuner mode. When CATV indication lights in the display window: for cable-TV reception. When no indication lights in the display window: for off-the air reception using...
Operating Instructions - Page 24

...
ED CD
3
Q
O
C=J CD C:=1
CD C=7 CD
L-D c
CD
C] C=3 C=7 CJI
1 Turn on the TV and select the channel for the VCR (3 or 4) or select the input for the VCR.
2 Insert a cassette. The power is turned on automatically, and the* • indicator appears in the display window. If you insert a cassette whose safety tab is broken off, playback...
Operating Instructions - Page 25

... The DIGITAL AUTO TRACKING indicator lights and the
-" indicator appears in the display window. Manual adjustment If the noise level is not reduced even when AUTO TRACKING is pressed, adjust the tracking manually by ...blue-screen display does not appear even when a blank portion of the tape is reached.
Note Sufficient picture quality may not be obtained when playing back tapes recorded on another...
Operating Instructions - Page 27

... broken off The cassette will be ejected automatically when • REC is pressed.
Insert a cassette.The power is turned on automatically and the indicator appears.
2 Set TV/VCR to VCR. 3 Press INPUT SELECT, if the AN indicator lights in the
display window.
4 Select the recording speed, SP, LP or EP using REC MODE.
5 Turn on the...
Operating Instructions - Page 34

..."Timer setting example."
When the presettings of your timer-activated recordings overlap
The recording of program 2 will not begin until the recording of ...memory will be cleared. Reset the clock and preset the data for timer-activated recordings again.
• If an unusual timer indication or no indication appears on the display window or the TV screen, turn off the VCR, disconnect the power...
Operating Instructions - Page 35

... end.
Starting Recording Immediately
Before operation
• Make sure that the tape speed and the channel are set as you desire.
• Set the TV/VCR on the Remote Commander to VCR.
1 Insert a cassette. 2 Press REC TIME.
The REC TIME indicator appears, and the display shows "0:00."
0
•§Ce
DO
0
R
ct=
3, 4
TVNCR
•
0 0 0 io u
0 0 0
D00
0 _0...
Operating Instructions - Page 36

... a cassette.
2 Press START TIME. The START indicator appears, and the display window shows the recording start time.
STVA', ;
o
SP
•
cla
3 Press START TIME repeatedly so that the time you want to start recording is displayed. Each time you press START TIME, the time display increases at an interval of 10 minutes. Example: If the current...
Operating Instructions - Page 38
...display window while an index signal is being marked.
• VCR
IEp
I L CAZ"
• ri n
• L i U.
n ni•n -1
U 14 LI IS
Note The index signal is marked only when you start recording from the stop mode. If the VCR is set to the recording-pause mode and then recording...2
r 3
Present position
(1/
33
1 Insert a recorded cassette.
2 Set TV/VCR to VCR. 3 Press INDEX/GO-TO during ...
Operating Instructions - Page 39

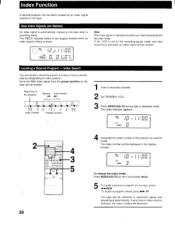
Watching the Beginning of Each Recording Consecutively - Index Scan
You can watch the beginning of each recording consecutively by detecting the index signal one by one.
1 Insert a recorded cassette.
2 Set TV/VCR to VCR.
3 Press INDEX/GO-TO during stop or playback mode. The ...for the first index signal, "SC" will be displayed on the display window. Each time an index signal is detected, the ...
Operating Instructions - Page 40

...-TO indicator appears in the display window.
ars VCR
12CAry I I:ElO.
ISM 23s
I
The tape advances rapidly and automatically stops at ne end of the recorded portion.
5 To advance the tape, press 0-1.- FF. To rewind the tape, press -IN REW. After the tape is advanced or rewound for the setting time, the playback starts...
Operating Instructions - Page 43

... so that the VCR indicator appears in the display window.
• For UHF programs, check that the UHF antenna is installed. • The TV's channel is not set to 3 CH or 4 CH, or the video input
has not been selected at the monitor.
A tape recorded in the LP mode may not provide picture of sufficient quality...