Lantronix xPico driver and firmware
Related Lantronix xPico Manual Pages
Download the free PDF manual for Lantronix xPico and other Lantronix manuals at ManualOwl.com
xPico - Product Brief - Page 2
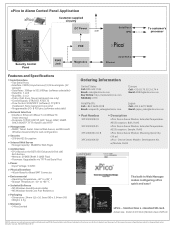
... 16-bit x86 Architecture
• Memory: 256KB SRAM, 512KB Flash • Firmware: Upgradeable via TFTP and Serial Port
> Power
• Input Voltage: 3.3VDC
> Physical Interface
• 40-pin Board-to-Board SMT Connector
> Environmental
• Operating Temperature: -40° to +85° C • Storage Temperature: -40° to +85° C
> Included Software
• MS Windows-based...
xPico - Product Brief (A4 Format) - Page 2
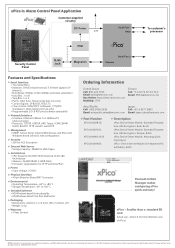
... 16-bit x86 Architecture
• Memory: 256KB SRAM, 512KB Flash • Firmware: Upgradeable via TFTP and Serial Port
> Power
• Input Voltage: 3.3VDC
> Physical Interface
• 40-pin Board-to-Board SMT Connector
> Environmental
• Operating Temperature: -40° to +85° C • Storage Temperature: -40° to +85° C
> Included Software
• MS Windows-based...
xPico - User Guide - Page 3
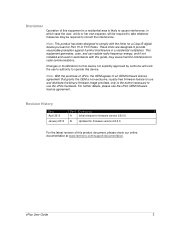
... the xPico hardware. For further details, please see the xPico OEM firmware license agreement.
Revision History
Date April 2012 January 2013
Rev. Comments
A
Initial release for firmware version 6.8.0.0.
B
Updated for firmware version 6.8.0.3.
For the latest revision of this product document, please check our online documentation at www.lantronix.com/support/documentation.
xPico User Guide...
xPico - User Guide - Page 6
... Monitor Mode at bootup 55
HTTP Port Number 55
MTU Size ...55
TCP Re-Transmission Timeout 56
Enable alternate MAC 56
Ethernet Connection Type 56
Security Settings (Option 6 56
Disable SNMP...57
SNMP Community Name 57
Disable Telnet Setup 57
Disable TFTP Firmware Upgrade 58
Disable Port 77FE (Hex 58
Disable Web Server 58
Disable Web Setup 58
xPico User Guide
6
xPico - User Guide - Page 7
... Settings Defaults 61 Security Settings Defaults 61
9. GPIO Interface
62
Configurable Pins ...62
Features ...62
Control Protocol ...63
Guidelines ...63
Commands...63
Examples ...65
10. Firmware Upgrades
67
Obtaining Firmware ...67
Reloading Firmware 67
Using TFTP: Graphical User Interface 67
Using TFTP: Command Line Interface 68
Recovering the Firmware Using the Serial Port...
xPico - User Guide - Page 8
... Settings 28 Figure 4-8. UDP Connection Settings 31 Figure 4-9. Configurable Pins Settings 32 Figure 4-10. Apply Settings and Apply Defaults 33 Figure 5-1. MAC Address 35 Figure 5-2. Setup Menu Options 35 Figure 7-1. Serial Port Parameters 40 Figure 7-2. Hostlist Option 46 Figure 8-1. Expert Settings 54 Figure 8-2. Security Settings 56 Figure 10-1. TFTP Window 68
xPico User Guide...
xPico - User Guide - Page 9
... Upgrades 11: Monitor Mode
12: Troubleshooting A: Binary to Hexadecimal Conversions B: Compliance
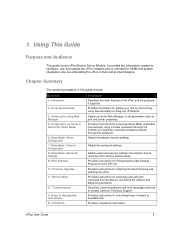
Provides instructions for obtaining the latest firmware and updating the xPico.
Provides instructions for accessing and using the command line interface for monitoring the network and diagnosing problems.
Describes common problems and error messages and how to contact Lantronix Technical Support...
xPico - User Guide - Page 14
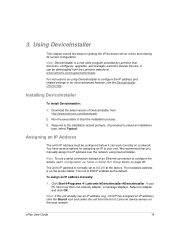
..., configures, upgrades, and manages Lantronix Device Servers. It can be downloaded from the Lantronix website at www.lantronix.com/support/downloads.
For instructions on using DeviceInstaller to configure the IP address and related settings or for more advanced features, see the DeviceInstaller Online Help.
Installing DeviceInstaller
To install DeviceInstaller:
1. Download the latest version of...
xPico - User Guide - Page 17
...
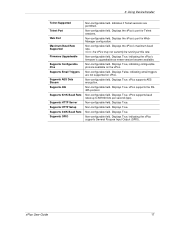
Telnet Supported
Telnet Port
Web Port
Maximum Baud Rate Supported
Firmware Upgradeable
Supports Configurable Pins Supports Email Triggers
Supports AES Data Stream Supports 485
Supports 921K Baud Rate
Supports HTTP Server Supports HTTP Setup Supports 230K Baud Rate Supports GPIO
Non-configurable field. Indicates if Telnet sessions are permitted.
Non-configurable field. Displays the xPico's port...
xPico - User Guide - Page 58
... Mode: Advanced Settings
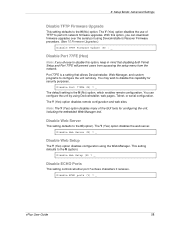
Disable TFTP Firmware Upgrade
This setting defaults to the N (No) option. The Y (Yes) option disables the use of TFTP to perform network firmware upgrades. With this option, you can download firmware upgrades over the serial port using DeviceInstaller's Recover Firmware procedure. (See 10 Firmware Upgrades.)
Disable TFTP Firmware Update (N) : _
Disable Port 77FE (Hex)
Note...
xPico - User Guide - Page 67
...Upgrades
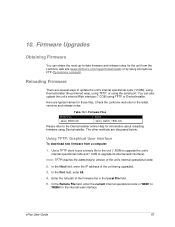
Obtaining Firmware
You can obtain the most up-to-date firmware and release notes for the unit from the Lantronix web site (www.lantronix.com/support/downloads) or by using anonymous FTP (ftp.lantronix.com/pub).
Reloading Firmware
There are several ways to update the unit's internal operational code (*.ROM): using DeviceInstaller (the preferred way), using TFTP, or using the serial port...
xPico - User Guide - Page 68
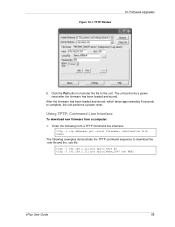
... 10-1. TFTP Window
10: Firmware Upgrades
6. Click the Put button to transfer the file to the unit. The unit performs a power reset after the firmware has been loaded and stored.
After the firmware has been loaded and stored, which takes approximately 8 seconds to complete, the unit performs a power reset.
Using TFTP: Command Line Interface
To download new firmware from a computer:
1. Enter the...
xPico - User Guide - Page 69
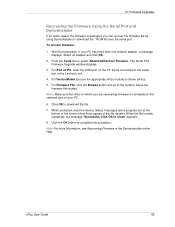
...download the *.ROM file over the serial port.
To recover firmware:
1. Start DeviceInstaller. If your PC has more than one network adapter, a message displays. Select an adapter and click OK.
2. From the Tools menu, select Advanced/Recover Firmware. The Serial Port Firmware Upgrade window displays.
3. For Port on PC, enter the COM port on the PC that is connected to the serial port of the Lantronix...
xPico - User Guide - Page 76
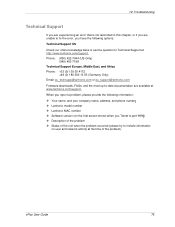
....com
Firmware downloads, FAQs, and the most up-to-date documentation are available at www.lantronix.com/support. When you report a problem, please provide the following information: Your name, and your company name, address, and phone number Lantronix model number Lantronix MAC number Software version (on the first screen shown when you Telnet to port...
xPico - Integration Guide - Page 9

...™ User Guide
Com Port Redirector User Guide
Notification Soldering Profile and Washing
Description
Provides a detailed description of the xPico evaluation kit hardware
Provides detailed information for installing and operating the IAP device server using our Modbus firmware.
Provides instructions for using the Windows-based utility to configure the xPico and other Lantronix device servers...
xPico - Integration Guide - Page 19
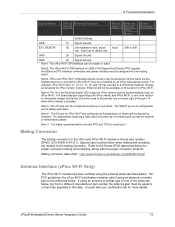
.... Drive low to reboot unit.
30K to 50K
GND
39 Signal Ground
GND
40 Signal Ground
Note1: The xPico Wi-Fi SPI interface can be master or slave.
Note2: The xPico Wi-Fi USB interface is USB2.0 Full Speed Host/Device/OTG capable. Host/Device/OTG interface connectors and power interface must be designed into the mating board.
Note3. xPico...
xPico - Integration Guide - Page 41
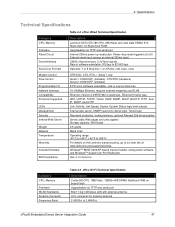
...Technical Specifications
Category CPU, Memory
Firmware Reset Circuit
Serial Interface
Serial Line Formats Modem Control Flow Control
Programmable I/O Network Interface Compatibility Protocols Supported
LEDs Management Security Internal Web Server
Weight Material Temperature
Warranty
Included Software
EMI Compliance
Table 4-4 xPico Wired Technical Specification
Description Lantronix DSTni-EX 186...
xPico - Integration Guide - Page 43

...°C (-40°F to 185°F) with use of heat pad between module and mating PCB For details on the Lantronix warranty policy, go to our web site at www.lantronix.com/support/warranty. Windows™ 98/NT/2000/XP-based Device Installer configuration software and Windows™-based Com Port Redirector See A:Compliance.
xPico® Embedded Device Server Integration Guide
43
xPico - Development Kit Quick Start - Page 6
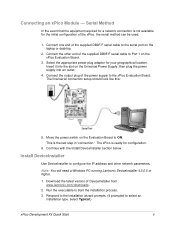
... the equipment required for a network connection is not available for the initial configuration of the xPico, the serial method can be used.
1. Connect one end of the supplied DB9F/F serial cable to the serial port on the laptop or desktop.
2. Connect the other end of the supplied DB9F/F serial cable to Port 1 on the xPico Evaluation Board.
3. Select the appropriate power plug adaptor for your...
xPico - Development Kit User Guide - Page 10
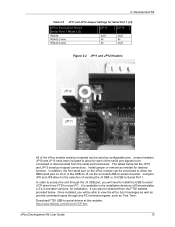
... board USB-to-serial converter. Jumpers JP8 and JP9 allow for the selection of sending the J3 DB9 or J5 USB-to-Serial Port 1.
In order to access the unit through the J5 USB port, you will need to install the USB-to-serial VCP driver from FTDI on your PC. It is available in the installation directory of DeviceInstaller 4.3.0.2 and later versions, for installation...