Sony SLV-400 driver and firmware

Related Sony SLV-400 Manual Pages
Download the free PDF manual for Sony SLV-400 and other Sony manuals at ManualOwl.com
Operating Instructions - Page 2

... whenever you call upon your Sony service dealer regarding this product.
Model No. SLV-400 Serial No
For the Customers in the U.S.A.
INFORMATION This equipment generates and uses radio frequency energy and if not installed and used properly, that is, in strict accordance with the manufacturer's instructions, may cause interference to radio and television reception. It has been...
Operating Instructions - Page 3

... of Contents
Preliminaries
Warning
2
Owner's Record
2
Precautions
4
Introduction
5
Using This Manual
5
Overview
5
Preparation
Hookups and Getting Started
6
Audio/Video (A/V) Hookup
7
Antenna Hookup
8
Simple Cable Hookup
10
Alternate Cable Hookup
12
Advanced Cable Hookup
14
Preparing the Remote Commander
17
Inserting Batteries
17
Setting the Time and Date
18
Example...
Operating Instructions - Page 4

...etc.) or near materials (curtains, draperies) that may block the ventilation slots.
• Do not install the unit near heat sources such as radiators or air ducts, or in a place subject to ... use, turn the power off to conserve energy and to extend its life.
• Remove and store video cassettes after recording or playback.
Cleaning
• Clean the cabinet, panel and controls with a dry, ...
Operating Instructions - Page 9

... in the display window goes off. 2 Tune the TV normally.
To Watch the VCR 1 Tune the TV to CH 3 or CH 4, whichever you set on the
back of the VCR. (If you made the A/V connections on page 7, set your TV to the A/V input instead.) 2 Insert a cassette and press I> PLAY. Details are on page 24.
To Record a Program 1 Insert...
Operating Instructions - Page 11

... Started
VCR Setup (Simple Cable)
1 Set the RF Unit on the VCR's rear panel to CH3 or
CH4. If you made A/V connections, skip this step.
R3 M 41 INIM]
2 Set NORM/CATV to CATV.
Press MENU.
MENU
• CMOS SETOMEON TUNER PRESET MO. SET
Select TUNER PRESET
MENU
TIMES SET/OHECN ▪ TUNES PRESET
MOCK SET
Set to CATV...
Operating Instructions - Page 13
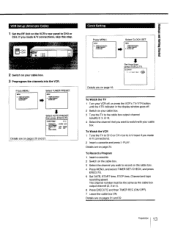
... VCR 1 Tune the TV to CH 3 or CH 4 (or to A/V input if you made
A/V connections). 2 Insert a cassette and press I> PLAY. Details are on page 24.
To Record a Program 1 Insert a cassette. 2 Switch on the cable box. 3 Select the channel you wish to record on the cable box. 4 Press MENU, and select TIMER SET/CHECK, and press
EXECUTE...
Operating Instructions - Page 16

...display window goes off. 2 Set the A/B switch to B. 3 Switch on your cable box. 4 Tune the TV to the cable box output channel (usually 2,3
or 4). 5 Select the channel you want to watch with your cable box. 6 After watcing the TV, please remember to return the A/B
switch and cable...and select TIMER SET/CHECK. 4 Press EXECUTE. 5 Set DATE, START time, STOP time, Channel and tape
recording speed. 6 ...
Operating Instructions - Page 20

... only, make sure that the TV is set to the correct channel (CH 3 or CH 4) for the VCR. If you have connected the TV and the VCR using the LINE OUT, select the input for the VCR. • Press TV/VTR so that the VTR indicator lights up in the display window on the VCR. •...
Operating Instructions - Page 24

... the mechanism draws it into the compartment. When the cassette has been loaded, the cassette indicator (t) lights up in the display window and the VCR turns on automatically.
Protecting your cassettes against accidental erasure Cassettes have a safety tab to protect against accidental recording. Break off the safety tab with a screwdriver or other tool. If...
Operating Instructions - Page 26

...TV screen, press DISPLAY on the Remote Commander.
7- 1
Indexing Tape Contents
When a cassette is inserted, the clock display will be automatically switched to the counter display and the counter reading "OHOOMOOS" will appear in the display window. If you want , however, to reset the counter to zero, press COUNTER RESET on the Remote Commander. By noting the setting... display cannot be displayed ...
Operating Instructions - Page 28

... the cable television and/or program owner.
Recording TV Programs
o ieDC. o,
3
5
1 Insert a cassette.
The VCR turns on automatically (auto power on).
2 Turn on the TV.
3 If your TV is connected to both VHF/UHF OUT and
LINE OUT on the VCR, select the input for the VCR.
4 If your TV is connected only to VHF/UHF OUT, set the
:1
TV...
Operating Instructions - Page 32

... TIMER REC TO SET TIMER" appears on the TV screen.
13 Press TIMER REC (ON/OFF).
The VCR enters the timer recording standby mode and the TIMER REC (recording) indicator in the display window lights up. If a cassette is not loaded into the VCR, the TIMER REC (recording) indicator will not light up in the display window, but the timer...
Operating Instructions - Page 35

..."-L" 'o
earEto -
PLAY
1 Press TIMER REC (ON/OFF).
The TIMER REC (recording) indicator in the display window turns off.
4 Press • or • to move the
cursor (*) to TIMER SET/CHECK.
MENU
• 115486 SET/CHECK TUNER PRESET CLOCK SET
5 Press EXECUTE.
The TIMER SET/CHECK display appears.
TPAER SET/CHECK
7/4 SUN
DATE
START STOP CH
NT/1081f 0:004M 10...
Operating Instructions - Page 37

... mode, you must first turn off the TIMER REC (recording) indicator in the display window. Here's how:
1 Press TIMER REC (ON/OFF).
The TIMER REC (recording) indicator in the display window turns off and the VCR leaves the timer recording standby mode.
2 Press POWER.
The VCR is ready to use.
3 After using the VCR, press TIMER REC (ON...
Operating Instructions - Page 38

...Playback
Using the DUAL MODE SHUTTLE ring on your VCR or Remote Commander, you can play cassettes at a variety of forward...for forward viewing or counterclockwise for viewing in reverse, you can control the cassette playback speed. • Picture Search During Playback ...arrows 414 or IN appear in the display window. A high-speed picture without sound is displayed on the screen until you release the ...
Operating Instructions - Page 40

... channel number buttons on the Remote Commander. Press ENTER while the channel display flashes.
6 Press QUICK TIMER on the Remote Commander
again to start recording.
7 Select the recording duration by pressing QUICK
TIMER on the Remote Commander to change the duration indicator in the display window. Each time you press QUICK TIMER, the recording duration increases by 30 minutes. Once...
Operating Instructions - Page 44

... in your area.
2 Press POWER.
The power indicator lights up in the display window.
3 Press TV/VTR so that the VTR indicator lights up in
the display window.
4 Check that the channel number indicator appears in
the display window, then select an active channel in your area by pressing CHANNEL +/-.
5 Turn on your TV and set it to the channel you...
Operating Instructions - Page 47

...Controls
Refer to the pages indicated for details. Front Panel
DA Pro Head Z,V=IP,Z"`
151
4
131 1112 11
7
▪ POWER ON/OFF switch and indicator (page 44) X Cassette compartment E INPUT SELECT button (page 28)
A CHANNEL +/-buttons (page 28)
El Display window and function mode display...(pages 32, 35, 36, 37) 13 TV/VTR button E EJECT button (page 24) M Remote Sensor
47 Additional Information
Operating Instructions - Page 51

...the unit, and contact your Sony dealer or local authorized Sony Service Center facility.
Power
Time and Date Clock TV Reception
Recording and Playback
Symptom The POWER switch doesn't work.
The power is turned on but the... Press TV/VTR so that the VTR indication appears in the display window.
• The TV channel is not set to Ch 3 or Ch 4, or the video input has not been selected on the TV or ...
Operating Instructions - Page 54

... Active channels 20 Adjusting
FINE TUNING (see "Fine Tuning") picture 22
tracking (automatic and manual) 27 Advanced cable Hookup 14 VCR setup 15 AFT (Auto fine tuning) setting 22 Alternate cable Hookup 12 VCR setup 13 Antenna Hookup 8 VCR setup 9 Audio/Video (A/V) Hookup 7 Connecting cable 7, 42, 43 AUTO TRACKING indicator 27, 49
B
Buttons Channel +/- buttons 28, 44, 50 Channel...