Canon LV-7105 driver and firmware


Related Canon LV-7105 Manual Pages
Download the free PDF manual for Canon LV-7105 and other Canon manuals at ManualOwl.com
LV-7105 Brochure - Page 2

... adjustment of color, contrast, sharpness, and more.
LV-7105 Kit Contents:
• LV-7105 Projector • Power Cable • VGA Computer Cable • Wireless Remote
Control Unit (AA Alkaline Batteries) • Mouse Control Cable for PS/2 • Lens Cap • Soft Carrying Case • Warranty Card • User Manual
Nomenclature
Air Intake Vents Speaker (Monaural) Projection Lens...
Owners Manual - Page 3
... projector from wall outlet and refer servicing to qualified service personnel under the following conditions: a. When the power cord or plug is damaged or frayed. b. If liquid has been spilled into the projector. c. If the projector has been exposed to rain or water. d. If the projector does not operate normally by following the
operating instructions. Adjust only those controls...
Owners Manual - Page 4

... for a Class A digital device, pursuant to Part 15 of FCC Rules. These limits are designed to provide reasonable protection against harmful interference when the equipment is operated in a commercial environment. This equipment generates, uses, and can radiate radio frequency energy and, if not installed and used in accordance with the instruction manual, may cause harmful...
Owners Manual - Page 5

... THE REMOTE CONTROL 14
OPERATING RANGE REMOTE CONTROL BATTERIES INSTALLATION
14 15
SETTING
32
TOP CONTROLS AND INDICATORS
16
OPERATING ON-SCREEN MENU
17
SETTING MENU
32
HOW TO OPERATE THE ON-SCREEN MENU
17
SETTING LANGUAGE
33
FLOW OF ON-SCREEN MENU
17
MENU BAR
18
APPENDIX
34
BASIC OPERATION
19
OPERATING WIRELESS MOUSE
34
TURNING ON / OFF THE PROJECTOR...
Owners Manual - Page 7

... Obstructions may block cooling air.
POWER CORD CONNECTOR
EXHAUST VENT
HOT AIR EXHAUSTED !
Air blown from the exhaust vent is hot. When using or installing the projector, the following precautions should be ...parts. This area will become hot while the projector is used. This projector detects the internal temperature and automatically controls the operating power of the Cooling Fans.
BOTTOM OF THE ...
Owners Manual - Page 15

... to mute sound.(P21)
POWER KEYSTONE D.ZOOM VOLUME
MUTE MENU
COMPUTER VIDEO
VOLUME BUTTON Used to adjust volume. (P21)
D.ZOOM BUTTON Used to select DIGITAL ZOOM mode and resize the... liquid. q Do not expose the Remote Control Unit to moisture, or heat. q Do not drop the remote control unit. q If batteries have leaked on the remote control, carefully wipe the case clean and load new batteries.
15
Owners Manual - Page 34
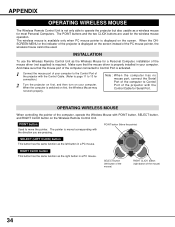
... Remote Control Unit as the Wireless Mouse for a Personal Computer, installation of the mouse driver (not supplied) is required. Make sure that the mouse driver is properly installed in your computer. And make sure that the mouse port of the computer connected to Control Port is activated.
1 Connect the mouse port of your computer to the Control Port of the projector with the Control Cable...
Service Manual - Page 6

... Electrical Adjustment Electrical Adjustment Electrical Adjustment Waveform checks
3) Other Equipment (Local Purchase)
Description Screen Personal Computer
Specifications Over 40" Windows 95 OS
Remarks All Adjustment All Adjustment
4) Chart/Software (Attached with this manual)
Description Monitor Tester Gray Scale Chart Color Shading Correction Tool
Specifications XGA and SVGA Bitmap Data...
Service Manual - Page 7

... 4.3 Hybrid gamma correction 1-14 4.4 Fan speed control 1-14
5. CONNECTING 1-16 5.1 Connection to the computer 1-16 5.2 Connecting to the video equipment 1-17
6. SETTING-UP THE PROJECTOR 1-18 6.1 Positioning the projector 1-18 6.2 Installation precautions 1-18
7. SUPPORTED COMPUTER SYSTEM MODE 1-20
Part 2: Repair Information
1. SAFETY INSTRUCTIONS 2-1 2. CIRCUIT PROTECTIONS 2-2
2.1 Fuse...
Service Manual - Page 24

...
3.7 Operating range
Point the remote control toward the projector (receiver's window) when pressing the buttons. Maximum operating range for the remote control is approximately 5m (16.4') and 60˚ in front of the projector. Precautions • Prevent the direct sunlight or strong light from lighting apparatus from striking the
infrared remote receiver on the projector. • Do not look...
Service Manual - Page 30

... 1: General Information
6. SETTING-UP THE PROJECTOR
6.1 Positioning the projector
This projector is designed to project on a flat projection surface. The projector can be focused from ...and other optical parts, resulting in impaired image quality. Also, do not install the projector in high- or low-temperature locations.
3) Operating temperature range: 5˚C to 35˚C
4) Storage temperature ...
Service Manual - Page 31
Part 1: General Information
in blurred images. 6) Screen and room brightness
Do not install the projector where sunlight or lighting directly strikes on the screen. If sunlight or light from lighting strikes on the screen, image will appear whitish and difficult-to-view.
1-19
Service Manual - Page 35

... AC line before any service is performed on the projector.
2: Comply with all caution and safety-related notes provided on the cabinet back, cabinet bottom, inside the cabinet or on the chassis.
3: When replacing a chassis in the cabinet, always be certain that all the protective devices are installed properly, such as, control knobs, adjustment covers...
Service Manual - Page 36

...]
1. Remove the cabinet top and main board following to "Mechanical Disassemblies".
2. Remove a screw and the line filter cover upward.
3. Remove the fuse from fuse holder. To install the fuse, take reversed step in the above.
2.2 Thermal Switch
There is the thermal switch (SW902) inside of the projector to prevent the internal temperature from...
Service Manual - Page 47

...Glass-in Ass'y Disassembly
1. Remove the cabinet top, front, main and component boards following to "Mechanical Disassemblies".
2. Remove each screw and take the each polarized ...the cabinet top, front and main boards following to "Mechanical Disassemblies".
2. Remove 4 screws by using the 2.0 mm hex driver and take the LCD Panel/Prism ass'y off upward from the optical unit.
3. Remove each screw and...
Service Manual - Page 49
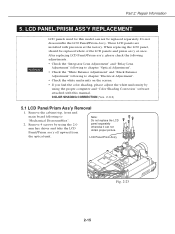
...the LCD Panel/Prism Ass'y. These LCD panels are installed with precision at the factory. When replacing the LCD...computer and "Color Shading Correction" software attached with this manual. COLOR SHADING CORRECTION (Ver. 2.0.2)
5.1 LCD Panel/Prism Ass'y Removal
1. Remove the cabinet top, front and
main board following to "Mechanical Disassemblies". 2. Remove 4 screws by using the 2.0 mm hex driver...
Service Manual - Page 50
...Repair Information
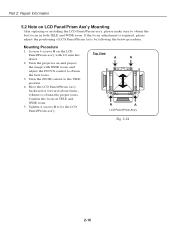
5.2 Note on LCD Panel/Prism Ass'y Mounting
After replacing or installing the LCD Panel/Prism ass'y, please make sure to obtain the best ... the LCD Panel/Prism ass'y with 2.0 mm hex driver.
2. Turn the projector on and project the image with WIDE zoom, and adjust the FOCUS control to obtain the best focus.
3. Turn the ZOOM control to the TELE position.
4. Move the LCD Panel/Prism...
Service Manual - Page 71

...computer signal. 2. Set to COMPUTER mode. 3. Enter to the service... mode, select item no. "9" (Red) or "10" (Blue), and change data
values respectively to make a proper white balance at darker portion of the screen.
[AV black balance adjustment]
4. Receive the 16-step gray scale video signal. 5. Set... video signal. 8. Set to VIDEO (Component)...computer and...
Service Manual - Page 73

...driver and a slot screwdriver. • Remove cabinet top following to "Mechanical Disassemblies".
CAUTION
Do not disconnect the connectors on main and component boards otherwise the projector can not be turned on.
[Adjustment]]
1. Turn on lamp by a state of without FPC cable... in Fig.314, loosen 2 screws C with the 2.0mm hex driver and adjust a slots D to make color uniformity in yellow by ...
Service Manual - Page 75

... adjustment]
• Adjustment requires a 2.0mm hex driver and a slot screwdriver. • Remove cabinet top following to "Mechanical Disassemblies".
CAUTION
Do not disconnect the connectors on main and component boards otherwise the projector can not be turned on.
[Adjustment]
1. Turn on lamp by a state of without FPC cable of LCD panels.
2. Adjust the adjustment base...