Belkin F5D5730au driver and firmware


Related Belkin F5D5730au Manual Pages
Download the free PDF manual for Belkin F5D5730au and other Belkin manuals at ManualOwl.com
F5D5730au User Manual - Page 4

..., management, and firmware updates via Web
Browser Interface • Two-level password protection for device management • Flash memory for future firmware upgrades • Simultaneous USB and Ethernet support
Package Contents • Belkin High-Speed Modem with USB and Ethernet • Power Adapter • RJ45 Crossover Cable • A-B USB Cable • RJ11 Phone Cable • CD...
F5D5730au User Manual - Page 5

INTRODUCTION
System Requirements PC running Windows® 98SE , Me, 2000, XP CD-ROM drive (For USB Installation Only) One free USB port (For USB Installation Only) One RJ45 Ethernet port (Ethernet Installation Only)
2
F5D5730au User Manual - Page 7

... Modem
Power
Ethernet
Reset
RJ11 USB
Before You Start Before you start to use your Modem you must have the following: 1. An active ADSL account and line with a user name and password. 2. IP address, DNS, and gateway settings from your ISP only if applicable. 3. At least one computer with either USB or Ethernet connection. 4. TCP/IP networking protocol installed on the computer (most computers...
F5D5730au User Manual - Page 8

... your equipment in one of two ways: via an Ethernet crossover cable or a USB connection. If you are connecting via an Ethernet crossover connection then follow the diagram below and proceed to "Installation Method 1" on page 6.
If you have chosen to connect via a USB connection, make sure the computer you are connecting to is switched off. Use...
F5D5730au User Manual - Page 9

... 20
seconds for the Modem to initialise, then boot up your computer. 6. Your PC will automatically detect this Modem as "USB Net Card". 7. Insert the bundled USB driver CD into the CD-ROM drive and follow the
on-screen instructions to install the USB Modem drivers. 8. After installation, the Modem will be installed as "USB Network Adapter"
within the Device Manager of Windows. You will be required...
F5D5730au User Manual - Page 10
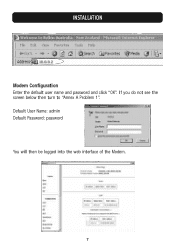
INSTALLATION
Modem Configuration Enter the default user name and password and click "OK". If you do not see the screen below then turn to "Annex A Problem 1". Default User Name: admin Default Password: password You will then be logged into the web interface of the Modem.
7
F5D5730au User Manual - Page 11

INSTALLATION
1. Click on "WAN" under the Configuration menu on the left-hand side of the screen.
2. Your screen will look like this.
8
F5D5730au User Manual - Page 12

... such as "xyz Internet provider". b. Username: As given to you by your ADSL provider. For New Zealand Xtra account holders, the user name always needs the extension ".xadsl" after the normal user name, and should be entered in the form of an e-mail address, e.g. [email protected]. c. Password: As provided...
F5D5730au User Manual - Page 13

... the "Submit" button to update the changes and then scroll back to the bottom of the screen and then click on "Save Configuration".
8. The screen will change and you will see the following. Click on "Submit" to make the change to the Modem.
9. The Modem will restart and the LAN connection will be reestablished...
F5D5730au User Manual - Page 14

INSTALLATION
10. When you see this screen, the Modem has rebooted and is ready to be connected to ADSL.
11. On the left of the screen under the Status settings in your browser, click on "PPP".
You will then see the following.
11
F5D5730au User Manual - Page 15

INSTALLATION
12. Ensure that "Connect" is displayed in the drop-down window and then click on the "Execute" button. The Modem will initiate the connection to your ADSL provider and the screen shot will look similar to this one once connected. Note that under the "Status" ...
F5D5730au User Manual - Page 16

... browser address bar displays nothing except "10.0.0.2". • Check that your PC is configured to accept IP addresses dynamically by doing
the following:
Solution for Windows 98 and Me 1. Go to "Start / Settings / Control
Panel". In the Control Panel, double-click on "Network" and choose the "Configuration" tab. 2. Select "TCP / IP", or the name of your Network Interface Card (NIC...
F5D5730au User Manual - Page 17

ANNEX A - TROUBLESHOOTING
6. Select the "Disable DNS" radio button and click "OK" to finish the configuration.
Solution for Windows 2000 1. Go to "Start / Settings / Control Panel". In the Control Panel, double-click
on "Network and Dial-up Connections". 2. Double-click "LAN Area Connection".
14
F5D5730au User Manual - Page 18

ANNEX A - TROUBLESHOOTING
3. In the "LAN Area Connection Status" window, click "Properties". 4. Select "Internet Protocol (TCP/IP)" and click "Properties".
15
F5D5730au User Manual - Page 19

ANNEX A - TROUBLESHOOTING
5. Select "Obtain an IP address automatically" and "Obtain DNS server address automatically". Click "OK" to finish the configuration.
Solution for Windows XP 1. Go to Control Panel on your computer and double-click
"Network Connections" and right-click your network connection and select "Properties".
16
F5D5730au User Manual - Page 20

ANNEX A - TROUBLESHOOTING
2. Highlight "Internet Protocol (TCP/IP)" and select "Properties". If you do not have TCP/IP displayed in the list then you will need to install TCP/IP before proceeding.
3. Ensure that: "Obtain an IP address automatically" and "Obtain DNS server address automatically" is selected and then hit "OK" twice.
17