Asus VP279Q-P driver and firmware

Related Asus VP279Q-P Manual Pages
Download the free PDF manual for Asus VP279Q-P and other Asus manuals at ManualOwl.com
User Guide - Page 2

... this manual, including the products and software described in it, may be reproduced, transmitted, transcribed, stored in a retrieval system, or translated into any language in any form or by any means, except documentation kept by the purchaser for backup purposes, without the express written permission of ASUSTeK COMPUTER INC. ("ASUS"). Product warranty or service will...
User Guide - Page 4

...for a Class B digital device, pursuant to Part 15 of the FCC Rules. These limits are designed to provide reasonable protection against harmful interference in a residential installation. This equipment generates,...is connected. • Consult the dealer or an experienced radio/TV technician for help.
This product implements power management functionality. In case of no signal input after 10 seconds...
User Guide - Page 5
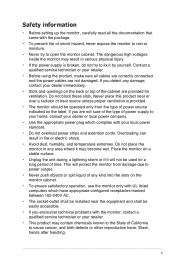
...Before setting up ...power supply is broken, do not try to fix it by yourself. Contact a qualified service technician or your retailer.
• Before using the product, make sure all cables are correctly connected and the power cables... with UL listed computers which have appropriate configured receptacles marked between 100-240V AC.
• The socket-outlet shall be installed near the equipment and...
User Guide - Page 7
... updates. 1. ASUS websites
The ASUS websites worldwide provide updated information on ASUS hardware and software products. Refer to http://www.asus.com 2. Optional documentation Your product package may include optional documentation that may have been added by your dealer. These documents are not part of the standard package.
Takeback Services
ASUS recycling and takeback programs come from...
User Guide - Page 14

... Disconnect power and signal cables. Carefully... put the front of the monitor face down on a clean table.
2. Turn the screw counter-clockwise to loosen the screw located at the bottom of the base.
3. Remove the base from the stand. 4. Remove the stand cover. Then loosen the 4 screws to remove the
stand. 5. Align and install...load
22.7kg (Screw size: M4 x 10 mm).
2-1
Chapter 2: Setup
User Guide - Page 28
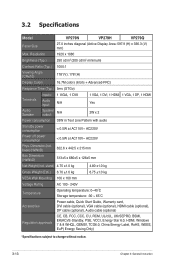
...VESA Wall Mounting 100 x 100 mm
Voltage Rating
AC 100 - 240V
Temperature
Operating temperature: 0~40˚C Storage temperature: -30 ~ 65˚C
Accessories
Power cable, Quick Start Guide, Warranty card, DVI cable (optional), VGA cable (optional), HDMI cable (optional), DP cable (optional), Audio cable (optional)
Regulation approvals
CE, CB, FCC, CCC, CU, RCM, UL/cUL, UKrSEPRO, BSMI, EK(KC...
User Guide - Page 29

... the signal cable and make sure that none of the pins are bent.
• Perform Reset via OSD. • Select the appropriate Color Temperature via OSD.
No sound or sound is low
• Adjust the volume settings of both your monitor and computer.
• Make sure the computer sound card driver is properly installed and activated.
ASUS LCD...
User Guide - Page 30

...Support Timing
Mode DOS
Resolution (active dot)
720x400@70Hz
Resolution (total dot)
900 x 449
Horizontal Frequency
(KHz)
31.469
Vertical Frequency
(Hz)
70.087
Nominal Pixel Color (MHz)
28.322
640x480@60Hz
800 x 525
31.469
59.940
25.175
VGA...59.954
146.250
WUXGA 1920x1080@60Hz 2200 x 1125
67.500
60.000
148.500
MAC [email protected] 864 x 525
35
66.66
30.24
SVGA 832x624@75Hz 1152 x...