Asus H87M-PRO driver and firmware


Related Asus H87M-PRO Manual Pages
Download the free PDF manual for Asus H87M-PRO and other Asus manuals at ManualOwl.com
H87M-PRO User's Manual - Page 5

...11 4.3.7 Network iControl 4-12 4.3.8 USB BIOS Flashback 4-13 4.3.9 EZ Update 4-14 4.3.10 USB Charger 4-15 4.3.11 System Information 4-16 4.3.12 Audio configurations 4-17 4.3.13 Intel® SBA support 4-19
RAID support 5.1 RAID configurations 5-1
5.1.1 RAID definitions 5-1 5.1.2 Installing Serial ATA hard disks 5-2 5.1.3 Setting the RAID item in BIOS 5-2 5.1.4 Intel® Rapid Storage...
H87M-PRO User's Manual - Page 7

... when installing system components. • Chapter 3: BIOS setup This chapter tells how to change system settings through the BIOS Setup menus. Detailed descriptions of the BIOS parameters are also provided. • Chapter 4: Software support This chapter describes the contents of the support DVD that comes with the motherboard package and the software. • Chapter 5: RAID support This...
H87M-PRO User's Manual - Page 12
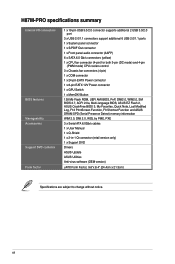
... Log, F12 PrintScreen Function, F3 Shortcut Function and ASUS DRAM SPD (Serial Presence Detect) memory information WfM 2.0, DMI 2.0, WOL by PME, PXE 3 x Serial ATA 6.0Gb/s cables 1 x User Manual 1 x Q-Shield 1 x 2-in-1 Q-connector (retail version only) 1 x Support DVD Drivers ASUS Update ASUS Utilities Anti-virus software (OEM version)
uATX Form Factor, 9.6"x 8.4" (24.4cm x 21.3cm)
Specifications...
H87M-PRO User's Manual - Page 16

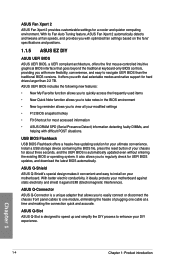
... Capacitors This motherboard uses all high-quality conductive polymer capacitors for durability, improved lifespan, and enhanced thermal capacity.
Intel® Smart Response Technology Intel® Smart Response Technology, an important part of Green ASUS eco-friendly computing, reduces load and wait time, eliminates unecessary hard drive spin thus lowering power usage, and uses an installed SSD...
H87M-PRO User's Manual - Page 18
... modified settings
• F12 BIOS snapshot hotkey
• F3 Shortcut for most accessed information
• ASUS DRAM SPD (Serial Presence Detect) information detecting faulty DIMMs, and helping with difficult POST situations.
USB BIOS Flashback USB BIOS Flashback offers a hassle-free updating solution for your ultimate convenience. Install a USB storage device containing the BIOS file, press...
H87M-PRO User's Manual - Page 25
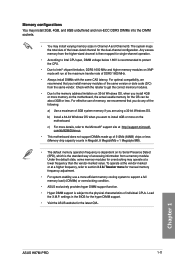
... efficient memory cooling system to support a full memory load (4 DIMMs) or overclocking condition.
• ASUS exclusively provides hyper DIMM support function.
• Hyper DIMM support is subject to the physical characteristics of individual CPUs. Load the X.M.P. settings in the BIOS for the hyper DIMM support.
• Visit the ASUS website for the latest QVL.
Chapter 1
ASUS H87M-PRO
1-11
H87M-PRO User's Manual - Page 28

... the power cord for about 5-10 seconds. • If your system fail to boot due to BIOS overclocking, press the MemOK! switch to boot and load BIOS default settings. A message will appear during POST reminding you that the BIOS has been restored to its default settings. • We recommend that you download and update to the latest BIOS version from the ASUS...
H87M-PRO User's Manual - Page 33

... time for USB-chargeable devices, optimized power efficiency, and backward compatibility with USB 2.0.
USB3_12
H87M-PRO
H87M-PRO USB3.0 Front panel connector
• The USB 3.0 module is purchased separately. • These connectors are based on xHCI specification. We recommend you to install the
related driver to fully use the USB 3.0 ports under Windows® 7.
3. Digital audio connector...
H87M-PRO User's Manual - Page 34

... USB_P13USB_P13+
GND
H87M-PRO
PIN 1
PIN 1
PIN 1
H87M-PRO USB2.0 connectors
Never connect a 1394 cable to the USB connectors. Doing so will damage the motherboard!
You can connect the front panel USB cable to the ASUS Q-Connector (USB, dark brown) first, and install the Q-Connector (USB) to the USB connector onboard if your chassis supports front panel USB ports.
• The USB 2.0 module is...
H87M-PRO User's Manual - Page 52

... improper installation of the USB storage device and filename/file format error. If this scenario happens, please restart the system to turn off the light.
• Updating BIOS may have risks. If the BIOS program is damaged during the process and results to the system's failure to boot up, please contact your local ASUS Service Center.
2-12
Chapter 2: Basic Installation
Chapter...
H87M-PRO User's Manual - Page 54

...8 series chipset, all USB devices connected to the USB 2.0 and USB 3.0 ports are controlled by the xHCI controller. Some legacy USB devices must update their firmware for better compatibility.
• Multi-VGA output supports up to three displays under Windows® OS environment, two displays under BIOS, and one display under DOS.
• Intel display architecture design supports the following...
H87M-PRO User's Manual - Page 59
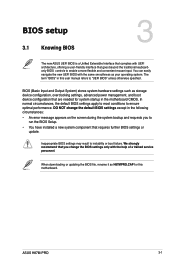
... Setup. • You have installed a new system component that requires further BIOS settings or
update.
Inappropriate BIOS settings may result to instability or boot failure. We strongly recommend that you change the BIOS settings only with the help of a trained service personnel.
When downloading or updating the BIOS file, rename it as H87MPRO.CAP for this motherboard.
Chapter 3
ASUS H87M-PRO...
H87M-PRO User's Manual - Page 100
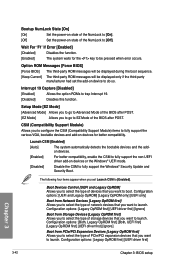
...]
For better compatibility, enable the CSM to fully support the non-UEFI driver add-on devices or the Windows® UEFI mode.
[Disabled]
Disable the CSM to fully support the Windows® Security Update and Security Boot.
The following four items appear when you set Launch CSM to [Enabled].
Boot Devices Control [UEFI and Legacy OpROM] Allows you to select...
H87M-PRO User's Manual - Page 101

... the PK is deleted, all the system's Secure Boot keys will not be active. Configuration options: [Yes] [No]
Load PK from File Allows you to load the downloaded PK from a USB storage device.
[Yes]
Load the default PK.
[Enabled] Load from a USB storage device.
The PK file must be formatted as a UEFI variable structure with time-based authenticated variable.
Chapter 3
ASUS H87M-PRO
3-43
H87M-PRO User's Manual - Page 103

.... • Press after POST.
• To select the boot device during system startup, press when ASUS Logo appears.
Boot Override
These items displays the available devices. The number of device items that appears on the screen depends on the number of devices installed in the system. Click an item to start booting from the selected device.
Chapter 3
ASUS H87M-PRO
3-45
H87M-PRO User's Manual - Page 113

...devices. Install the necessary drivers to use the devices.
The Utilities menu shows the applications and other software that the motherboard
supports.
Click an item to install
The AHCI/RAID Driver menu contains the RAID/AHCI driver disk.
The Manual menu contains the list of supplementary user manuals. Click an item to open the folder of the user manual.
Click the Contact tab to display the ASUS...
H87M-PRO User's Manual - Page 126

... that allows you to automatically update your motherboard's softwares, drivers and the BIOS version easily. With this utlity, you can also manually update the saved BIOS and select a boot logo when the system goes into POST. To launch EZ Update, click EZ Update on the AI Suite 3 main menu bar.
Click to automatically update your
motherboard's driver, software and
firmware
Click to find and select...
H87M-PRO User's Manual - Page 131
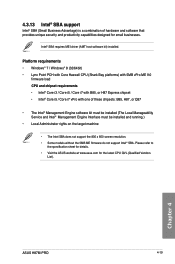
... and productivity capabilities designed for small businesses.
Intel® SBA requires MEI driver (AMT host software kit) installed.
Platform requirements • Windows® 7 / Windows® 8 (32/64bit) • Lynx Point PCH with Core Haswell CPU (Shark Bay platforms) with 5MB vPro ME 9.0
firmware load CPU and chipset requirements • Intel® Core i3 / Core i5 / Core i7 with B85...
H87M-PRO User's Manual - Page 133

... 5: RAID support
RAID support
5.1 RAID configurations
The motherboard supports the following SATA RAID solutions:
5
• Intel® Rapid Storage Technology with RAID 0, RAID 1, RAID 10 and RAID 5 support.
If you want to install a Windows® operating system to a hard disk drive included in a RAID set, you have to create a RAID driver disk and load the RAID driver during OS installation...
H87M-PRO User's Manual - Page 140
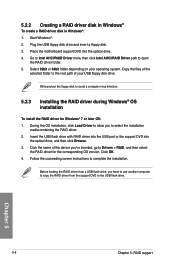
... port or the support DVD into the optical drive, and then click Browse.
3. Click the name of the device you've inserted, go to Drivers > RAID, and then select the RAID driver for the corresponding OS version. Click OK.
4. Follow the succeeding screen instructions to complete the installation.
Before loading the RAID driver from a USB flash drive, you have to use another computer to copy the RAID...