Acer G540-E5405 - Altos - 2 GB RAM driver and firmware
Drivers and firmware downloads for this Acer Computers item

Related Acer G540-E5405 Manual Pages
Download the free PDF manual for Acer G540-E5405 and other Acer manuals at ManualOwl.com
Altos G540 User's Guide EN - Page 7

...
Internal components
13
System boards
14
Mainboard
14
Backplane board
17
SAS controller board
18
BMC module
19
ARMC/3 module
20
System LED indicators
21
Front panel LED indicators
21
Hot-plug HDD LED indicator
22
LAN port LED indicators
22
Power supply module LED indicators
23
2 System setup
25
Setting up the system
27
Pre-installation requirements
27
Connecting...
Altos G540 User's Guide EN - Page 8
... 5-25 inch storage device
48
Upgrading the processor
50
Upgrading the system memory
55
Installing an expansion card
60
Installing the SAS controller board
62
Installing the BMC module
63
Installing the ARMC/3 module
64
Installing a redundant power supply module
66
4 System BIOS
69
BIOS overview
71
Entering BIOS setup
72
BIOS setup primary menus
72
BIOS setup navigation keys...
Altos G540 User's Guide EN - Page 27

17
No.
Code
Description
37
PCI-E 4
PCI-E 5
PCI Express x8 expansion slots
38
U4
Video memory
39
PCI-X 2
PCI-X 31
64-bit, 66/100 MHz PCI-X expansion slots
40
PCI-E 1
PCI Express x8 expansion slot
1 The PCI-X 3 slot (green) supports the installation of a SAS ZCR (Zero Channel RAID) option card.
Backplane board
The backplane board attached to rear of the hot-plug HDD cage is what ...
Altos G540 User's Guide EN - Page 28

...
SAS controller board
This controller board enables the installation of a SAS HDD.
No. Code
Description
1
SODIMM_CON1 Controller mainboard connector
2
JP3
SAS controller RAID jumper
Set to Close 2-3 to enable firmware RAID/ 0 channel RAID support (default)
3
SAS1-1
SAS data cable connector 1
4
U1
LSI SAS 1068 chipset
5
SAS1-2
SAS data cable connector 2
6
SU3
Flash ROM
7
U5...
Altos G540 User's Guide EN - Page 41
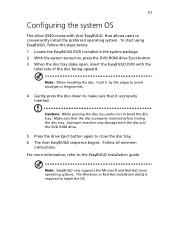
... damage both the disc and the DVD-ROM drive.
5 Press the drive Eject button again to close the disc tray. 6 The Acer EasyBUILD sequence begins. Follow all onscreen
instructions. For more information, refer to the EasyBUILD Installation guide.
Note: EasyBUILD only supports the Microsoft and Red Hat Linux operating systems. The Windows or Red Hat installation disc(s) is required to...
Altos G540 User's Guide EN - Page 43

...the related user documentation.
To turn off the system via software: 1 Press Ctrl+Alt+Delete on the attached keyboard or click the Start
on the Windows taskbar. 2 Select Shut Down. 3 Select Shut down ...from the drop-down menu, then click OK.
To turn off the system via hardware:
If you cannot shut down the server via software, press the power...
Altos G540 User's Guide EN - Page 46

This chapter discusses the precautionary measures and installation procedures you need to know when upgrading the system.
Altos G540 User's Guide EN - Page 48

... service technician.
1 Turn off the server and all connected peripherals. 2 Unplug all power cables from their outlets. 3 Disconnect all telecommunication cables from their ports. 4 Place the server on a flat, stable surface. 5 Open the server according to the instructions on page 39. 6 Follow the ESD precautions described in the previous section when
handling a server component.
Post-installation...
Altos G540 User's Guide EN - Page 49

... proceed, make sure that you have turned off the system and all peripherals connected to it. Read the "Pre-installation instructions" section on page 38.
You need to open the server before you can install upgrade components. The front bezel and (left) side panel are removable to allow access to the server's internal components...
Altos G540 User's Guide EN - Page 52
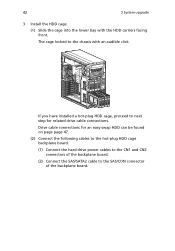
... an audible click.
If you have installed a hot-plug HDD cage, proceed to next step for related drive cable connections.
Drive cable connections for an easy-swap HDD can be found on page page 47.
(2) Connect the following cables to the hot-plug HDD cage backplane board.
(1) Connect the hard drive power cables to the CN1 and CN2 connectors of...
Altos G540 User's Guide EN - Page 54

44
3 System upgrade
Removing a HDD cage
1 Perform the pre-installation instructions described on page 37. 2 Prepare the HDD cage for removal.
• For a hot-plug HDD cage, disconnect the data and power cables from the backplane board, then remove all HDDs from the cage.
• For an easy-swap HDD cage, disconnect the data and power cables from their...
Altos G540 User's Guide EN - Page 56
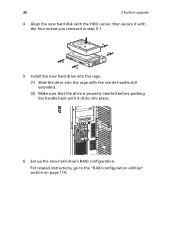
... removed in step 3-1.
5 Install the new hard drive into the cage.
(1) Slide the drive into the cage with the carrier handle still extended.
(2) Make sure that the drive is properly inserted before pushing the handle back until it clicks into place.
6 Set up the new hard drive's RAID configuration.
For related instructions, go to the "RAID configuration utilities" section...
Altos G540 User's Guide EN - Page 58
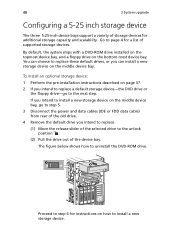
...can install a new storage device on the middle device bay.
To install an optional storage device: 1 Perform the pre-installation instructions described on page 37. 2 If you intend to replace a default storage device-the DVD drive or
the floppy drive-go to the next step.
If you intend to install a new storage device on the middle device bay, go to step 5. 3 Disconnect the power and data cables (IDE...
Altos G540 User's Guide EN - Page 60
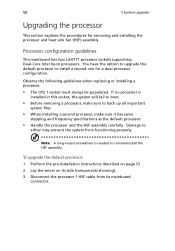
... guidelines
The mainboard has two LGA771 processor sockets supporting Dual-Core Intel Xeon processors. You have the option to upgrade the default processor or install a second one for a dual-processor configuration.
Observe the following guidelines when replacing or installing a processor.
• The CPU 1 socket must always be populated. If no processor is installed in this socket, the system...
Altos G540 User's Guide EN - Page 62
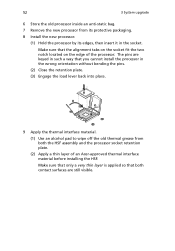
... the retention plate. (3) Engage the load lever back into place.
9 Apply the thermal interface material.
(1) Use an alcohol pad to wipe off the old thermal grease from both the HSF assembly and the processor socket retention plate.
(2) Apply a thin layer of an Acer-approved thermal interface material before installing the HSF.
Make sure that...
Altos G540 User's Guide EN - Page 64

54
3 System upgrade
4 Reinstall the HSF assembly. (1) Align then insert the HSF on top of the retention plate. (2) Use a long-nosed screwdriver to tighten the four HSF mounting pins to secure the assembly.
5 Observe the post-installation instructions described on page 38.
Altos G540 User's Guide EN - Page 65

...Upgrading the system memory
This section explains the procedures for removing and installing a fully-buffered memory module.
System memory interface
The mainboard has eight DIMM slots divided into two memory...DIMMD1 and DIMMD2
System memory configuration guidelines • To ensure data integrity, use only Acer-approved 240-pin, DDR2
667 FBD ECC modules in 512 MB, 1 GB, or 2 GB capacities. • ...
Altos G540 User's Guide EN - Page 118
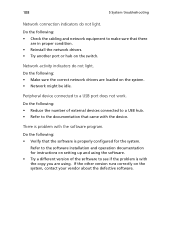
... of external devices connected to a USB hub. • Refer to the documentation that came with the device.
There is problem with the software program.
Do the following: • Verify that the software is properly configured for the system.
Refer to the software installation and operation documentation for instructions on setting up and using the software. • Try a different version of the...
Altos G540 User's Guide EN - Page 145

...S
SAS controller board board layout 18 install 62 mainboard slot 16
security keylock 8 serial port
BIOS setting 81 location 11 server management specification 5 tools 113 upgrade options 7 side panel release button 8 remove 39 south bridge 16 specification chipset 3 environmental 6 hardware monitoring 5 I/O ports 5 mechanical 6 media storage 4 memory 3 networking 4 operating system 5 PCI interface...
Altos G540 User's Guide EN - Page 146

... system setup connect peripherals 28 install OS 31 pre-installation
requirements 27 turn on system 29 system upgrade 5.25 inch storage device 48 ARMC/3 module 64 BMC module 63 ESD precautions 37 expansion card 60 hard drive 41 installation precautions 37 memory 55 post-installation instructions 38 preinstallation instructions 38 processor 50 redundant power supply
module 66 SAS controller board 62...