Acer Altos G320 driver and firmware
Drivers and firmware downloads for this Acer Computers item

Related Acer Altos G320 Manual Pages
Download the free PDF manual for Acer Altos G320 and other Acer manuals at ManualOwl.com
Altos G320 User's Guide - Page 7

... instructions
26
Opening the server
27
Removing the left-side panel
27
Unlocking the front bezel
28
Removing the front bezel
28
Installing and removing storage devices
29
Installing and removing hard disk
31
Upgrading the processor
33
Removing the HSFD assembly
33
Removing the CPU
34
Installing the CPU
34
Installing the HSFD assembly
35
Upgrading the system memory...
Altos G320 User's Guide - Page 15
5
• VGA/monitor port • Serial port • Two LAN ports (RJ-45)
Operating system and software • Microsoft® Windows® Server 2003, X64 edition • Microsoft Windows Server 2003 • Novell®... Server 9.0 EM64T • ASM (Acer Server Manager) • EasyBUILD (includes SATA/SCSI RAID Configuration Utility)
Power supply • 400-watt ATX12, auto-switching...
Altos G320 User's Guide - Page 34

This chapter discusses the precautionary measures and installation procedures you need to know when upgrading the system.
Altos G320 User's Guide - Page 36

... you are a qualified service technician.
Post-installation instructions
Perform the steps below after installing a server component: 1 See to it that all components are installed according to the
described step-by-step instructions. 2 Reinstall any expansion board(s) or peripheral(s) that you have
previously removed. 3 Reinstall the chassis panels. 4 Connect the necessary cables. 5 Turn on the...
Altos G320 User's Guide - Page 40

30
To install a 5.25-inch storage device
3 System upgrade
Note: If you are installing a storage device on an empty 5.25-inch drive bay, you must remove the blank plastic front on the front bezel first.
1 Observe the ESD precautions and pre-installation procedures described on page 25.
2 If you are installing a device on an empty 5.25-inch drive bay, you must remove the...
Altos G320 User's Guide - Page 42

... in the direction of the unlock icon (1), 3 Insert the drive into an empty HDD bay (2). 4 Make sure that the drive is properly inserted before closing the
lever, then push the lever in the direction of the lock icon (3). 5 Connect the data (4) and power (5) cables to the new drive.
6 Observe the post-installation instructions described on page 26.
Altos G320 User's Guide - Page 43
33
Upgrading the processor
This section include instructions for installing and removing a processor and heat sink-fan duct (HSFD) assembly.
Removing the HSFD assembly
Important: Before removing a CPU from the mainboard, make sure to create a backup file of all important data.
1 Observe the ESD precautions and pre-installation instructions described on page 25.
Warning! The heat sink becomes very...
Altos G320 User's Guide - Page 44
... open, upright position (1).
2 Lift the load plate (2). 3 Pull out the CPU from the socket (3).
Installing the CPU
The mainboard has a 775-pin processor socket that support Intel Pentium D, Pentium 4, or Celeron D processors.
1 Observe the ESD precautions and pre-installation instructions described on page 25.
2 Locate the CPU socket on the mainboard. 3 Push the CPU socket retainer lever down and...
Altos G320 User's Guide - Page 46
36
3 System upgrade
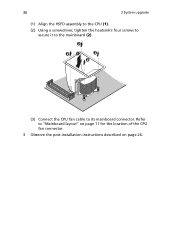
(1) Align the HSFD assembly to the CPU (1).
(2) Using a screwdriver, tighten the heatsink's four screws to secure it to the mainboard (2).
(3) Connect the CPU fan cable to its mainboard connector. Refer to "Mainboard layout" on page 11 for the location of the CPU fan connector.
3 Observe the post-installation instructions described on page 26.
Altos G320 User's Guide - Page 47

37
Upgrading the system memory
This section includes instructions for removing and installing a memory module.
Altos G320 has four DDR2-533/667 DIMM slots. Each slot supports 512 MB, 1 GB or 2 GB memory modules. The maximum memory capacity is 8 GB.
Memory module installation guidelines
• The minimum memory configuration is one DIMM, installed in the DIMM 1A socket (the socket closest to ...
Altos G320 User's Guide - Page 48

38
3 System upgrade
• Altos G320 mainboard does not support installation of three DIMMs only.
The table below lists the supported memory installation based on the memory interleave configuration:
DIMM 1A 512 MB 1 GB 2 GB 512 MB 1 GB 2 GB 512 MB 1 GB 2 GB
Bank 1 DIMM 2A
512 MB 1 GB 2 GB
DIMM 1B
...
Altos G320 User's Guide - Page 50

...upgrade
3 Open the clips on the socket. 4 Align then insert the DIMM into the socket (1). 5 Press the holding clips inward to lock the DIMM in place (2).
Note: The DIMM socket is slotted to ensure proper installation...the post-installation instructions described on page 26.
To reconfigure the system memory:
The system automatically detects the amount of memory installed. Run the BIOS setup to view...
Altos G320 User's Guide - Page 52
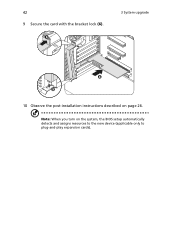
42 9 Secure the card with the bracket lock (6).
3 System upgrade
10 Observe the post-installation instructions described on page 26.
Note: When you turn on the system, the BIOS setup automatically detects and assigns resources to the new device (applicable only to plug-and-play expansion cards).
Altos G320 User's Guide - Page 83
... files. In addition to the server firmware and files, also update any drivers used for components you have installed in your system, such as video drivers, network drivers and SCSI drivers.
If you are unable to resolve your server problems on your own, contact your dealer or local Acer representative for assistance.
Resetting the system
Before going through in-depth...
Altos G320 User's Guide - Page 84
... for example, two add-in boards sharing the same interrupt. • Are all peripheral devices installed correctly? • If the system has a hard disk drive, is it properly formatted or configured? • Are all device drivers properly installed? • Are the configuration settings made in BIOS setup correct? • Is the operating system properly loaded? Refer to the operating system...
Altos G320 User's Guide - Page 89

79
• If using RAID configuration with SATA or SCSI drives, make sure the RAID card is installed correctly.
Bootable CD drive is not detected. Make sure the Boot settings in the BIOS setup utility is configured to allow the CD drive to be the first bootable device.
New memory modules installed are not detected. Do the following: • Make sure the memory modules are properly seated...
Altos G320 User's Guide - Page 90

... frame type in the NET.CFG file.
The controller stopped working when an add-in adapter was installed.
• Make sure the cable is connected to the port from the onboard network controller.
• Make sure the BIOS is current. • Make sure the other adapter supports shared interrupts and your
OS supports shared interrupts. • Try reseating the add-in...
Altos G320 User's Guide - Page 91

... does not light. Do the following: • Make sure the correct network drivers are loaded on the system. • Network might be idle. Try accessing the server.
Server hangs when the drivers are loaded. Change the PCI interrrupt settings.
System boots when installing a PCI card. System Server Management feature require full-time standby power. This means some parts of the system have...
Altos G320 User's Guide - Page 98

This appendix shows you how to install the ASM software package and gives information about the software program and utilities bundled with your server.
Altos G320 User's Guide - Page 100

... the network.
System requirements
ASM requires TCP/IP connectivity between the ASM Agent and the ASM Console.
ASM Agent
• Intel Pentium 4 (800 MHz), Intel Xeon (800 MHz), AMD Opteron (1000 MHz) or higher processor
• 512 MB of RAM • SATA/SCSI hard drive with at least 100 MB free hard disk space • Microsoft Windows 2003...