Sony HDR CX7 - Handycam Camcorder - 1080i driver and firmware
Drivers and firmware downloads for this Sony item

Related Sony HDR CX7 Manual Pages
Download the free PDF manual for Sony HDR CX7 and other Sony manuals at ManualOwl.com
Operating Guide - Page 2

... SAFEGUARDS
For your protection, please read these safety instructions completely before operating the appliance, and keep this manual for future reference. Carefully observe all warnings, precautions and instructions on the appliance, or the one described in the operating instructions and adhere to them.
Use
Power Sources
This set should be operated only from the type of...
Operating Guide - Page 3

... from the wall outlet and disconnect the antenna or cable system. This will prevent damage to the set due to lightning and power-line surges.
Service
Damage Requiring Service
Unplug the set from the wall outlet and refer servicing to qualified service personnel under the following conditions: - When the power cord or plug is damaged or
frayed. - If liquid...
Operating Guide - Page 4

... have any questions about this product, you may call: Sony Customer Information Center 1-800222-SONY (7669). The number below is for the FCC related matters only.
Regulatory Information
Declaration of Conformity Trade Name: SONY Model No.: HDR-CX7 Responsible Party: Sony Electronics Inc. Address: 16530 Via Esprillo, San Diego, CA 92127 U.S.A Telephone number: 858-942-2230 This device complies...
Operating Guide - Page 5

... called as "Memory
Stick PRO Duo" in this manual.
Using the camcorder
• The camcorder is not dustproofed, dripproofed or waterproofed. See "Precautions" (p. 35).
• To prevent the "Memory Stick PRO Duo" from being broken or recorded images from being lost, do not do the following when either of the respective lamps of the POWER switch (p. 12...
Operating Guide - Page 6

... that you save your image data periodically, after recording.
When the camcorder is connected to a computer
• Do not try to format the "Memory Stick PRO Duo" in the camcorder using a computer. If you do so, your camcorder may not operate correctly.
About language setting
• The on-screen displays in each local language are used for illustrating the...
Operating Guide - Page 7
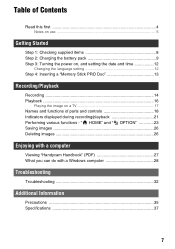
... the language setting 12 Step 4: Inserting a "Memory Stick PRO Duo 13
Recording/Playback
Recording 14 Playback 16
Playing the image on a TV 17 Names and functions of parts and controls 18 Indicators displayed during recording/playback 21 Performing various functions - " HOME" and " OPTION 23 Saving images 26 Deleting images 26
Enjoying with a computer
Viewing "Handycam Handbook" (PDF...
Operating Guide - Page 8
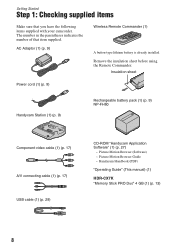
... sheet
Power cord (1) (p. 9)
Handycam Station (1) (p. 9)
Rechargeable battery pack (1) (p. 9) NP-FH60
Component video cable (1) (p. 17) A/V connecting cable (1) (p. 17) USB cable (1) (p. 29)
CD-ROM "Handycam Application Software" (1) (p. 27)
- Picture Motion Browser (Software) - Picture Motion Browser Guide - Handycam Handbook (PDF)
"Operating Guide" (This manual) (1)
HDR-CX7K "Memory Stick...
Operating Guide - Page 23

... the desired setup item.
Using the OPTION MENU
The OPTION MENU appears just like the pop-up window that appears when you right-click the mouse on a computer. Various functions are displayed in the context of the operation. For details, see "Handycam Handbook" (PDF).
1 While using your camcorder,
touch (OPTION) on the screen.
4 Follow the guide on...
Operating Guide - Page 27
Enjoying with a computer
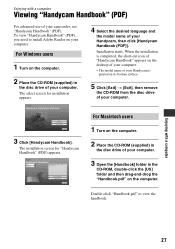
Viewing "Handycam Handbook" (PDF)
For advanced use of your camcorder, see "Handycam Handbook" (PDF). To view "Handycam Handbook" (PDF), you need to install Adobe Reader on your computer.
For Windows users
1 Turn on the computer.
2 Place the CD-ROM (supplied) in
the disc drive of your computer. The select screen for installation appears.
4 Select the desired language and
...
Operating Guide - Page 28

...on a compatible Blu-ray Disc™ player/recorder or other compatible device.
x Using a Macintosh computer The supplied software "Picture Motion Browser" does not support a Macintosh computer. On the advanced use of images on your camcorder connected to your computer, see the following URL; http://guide.d-imaging.sony.co.jp/mac/ ms/us/
28
Installing the software
x Environment for using "Picture...
Operating Guide - Page 29

... agree, then click [Next]. 8 Connect your camcorder to the computer following the steps below. 1 Connect the AC Adaptor to the Handycam
Station and a wall outlet. 2 Set the camcorder onto the Handycam
Station, then slide the POWER switch to turn on. 3 Connect the (USB) jack (p. 20) of the Handycam Station to the computer using the supplied USB cable.
9 When [Connecting...] appears on the...
Operating Guide - Page 30

... Guide."
x Connecting your camcorder to a computer
To connect your camcorder to a computer, follow the steps below. 1 Connect the AC Adaptor to the Handycam
Station and a wall outlet. 2 Set the camcorder onto the Handycam
Station, then slide the POWER switch to turn on your camcorder. 3 Connect the (USB) jack (p. 20) of the Handycam Station to a computer using the supplied USB cable. The [USB...
Operating Guide - Page 31
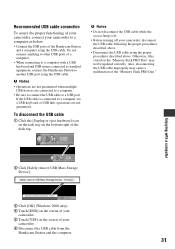
... be updated correctly. Also, disconnecting the USB cable improperly may cause a malfunction of the "Memory Stick PRO Duo."
Enjoying with a computer
2 Click [Safely remove USB Mass Storage Device].
3 Click [OK] (Windows 2000 only). 4 Touch [END] on the screen of your
camcorder. 5 Touch [YES] on the screen of your
camcorder. 6 Disconnect the USB cable from the
Handycam Station and the computer.
31
Operating Guide - Page 32

... and restart your computer.
Your camcorder is not recognized by the computer.
• Install "Picture Motion Browser" (p. 29).
• Disconnect devices from the USB jack of the computer other than the keyboard, mouse, and your camcorder.
• Disconnect the USB cable from the computer and the Handycam Station, and restart the computer, then connect the computer and your camcorder again in an...
Operating Guide - Page 35

... inside the casing, unplug your camcorder and have it checked by a Sony dealer before operating it any further.
• Avoid rough handling, disassembling, modifying, physical shock, or impact such as hammering, dropping or stepping on the product. Be particularly careful of the lens.
• Keep the POWER switch setting to OFF (CHG) when you...
Operating Guide - Page 36

...storage...installed rechargeable battery is not charged, the camcorder operation will not be affected as long as you are not recording the date.
x Procedures
Connect your camcorder to a wall outlet using the supplied AC Adaptor, and leave it with the POWER switch set...the Remote Commander may shorten, or the Remote Commander may not function properly. In this case, replace the battery with a Sony ...
Operating Guide - Page 39
...Dolby and the double-D symbol are trademarks
of Dolby Laboratories.
• Dolby Digital 5.1 Creator is a trademark of
Dolby Laboratories.
• HDMI, the HDMI logo and High-Definition
Multimedia Interface are trademarks or
registered trademarks of HDMI Licensing LLC.
• Microsoft, Windows, Windows Media,
Windows Vista, and DirectX are either
registered trademarks or trademarks of...