Sony DSC V1 - Cyber-shot 5MP Digital Camera driver and firmware
Drivers and firmware downloads for this Sony item


Related Sony DSC V1 Manual Pages
Download the free PDF manual for Sony DSC V1 and other Sony manuals at ManualOwl.com
Operating Instructions - Page 2

... maintenance (servicing) instructions in the literature accompanying the appliance.
If you have any questions about this product, you may call:
Sony Customer Information Center 1-800-222-SONY (7669)
The number below is for the FCC related matters only.
Regulatory Information
Declaration of Conformity
Trade Name:
SONY
Model No.:
DSC-V1
Responsible Party: Sony Electronics Inc.
Address:
680...
Operating Instructions - Page 4

... playback is not possible due to a malfunction of your camera or recording media, etc.
Back up recommendation To avoid the potential risk of data loss, always copy (back up) data to a disk.
Notes on image data compatibility • This camera conforms with the Design rule for
Camera File system universal standard established by the JEITA (Japan...
Operating Instructions - Page 5
... as examples of pictures in this manual are reproduced images, and are not actual images shot using this camera.
Trademarks
• "Memory Stick,"
and "MagicGate
Memory Stick" are trademarks of Sony
Corporation.
• "Memory Stick Duo" and
are trademarks of Sony Corporation.
• "Memory Stick PRO" and
are trademarks of Sony Corporation.
• "MagicGate" and
are
trademarks...
Operating Instructions - Page 7

... images on your computer
Copying images to your computer - For Windows users 85
Copying images to your computer - For Macintosh users 95
Troubleshooting
Troubleshooting 97 Warnings and messages 106 Self-diagnosis display 108
Additional information
Number of images that can be saved or shooting time 109
Menu items 111 SET UP items 115 Precautions 118 On "Memory Stick 119...
Operating Instructions - Page 8

...manual exposure mode
SCN: To shoot in the Scene Selection mode
SET UP: To set the SET UP items : To shoot movies, Clip Motion images or Multi Burst mode images : To view or edit images
D POWER button (14) E Finder window... to firmly secure the camera to tripods having longer screws, and may damage the camera.
• Use ACC jack to connect an external flash or the remote control tripod.
• Do...
Operating Instructions - Page 10
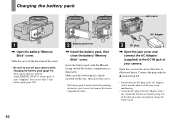
...; Be sure to turn off your camera when charging the battery pack (page 14).
• Your camera operates with the "InfoLITHIUM" NP-FC11 battery pack (C type) (supplied). You can use only C type battery pack (page 120).
2 Battery eject lever
, Install the battery pack, then close the battery/"Memory Stick" cover.
Insert the battery pack...
Operating Instructions - Page 20

...
Mode dial
When shooting pictures with the camera, be careful so that your fingers do not block the lens portion, finder window, flash emitter, or infrared ray emitter.
1
, Set the mode dial to , and turn on the power.
The name of the folder where the image will be recorded appears on the LCD screen for approximately...
Operating Instructions - Page 22

... position and size, and "AF mode" which sets the focus operation according to the AF response and the battery consumption. See page 45 for details.
Checking the last image you shot - Quick Review
60min Review
VGA
101 8/8
100-0029 2003 7 4 10:30PM
RETURN
, Press b (7) on the control button.
To return to the normal shooting...
Operating Instructions - Page 48

..., the camera may focus...flashing and remains on, return to the fully composed shot, and press the shutter button fully down.
AE/AF lock indicator
60min P
VGA...VGA FINE 101 98
S AF 0EV F2.8 30
Setting the distance to the subject
- Focus preset Mode dial: P/S/A/M/SCN/
When shooting an image using a previously set distance to the subject, or when shooting a subject through a net or through window...
Operating Instructions - Page 62
... the User's Manual for your e-mail software.
• For the number of images you can record in E-mail mode, see page 109.
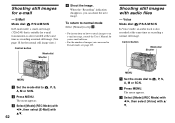
Shooting still images with audio files
- Voice Mode dial: /P/S/A/M/SCN
In Voice mode, an audio track is also recorded at the same time as recording a normal still image.
Control button
Mode dial Shutter
MENU
a Set the mode...
Operating Instructions - Page 85

... not provided on your computer
When neither a USB connector nor a "Memory Stick" slot is provided, you can copy images using an additional device. See the Sony Website for details. http://www.sony.net/
Contents of the CD-ROM
x USB Driver This driver is needed in order to connect the camera to a computer. • When using Windows XP, you need not install
the USB driver.
x Image Transfer This...
Operating Instructions - Page 86

... need not install the USB driver. Once the USB driver is installed, you need not install the USB driver again. a Start up your computer, and
insert the supplied CD-ROM into the CD-ROM drive.
Do not connect your camera to your computer at this time.
The model selection screen appears. If it does not appear, double-click (My Computer) t (ImageMixer) in that order. b Click [Cyber-shot] on...
Operating Instructions - Page 87
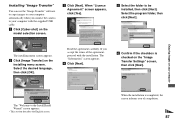
... "Image Transfer"
You can use the "Image Transfer" software to copy images to your computer automatically when you connect the camera to your computer with the supplied USB cable. a Click [Cyber-shot] on the
model selection screen.
c Click [Next]. When "Licence Agreement" screen appears, click [Yes].
e Select the folder to be installed, then click [Next]. Select the program folder, then...
Operating Instructions - Page 88

... the procedure. • The USB driver is needed in order to use "Image Transfer". If the necessary driver is not already installed on your computer, a screen that asks if you want to install the driver will appear. Follow the instructions that appear on the screen.
Installing "ImageMixer"
You can use the "ImageMixer Ver. 1.5 for Sony" software to copy, view and edit images...
Operating Instructions - Page 91

... 3 If you find either of the devices above, follow the steps below to delete them. 1 Click [ Sony DSC]. (When using Windows 2000, rightclick [ Sony DSC].) 2 Click [Remove] (or [Uninstall] in Windows 2000). The "Confirm Device Removal" screen appears. 3 Click [OK]. The device is deleted.
Try the USB driver installation again using the supplied CD-ROM (page 86).
91
Enjoying images on your computer
Operating Instructions - Page 92

- Windows XP
Copying images using the Windows XP AutoPlay Wizard
a Make a USB connection (page 89). Click [Copy pictures to a folder on my computer using Microsoft Scanner and Camera Wizard], then click [OK].
The "Scanner and Camera Wizard" screen appears.
b Click [Next]. The images stored on the "Memory Stick" are displayed.
c Click the checkbox of images that you do not want to...
Operating Instructions - Page 95

... device. See the Sony Website for details. http://www.sony.net/
Steps requires your OS
Follow the steps below, according to your OS.
OS
Mac OS 8.5.1/8.6/9.0
Mac OS 9.1/9.2/Mac OS X (v10.0/v10.1/v10.2)
Steps Steps 1 to 4 Steps 2 to 4
a Installing the USB driver
1 Turn on your computer, and set the supplied CD-ROM into the CD-ROM drive. The model selection screen appears.
2 Click [Cyber-shot...
Operating Instructions - Page 96

...; Close down all applications running on the computer before installing the USB driver and application.
• You can use the "ImageMixer Ver. 1.5 for Sony" software to copy, view and edit images, and create video CDs. See the operation manual supplied with the CD-ROM for details about the installation method, or see the software's help files for the operation method.
•...
Operating Instructions - Page 103

... is not connected directly to your computer.
• The USB driver is not installed. • Your computer does not properly recognize the
device because you connected the camera and your computer with the USB cable before you installed the "USB Driver" from the supplied CD-ROM.
Solution
p Check "Recommended computer environment" (pages 85 and 95).
p In Windows 2000, log on as Administrator...
Operating Instructions - Page 104
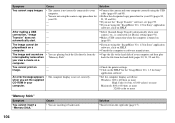
..., 91, 92 and 96).
You cannot print an
-
image.
-
p Check the printer settings. p Click on the HELP for the "ImageMixer Ver. 1.5 for Sony"
application software.
An error message appears when you set the supplied CD-ROM in your computer.
• The computer display is not set correctly.
p Set the computer display as follows: Windows: 800 × 600 dots or more High Color (16 bits, 65...