Sony DSC U20 - Cyber-shot 2MP Digital Camera driver and firmware
Drivers and firmware downloads for this Sony item


Related Sony DSC U20 Manual Pages
Download the free PDF manual for Sony DSC U20 and other Sony manuals at ManualOwl.com
Operating Instructions - Page 3

... you have any questions about this product, you may call: Sony Customer Information Services Center 1-800-222-SONY (7669)
The number below is for the FCC related matters only.
Declaration of Conformity
Trade Name: SONY
Model No.:
DSC-U20
Responsible Party:Sony Electronics Inc.
Address:
680 Kinderkamack Road, Oradell,
NJ 07649 U.S.A.
Telephone No.: 201-930-6972
This device complies with...
Operating Instructions - Page 6

... equipment and playback of images recorded or edited with other equipment on your camera are not guaranteed.
Note on "Memory Stick" This camera turns off whenever you remove the batteries or the "Memory Stick." Do not open the battery/"Memory Stick" cover while the access lamp is on.
Precaution on copyright Television programs, films, video tapes, and...
Operating Instructions - Page 7
... of pictures in this manual are reproduced images, and are not actual images shot using this camera.
Trademarks
• "Memory Stick,"
and "MagicGate Memory Stick"
are trademarks of Sony Corporation.
• "Memory Stick Duo" and
are
trademarks of Sony Corporation.
• "MagicGate" and
are trademarks of
Sony Corporation.
• Microsoft and Windows are registered trademarks of...
Operating Instructions - Page 8

... LCD screen 51
Deleting images
Deleting images 53 Formatting a "Memory Stick 55
Copying images
Copying images to your computer 57 1 Installing the USB driver and application .......... 59 2 Preparing your camera 68 3 Connecting your camera to your computer ........ 69 4 Copying images 71
Changing "Image Transfer" settings 76 5 Viewing the images on your computer 78 For Macintosh users 79
Operating Instructions - Page 28
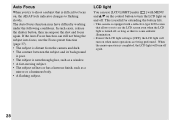
...; The subject is seen through glass, such as a window. • A fast-moving subject. • The subject reflects or has a lustrous finish, such as a
mirror or a luminous body. • A flashing subject.
LCD light
You can use [LCD LIGHT] under [ ] with MENU and v/V on the control button to turn the LCD light on and off...
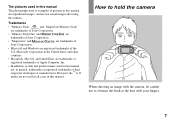
Operating Instructions - Page 37
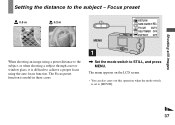
... image using a preset distance to the subject, or when shooting a subject through a net or window glass, it is difficult to achieve a proper focus using the auto focus function. The Focus preset function is useful in these cases.
1
, Set the mode switch to STILL, and press MENU.
The menu appears on the LCD...
Operating Instructions - Page 57

...8226; After the USB driver or applications are installed, step 1 is
unnecessary.
Recommended computer environment
Recommended Windows environment OS: Microsoft Windows 98, Windows 98SE, Windows 2000 Professional, Windows Millennium Edition, Windows XP Home Edition, or Windows XP Professional The above OS must be installed at the factory. Operation is not assured in an environment upgraded to the...
Operating Instructions - Page 58

... a USB cable, the camera can draw its power from your computer (USB Bus Powered).
* Compatible with Windows XP and Mac OS X
Communication with your computer
When your computer resumes from the suspend or sleep mode, communication between your camera and your computer may not recover at the same time.
When a USB connector is not provided on your computer
When neither a USB connector nor a "Memory...
Operating Instructions - Page 59
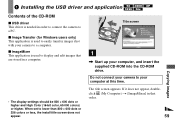
1 Installing the USB driver and application
Contents of the CD-ROM
x USB driver This driver is needed in order to connect the camera to a PC. x Image Transfer (for Windows users only) This application is used to easily transfer images shot with your camera to a computer. x ImageMixer This application is used to display and edit images that are stored in a computer.
• The display settings ...
Operating Instructions - Page 60
... may differ depending on your OS.
• Close down all applications running on the computer before installing the driver.
• When using Windows XP or Windows 2000, log on as Administrators.
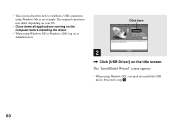
Click here
2
, Click [USB Driver] on the title screen. The "InstallShield Wizard" screen appears.
• When using Windows XP, you need not install the USB driver. Proceed to step 5.
60
Operating Instructions - Page 61
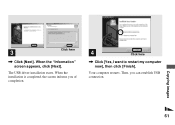
Click here
3
, Click [Next]. When the "Information" screen appears, click [Next].
The USB driver installation starts. When the installation is completed, the screen informs you of completion.
4
Click here
, Click [Yes, I want to restart my computer now], then click [Finish].
Your computer restarts. Then, you can establish USB connection.
Copying images
61
Operating Instructions - Page 62

... click [OK].
The "Welcome to the InstallShield Wizard" screen appears. The USB driver is needed in order to use "Image Transfer." If the necessary driver is not already installed on your computer, a screen that asks if you want to install the driver will appear. Follow the instructions that appear on the screen.
• This section describes the English...
Operating Instructions - Page 66

... instructions on each succeeding screen.
When installation is complete, the "Read Me" text appears. Read the text, then close the window by clicking at the upper right corner of the screen. After that, click [Finish] in the install screen to close the install screen.
• If DirectX8.0a or a later version is not installed in your computer, the...
Operating Instructions - Page 71
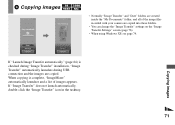
... image files recorded with your camera are copied into these folders.
• You can change the "Image Transfer" settings on the "Image Transfer Settings" screen (page 76).
• When using Windows XP, see page 74.
Copying images
If "Launch Image Transfer automatically" (page 64) is checked during "Image Transfer" installation, "Image Transfer" automatically launches during USB connection and...
Operating Instructions - Page 73
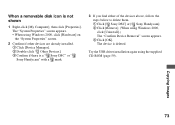
...a " Sony DSC" or " Sony Handycam" with a mark.
3 If you find either of the devices above, follow the steps below to delete them. 1 Click [ Sony DSC] or [ Sony Handycam]. 2 Click [Remove]. (When using Windows 2000, click [Uninstall].) The "Confirm Device Removal" screen appears. 3 Click [OK]. The device is deleted.
Try the USB driver installation again using the supplied CD-ROM (page 59).
Copying...
Operating Instructions - Page 78
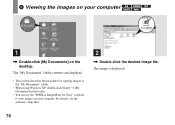
... Documents] on the desktop.
The "My Documents" folder contents are displayed.
• This section describes the procedure for copying images to the "My Documents" folder.
• When using Windows XP, double-click [Start] t [My Documents] in that order.
• You can use the "PIXELA ImageMixer for Sony" software to view images on your computer. For details, see...
Operating Instructions - Page 79

...
Mac OS 8.5.1/8.6/9.0
Steps 1 to 5
Mac OS 9.1/9.2/Mac OS X (v10.0/v10.1)
Steps 12 to 5
1 Installing the USB driver and "ImageMixer"
1 Installing the USB driver (for Mac OS 8.5.1, 8.6 or 9.0 users only)
1 Turn on your computer, and set the supplied CDROM into the CD-ROM drive. The "PIXELA ImageMixer for Sony" screen appears.
2 Double-click (Setup Menu).
3 Click (USB Driver). The "USB Driver...
Operating Instructions - Page 85

... USB driver is not installed. • The camera was connected to a computer with the USB cable before installing the USB driver, so the device was not recognized by the computer. • No "Memory Stick" is inserted.
p Use the supplied USB cable (page 69).
p Disconnect the USB cable, and connect it again firmly. Make sure that "USB MODE" is displayed on the LCD screen (pages 69 and 92).
p Set...
Operating Instructions - Page 86

... on HELP.
p Consult the computer or software manufacturer.
p Copy the file to the hard disk of your computer and then play back the file from the hard disk.
-
p Check the printer settings.
p Click on the HELP files for the "PIXELA
ImageMixer for Sony" application software.
• The computer display is not set correctly.
p Set the computer display as follows: Windows: 800 × 600 dots...
Operating Instructions - Page 103
..., 35 selecting a flash mode 32
Focusing focus preset 37 shooting (using auto adjustment mode 26
Formatting a "Memory Stick 55
I
Image copying images to your computer 57, 71 file names 77 image file storage destinations 77 image size 23, 25, 90
Index screen 45 Installation
Image Transfer 62 ImageMixer 65 USB driver 59
J
JPEG 26
L
LCD screen DISPLAY 29, 99...