Sony CCD-FX710 driver and firmware

Related Sony CCD-FX710 Manual Pages
Download the free PDF manual for Sony CCD-FX710 and other Sony manuals at ManualOwl.com
Primary User Manual - Page 2

... set out in Radio Interference Regulations.
Owner's Record
The model and serial numbers are located on the bottom. Record the senor number in the space provided on the right hand Refer to these numbers whenever you call upon your Sony dealer regarding this product.
Model No. CCD-FX710 Serial No.
2
Table of Contents
Before You Begin
About this Manual...
Primary User Manual - Page 3

...; When you are reading through this manual, buttons and settings on the camcorder are shown in capital letters, e.g. Slide the POWER switch to CAMERA.
• Use "Identifying the Parts" on page 53 as a guide to find functions and operations printed on the camcorder itself.
Note on TV Color Systems
TV color systems are different depending on the...
Primary User Manual - Page 4

... recording when used indoors)
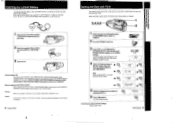
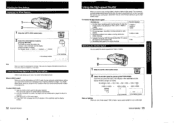
Checking the remaining battery
1 Slide the power switch to CAMERA. 2 Turn the STANDBY switch up. 3 Press TAPE/BATT. CHECK.
The bar of the remaining battery indicator in the viewfinder and the display window shows remaining battery power. When the battery is used up, the bar goes out, the (ST and red lamp flash...
Primary User Manual - Page 5
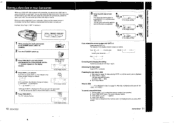
... the small green button on the POWER switch, slide it to CAMERA.
2 Turn the STANDBY switch up.
gAnt.° ".,/ s 1 Illr:- Ail ]
3 Press DATE (a) and TIME (NEXT) simultaneously for a few seconds until the date indicator appears in the display window.
aTdhveaDnAceTEnubmubtteornsn) oawndfuthnectTioIMnsEabsuatto(tno functions as NEXT (to set).
4 Adjust the flashing digits of
the year, month, day...
Primary User Manual - Page 6
... can use it for age as well. i and can also be used to record event dates in memory.
5 Press TIME (NEXT).
The "00" indicator flashes.
1 0 Getting Started
In the display window
6 Enter the birth date of your
0
child.
D. ATE
First adjust the flashing digits by pressing DATE (c), and then press TIME (NEXT). The age (year and month...
Primary User Manual - Page 7
...If you try to record with the red mark exposed, the G and A indicators flash in the viewfinder and the display window and you will hear...
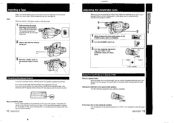
1 While pressing the smal green button on the
POWER switch, slide It to CAMERA.
2 Turn the STANDBY switch up.
3 Turn ...sports finder is convenient when moving around to shoot scenes.
Setting the viewfinder to the sports finder position Turn the viewfinder ...
Primary User Manual - Page 8

... in the display window and the viewfinder, and the red lamp in the viewfinder. as well as the camera recording/battery lamp on the camcorder, tlash slowly. When the tape reaches the end, the flashing becomes rapid and beeps sound for about live seconds when BEEP is set to ON.
Note on recording When you record from the...
Primary User Manual - Page 11

...recording is completed before the battery indicator appears inside the viewfinder, you should remove the tape, set the POWER switch to CAMERA, turn STANDBY up, and leave the camcorder until the Ct indicator flashes...capacity can be recovered if you fully discharge and charge the battery again.
20 Basic Operation
After long storage Recharge the battery pack after a long period of storage. If the ...
Primary User Manual - Page 14

....
5 Press ZERO MEM.
The insert ending point is stored in memory.
,..„
° I I + EDITSEARCII - 0
cowl 'I RESET
0 .RoT-O0Y0
In the viewfinde
c, I I l ° EDITSEARCH -
ZERO MEM
--- .,EI:11Oa-I°r-fl'rEem,('1•
In the display window I
6 Press START/STOP.
Insert recording begins. The insert recording stops automatically at the counter zero point.
To cancel the ZERO...
Primary User Manual - Page 15

... slide the AUTO LOCK switch down, only the settings you make during manual adjustment are changed. The other settings remain the same as those in automatic adjustment.
About the settings you made
The settings you made during manual adjustment are retained in the following cases. • When you set the POWER switch to OFF. • When you slide...
Primary User Manual - Page 16
...recording, then set the desired zoom angle.
3,5
2
1 Slide the AUTO LOCK switch down.
(AUTO LOCK)
2 Press FOCUS.
iO appears in the viewfinder, and MANUAL appears
in the display window.
FOCUS
In the viewfirider
3 Keep pressing the T side (telephoto) of the
power... for camera recording.
In the following cases, you should obtain better results by adjusting the white balance
manually.
Conditions...
Primary User Manual - Page 17
... display window
BAL In the viewfinder
Note
When you adjust the white balance manually, make sure you readjust white balance everytime you move from indoors to outdoors. or vice-versa.
Locking the White Balance Setting... ND2 (neutral density) filter (To reduce the exposure level to about half)
• Recording indoor sports (for stable shooting)
For your selection 1/10000 or 1/4000 or 1/2000
1/...
Primary User Manual - Page 18
...record the darkness faithfully
Adjusting the Exposure Manually
1 Slide the AUTO LOCK switch down.
2 3
(AUTO LOCK]
2 Press EXPOSURE ON/OFF.
The exposure is locked at the present brightness. The exposure indicator appears inside the viewfinder and EXPOSURE MANUAL appears in the display window... of shutter speed and aperture settings and gives you creative control of depth of field (range...
Primary User Manual - Page 19

... sure that the lithium battery is installed.
Cue"
3 5 6
3 1
2
roc,
1 While pressing the small green button on the POWER
switch, slide it to CAMERA.
ARM.°".../-Y-rIVI IIIK.:::/illi
2 Turn the STANDBY switch up to put the camcorder into
standby mode,
3 Alm the camcorder at the title card and adjust the focus
using the macro...
Primary User Manual - Page 23

... 40.
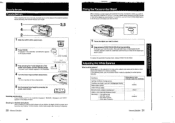
AC-V65N65A
to S VIDEO
to AUDIO OUT (L, R)
'CF.
S video cable (supplied)
EDIT.
AN connecting cable (supplied)
S VIDEO IN
iT7
AUDIO IN (L, R)
Signal flow
Editing a tape
1 Insert a tape to be recorded on into the recording VCR. 2 Slide the EDIT switch on the camcorder in the direction of the arrow. 3 Set the POWER switch on the camcorder to VTR...
Primary User Manual - Page 24

...: (Player)
Camcorder: (Recorder)
5t6
• V
Connection
Connections are the same as in "Recording from a VCR or TV" (page 43). Before you start to replace recordings, set the VCR to playback pause mode at the beginning of the scene to be recorded. Set the CHARGE/VTR selector on the AC power adaptor to VTR.
Replacing recordings
2
5
4
3 In the display window
I
1
7
In the display window...
Primary User Manual - Page 25

... • The 85 indicator in the viewfinder and the display window flashes. When a tape is inserted, the C indicator also flashes. • Several beeps sound continuously for about 5 seconds when the BEEP switch is set to ON and a tape is inserted.
• , -E.I
in the viewfinder
I I I I '1 In the display window
In such cases, no functions, except for tape ejection...
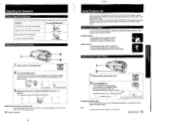
Primary User Manual - Page 26

...instructions. 2 After cleaning, check to see if the picture is clear by recording on or playing back an
ordinary tape. 3 If the picture is still noisy, repeat cleaning. (Do not repeat cleaning more than 5 times.) It the V8-25CLH cleaning cassette is not available in your area, consult your Sony service...Better Camera Recording
Achieving a Better Camera Recording
...the camcorder to support it. When ...
Primary User Manual - Page 28

...-,* FE PAU
VS
50
56
51
52
53
59
54
60
55
Wireless Remote Commander
6
7
2
8
3 9
w
5
10
El DATA SCREEN button 0 0 Ill Tape transport buttons
> PLAY (playback) FF (fast-forward) REW (rewind)
HI STOP II PAUSE
El • e REC (recording) switch El Display window E e e AUTO LOCK switch fi PUSH FOCUS HOLD button g FADER button E EXPOSURE ON...
Primary User Manual - Page 30

... your nearest Sony dealer.
to flashes for
The lithium battery is not Install a lithium battery
5 seconds
installed.
with the battery pack
after setting the
The lithium battery is
or other power source
POWER switch
-
exhausted.
attached. Otherwise,
to CAMERA.
The lithium battery is
you must readjust
weak.
the date, time and
birth dates.
* In these cases the displayed indicator...