HP Surestore Archive Server 100st driver and firmware
Drivers and firmware downloads for this Hewlett-Packard item


Related HP Surestore Archive Server 100st Manual Pages
Download the free PDF manual for HP Surestore Archive Server 100st and other HP manuals at ManualOwl.com
32/64/76 Slot, 5.2 Gbyte Drive Optical Jukebox Upgrade and Conversion Instructions - C1160-90018 - Page 1

32/64/76-Slot, 5.2 Gbyte-Drive Optical Jukebox
Upgrade and Conversion Instructions
Edition 1
Part No. C1160-90018 Printed in USA 3/98
32/64/76 Slot, 5.2 Gbyte Drive Optical Jukebox Upgrade and Conversion Instructions - C1160-90018 - Page 2

Printing History
New editions of these instructions incorporate all material updated since the previous edition. The printing date and part number indicate the current edition. The printing date changes when a new edition is printed. (Minor corrections and updates incorporated at reprint do not change this date.)
Part number C1160-90018
Edition 1
March 1998
ii
32/64/76 Slot, 5.2 Gbyte Drive Optical Jukebox Upgrade and Conversion Instructions - C1160-90018 - Page 4

These Instructions
These upgrade/conversion instructions include the following topics:
Chapter 1
Checking the parts in your kit against the parts list. Checking that you have the correct tools. Checking that you have the most current firmware for the jukebox controller and the drives.
Chapter 2
Procedures for adding two drives to a two-drive 5.2-Gbyte-drive jukebox and enabling 32 additional ...
32/64/76 Slot, 5.2 Gbyte Drive Optical Jukebox Upgrade and Conversion Instructions - C1160-90018 - Page 6

First Steps Overview
Overview
This chapter provides the following: • Contents of each upgrade and conversion kit • A checklist of equipment, tools, and firmware needed
1-2
32/64/76 Slot, 5.2 Gbyte Drive Optical Jukebox Upgrade and Conversion Instructions - C1160-90018 - Page 7
... 64 slots.
One two-drive model of this 5.2 Gbyte drive jukebox uses 76 slots. That model cannot be upgraded.
For an upgrade, use the following steps: Step 1 - Check the upgrade kit contents and that you have the necessary equipment,
tools, and firmware. Step 2 - Go to Chapter 2, "Upgrading Drives and Capacity" Step 3 - Go to Chapter 4, "Downloading Firmware" Step 4 - Go to Chapter...
32/64/76 Slot, 5.2 Gbyte Drive Optical Jukebox Upgrade and Conversion Instructions - C1160-90018 - Page 9

...Drives to 5.2 Gb Disk Drives"
• Chapter 4 - "Downloading Firmware"
• Chapter 5 - ""Verifying Jukebox Operation, Labeling, and Cleanup"
Contents of the C5131J/K/L Conversion Kits
Part
5.2 Gbyte drive interposer PCA interface PCA 8-slot magazine RFI clamp EMI gasket T-20 screws
M3x6 T-10 screws
flat cable clamp left panel - flint grey
right panel - flint grey
Qty
Part Number
Comments...
32/64/76 Slot, 5.2 Gbyte Drive Optical Jukebox Upgrade and Conversion Instructions - C1160-90018 - Page 14
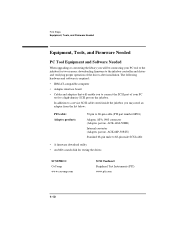
...: downloading firmware to the jukebox controller and drives and verifying proper operation of the drives after installation. The following hardware and software is required:
• IBM AT-compatible computer
• Adaptec interface board
• Cables and adapters that will enable you to connect the SCSI port of your PC tool to a high-density SCSI port on the jukebox.
In addition to a service...
32/64/76 Slot, 5.2 Gbyte Drive Optical Jukebox Upgrade and Conversion Instructions - C1160-90018 - Page 15
...Firmware Needed
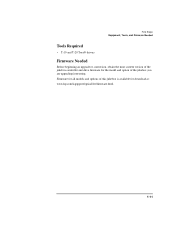
Tools Required
• T-10 and T-20 Torx® drivers
Firmware Needed
Before beginning an upgrade or conversion, obtain the most current version of the jukebox controller and drive firmware for the model and option of the jukebox you are upgrading/converting. Firmware for all models and options of this jukebox is available for download at: www.hp.com/isgupport/optical/fw/firmware...
32/64/76 Slot, 5.2 Gbyte Drive Optical Jukebox Upgrade and Conversion Instructions - C1160-90018 - Page 18

... Drive Jukeboxes Before You Begin
IMPORTANT
Before You Begin
Check the kit contents, tools and equipment needed for this upgrade in Chapter 1.
Before you begin, make sure you have the most current firmware for the jukebox controller and the drives for the model and option jukebox you are upgrading. Firmware may be obtained at www.hp.com/isgsupport/optical/firmware...
32/64/76 Slot, 5.2 Gbyte Drive Optical Jukebox Upgrade and Conversion Instructions - C1160-90018 - Page 21

Upgrading Drives and Capacity in 5.2 Gb Drive Jukeboxes Add Drives
Figure 2-2
Add Drives
1. Disconnect all cables from the currently installed drives to the interposer PCA. 2. Remove the two T-20 screws securing the empty drive location cover plate ( # 1
on Figure 2-2).
Removing the Drive #3 and #4 Cover Plate
2- 5
32/64/76 Slot, 5.2 Gbyte Drive Optical Jukebox Upgrade and Conversion Instructions - C1160-90018 - Page 26

Figure 2-7
Upgrading Drives and Capacity in 5.2 Gb Drive Jukeboxes Mount the Configuration Module
Mount the Configuration Module
Insert the configuration module into the connector on the interposer PCA as shown in the figure below. Mounting the Configuration Module
Go to Chapter 4, "Downloading Firmware." 2- 10
32/64/76 Slot, 5.2 Gbyte Drive Optical Jukebox Upgrade and Conversion Instructions - C1160-90018 - Page 41
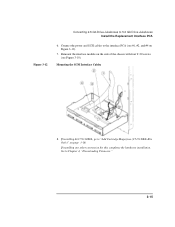
Figure 3-12
Converting 2.6 Gb Drive Jukeboxes to 5.2 Gb Drive Jukeboxes Install the Replacement Interface PCA
6. Connect the power and SCSI cables to the interface PCA (see #1, #2, and #4 on Figure 3-12).
7. Remount the interface module on the side of the chassis with four T-20 screws (see Figure 3-10).
Mounting the SCSI Interface Cables
8. If installing kit C5131J/K/L, go to "Add Cartridge...
32/64/76 Slot, 5.2 Gbyte Drive Optical Jukebox Upgrade and Conversion Instructions - C1160-90018 - Page 42

CAUTION
Converting 2.6 Gb Drive Jukeboxes to 5.2 Gb Drive Jukeboxes Add Cartridge Magazines (C5131J/K/L Kits Only)
Add Cartridge Magazines (C5131J/K/L Kits Only)
When adding magazines into the chassis, do not move the customer's disks from the their current locations. If the event that you must move a cartridge, record the cartridge location and orientation so the cartridge...
32/64/76 Slot, 5.2 Gbyte Drive Optical Jukebox Upgrade and Conversion Instructions - C1160-90018 - Page 47
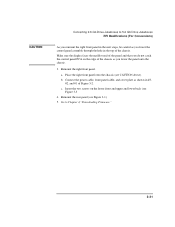
... panel.
a. Place the right front panel onto the chassis (see CAUTION above). b. Connect the power cable, front panel cable, and cover plate as shown in #3,
#2, and #1 of Figure 3-2. c. Insert the two screws on the lower front and upper and lower back (see
Figure 3-3 4. Remount the rear panel (see Figure 3-1). 5. Go to Chapter 4,"Downloading Firmware."
3-21
32/64/76 Slot, 5.2 Gbyte Drive Optical Jukebox Upgrade and Conversion Instructions - C1160-90018 - Page 49

4
Downloading Firmware
32/64/76 Slot, 5.2 Gbyte Drive Optical Jukebox Upgrade and Conversion Instructions - C1160-90018 - Page 50

Downloading Firmware Overview
Overview
This chapter provides the following: • Procedures for checking the revision level of the jukebox and drive firmware. • Procedures for connecting to the jukebox for downloading firmware.
4- 2
32/64/76 Slot, 5.2 Gbyte Drive Optical Jukebox Upgrade and Conversion Instructions - C1160-90018 - Page 51
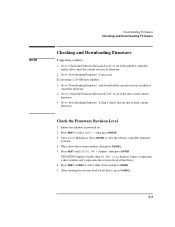
... the current revision of jukebox
controller firmware. 2. Go to "Check the Firmware Revision Level" to see if the drives need current
firmware. 3. Go to "Downloading Firmware" if Step 2 shows that the drives need current
firmware.
Check the Firmware Revision Level
1. Ensure the jukebox is powered on. 2. Press NEXT to select INFO *, then press ENTER. 3. REVISION # displays. Press ENTER to view the...
32/64/76 Slot, 5.2 Gbyte Drive Optical Jukebox Upgrade and Conversion Instructions - C1160-90018 - Page 52

.... 4. Connect a SCSI cable between your PC tool and one of the single-ended ports
on the interface module. (Connectors on the module are high-density.) 5. Turn the jukebox on.
Wait until the jukebox shows READY in the display. 6. Turn your PC tool on. 7. Follow your download utilities instructions to download the firmware needed
(jukebox and/or drives). 8. Go to...
32/64/76 Slot, 5.2 Gbyte Drive Optical Jukebox Upgrade and Conversion Instructions - C1160-90018 - Page 57
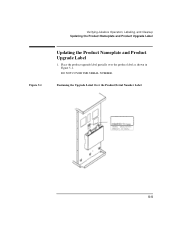
Figure 5-1
Verifying Jukebox Operation, Labeling, and Cleanup Updating the Product Nameplate and Product Upgrade Label
Updating the Product Nameplate and Product Upgrade Label
1. Place the product upgrade label partially over the product label as shown in Figure 5-1. DO NOT COVER THE SERIAL NUMBER.
Positoning the Upgrade Label Over the Product/Serial Number Label
5- 5
32/64/76 Slot, 5.2 Gbyte Drive Optical Jukebox Upgrade and Conversion Instructions - C1160-90018 - Page 58

Figure 5-2
Verifying Jukebox Operation, Labeling, and Cleanup Updating the Product Nameplate and Product Upgrade Label
2. Place the new product nameplate on the top of the jukebox as shown in Figure 5-2.
Position of the Model Nameplate
Replace the Jukebox Access ...