Asus VivoMini VC66 driver and firmware

Related Asus VivoMini VC66 Manual Pages
Download the free PDF manual for Asus VivoMini VC66 and other Asus manuals at ManualOwl.com
E12343_VC66_Series Users ManualEnglish - Page 2
... ASUS. ASUS ASSUMES NO RESPONSIBILITY OR LIABILITY FOR ANY ERRORS OR INACCURACIES THAT MAY APPEAR IN THIS MANUAL, INCLUDING THE PRODUCTS AND SOFTWARE DESCRIBED IN IT.
Copyright © 2016 ASUSTeK COMPUTER INC. All Rights Reserved.
LIMITATION OF LIABILITY
Circumstances may arise where because of a default on ASUS' part or other liability, you are entitled to recover damages from ASUS...
E12343_VC66_Series Users ManualEnglish - Page 3

... the USB cable from keyboard or mouse 15 Connect a display panel to your VivoMini 16 Turn on your VivoMini 18 Turning your VivoMini off 19 Putting your VivoMini to sleep 19 Entering the BIOS Setup 19 Quickly enter the BIOS 20 Load default BIOS settings 20
Upgrading your VivoMini Upgrading memory modules 22 Installing or upgrading the M.2 SSD 27 Installing or upgrading the wireless card...
E12343_VC66_Series Users ManualEnglish - Page 4

... chapter details the hardware components of your VivoMini.
Chapter 2: Using your VivoMini This chapter provides you with information on using your VivoMini.
Chapter 3: Upgrading your VivoMini This chapter provides you with information on how to upgrade the memory modules, wireless modules, and hard disk drive / solid state drive of your VivoMini.
Appendix This section includes notices and safety...
E12343_VC66_Series Users ManualEnglish - Page 19

... error message appears on the screen during the system
bootup and requests you to run the BIOS Setup. • You have installed a new system component that requires further
BIOS settings or update.
WARNING! Inappropriate BIOS settings may result to instability or boot failure. We strongly recommend that you change the BIOS settings only with the help of a trained service personnel.
VivoMini VC66...
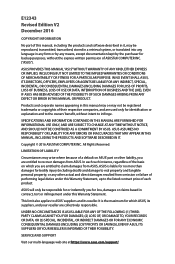
E12343_VC66_Series Users ManualEnglish - Page 20
... your PC is off, disconnect the power cord from your VivoMini's power connector. Reconnect the power cable and press the power button to turn on your VivoMini. Press or during POST.
NOTE: POST (Power-On Self Test) is a series of software controlled diagnostic tests that run when you turn on your PC.
Load default BIOS settings
To load the default values for each of...
E12343_VC66_Series Users ManualEnglish - Page 22
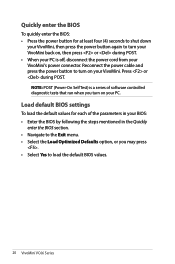
...asus.com for the list of compatible DIMMs. You can only install 1.35 V DDR4 SO-DIMM to the VivoMini's DIMM slots. NOTE: The illustrations in this section are for reference only and may vary per model. To install or upgrade the memory modules: 1. Turn off your VivoMini then disconnect all cables and peripherals. 2. Place the VivoMini... remove it from the compartment cover.
22 VivoMini VC66 Series
E12343_VC66_Series Users ManualEnglish - Page 24

6. Lift open the HDD layer. IMPORTANT! Lift the HDD layer carefully to prevent pulling on and causing damage to the cables connected.
7. Align and insert the memory module into the slot and press it down (A) until the retaining clips snaps back into place and it is securely seated in place. Repeat the same steps to install the other memory module.
24 VivoMini VC66 Series
E12343_VC66_Series Users ManualEnglish - Page 27

... illustrations in this section are for reference only and may vary per model. Your VivoMini includes a M.2(NGFF) slot that supports a M.2 2280 SSD. To install or upgrade the M.2 SSD: 1. Follow steps 1-6 under the Upgrading memory modules section to remove the top cover and HDD layer of your VivoMini. 2. Align and insert the M.2 SSD into its slot inside the...
E12343_VC66_Series Users ManualEnglish - Page 28

... and may vary per model. Your VivoMini includes a M.2(NGFF) slot that supports a M.2 2230 wireless and bluetooth module. To install or upgrade a wireless card: 1. Follow steps 1-6 under the Upgrading memory modules section to remove the top cover and HDD layer of your VivoMini. 2. Align and insert the wireless card into its slot inside the VivoMini (A), then secure it with a screw (B). 3. Connect...
E12343_VC66_Series Users ManualEnglish - Page 29

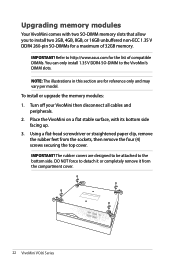
... only support one (1) HDD/SSD. To install or upgrade the HDD / SSD: 1. Follow steps 1-4 under the Upgrading memory modules section to remove the top cover of your VivoMini. 2. Remove four (4) screws from the HDD/SSD bracket. 3. Remove the HDD/SSD bracket. 4. Remove the cable from the holder, then remove the holder from the HDD/SSD bracket.
VivoMini VC66 Series...
E12343_VC66_Series Users ManualEnglish - Page 30
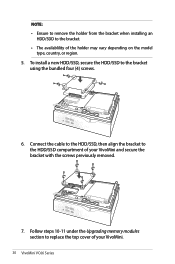
... the bracket
using the bundled four (4) screws.
6. Connect the cable to the HDD/SSD, then align the bracket to the HDD/SSD compartment of your VivoMini and secure the bracket with the screws previously removed.
7. Follow steps 10-11 under the Upgrading memory modules section to replace the top cover of your VivoMini.
30 VivoMini VC66 Series
E12343_VC66_Series Users ManualEnglish - Page 34

... provide reasonable protection against harmful interference in a residential installation. This equipment generates, uses and can radiate radio frequency energy and, if not installed and used in accordance with manufacturer's instructions, may cause harmful interference to radio communications. However, there is no guarantee that interference will not occur in a particular
34 VivoMini VC66 Series
E12343_VC66_Series Users ManualEnglish - Page 35

... operating conditions for satisfying RF exposure compliance.
Canadian Department of Communications Statement
This digital apparatus does not exceed the Class B limits for radio noise emissions from digital apparatus set out in the Radio Interference Regulations of the Canadian Department of Communications. This class B digital apparatus complies with Canadian ICES-003.
VivoMini VC66 Series 35