Asus Prodigy P4S driver and firmware


Related Asus Prodigy P4S Manual Pages
Download the free PDF manual for Asus Prodigy P4S and other Asus manuals at ManualOwl.com
Prodigy P4 User's Manual E1099 for English Version - Page 2

..., AND SHOULD NOT BE CONSTRUED AS A COMMITMENT BY ASUS. ASUS ASSUMES NO RESPONSIBILITY OR LIABILITY FOR ANY ERRORS OR INACCURACIES THAT MAY APPEAR IN THIS MANUAL, INCLUDING THE PRODUCTS AND SOFTWARE DESCRIBED IN IT.
Copyright © 2002 ASUSTeK COMPUTER INC. All Rights Reserved.
Product Name: Manual Revision: Release Date:
Prodigy Book Size Barebone System 1.01 E1099 August 2002
2
Prodigy P4 User's Manual E1099 for English Version - Page 4
... for a Class B digital device, pursuant to Part 15 of the FCC Rules. These limits are designed to provide reasonable protection against harmful interference in a residential installation. This equipment generates, ...the dealer or an experienced radio/TV technician for help.
WARNING! The use of shielded cables for connection of the monitor to the graphics card is required to assure compliance with...
Prodigy P4 User's Manual E1099 for English Version - Page 5

... 2: System Assembly 13
2.1 Opening the chassis 14 2.2 Remove the disk drive assembly 16 2.3 Install the hard disk drive 17 2.4 Install system memory 18 2.5 Install a CPU 19 2.6 Closing the chassis 21
Chapter 3: Optional Procedures 23
3.1 Removing the PCI I/O cover 24 3.2 Installing a PCI expansion card 25
Chapter 4: System Placement 27
4.1 Vertical placement 28 4.2 Horizontal placement...
Prodigy P4 User's Manual E1099 for English Version - Page 6

...DVD Drive 5) 1.44MB Floppy Disk Drive 6) PCI Riser Card 7) CPU Heatsink 8) Motherboard Support CD 9) 1 UltraDMA/33/66 IDE Cable 10) 1 Floppy Cable 11) Powered-by ASUS name plate 12) 56K PCI Modem Card (optional) 13) TV Connector Module (optional) 14) 2 Foot Stands 15) 4 Rubber Footpads 16) Motherboard User's Manual 17) Prodigy Book Size Barebone System User's Guide
If assembling the Prodigy system...
Prodigy P4 User's Manual E1099 for English Version - Page 7
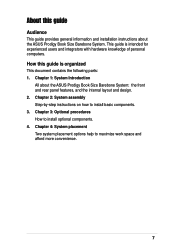
About this guide
Audience
This guide provides general information and installation instructions about the ASUS Prodigy Book Size Barebone System. This guide is intended for experienced users and integrators with hardware knowledge of personal computers.
How this guide is organized
This document contains the following parts: 1. Chapter 1: System Introduction
All about the ASUS Prodigy Book Size ...
Prodigy P4 User's Manual E1099 for English Version - Page 12

1.3 Internal Features
The figure below shows the system from above. The standard components are already installed.
ASUS Motherboard CPU Cooler
CD / DVD ROM Drive
Power Supply PCI Riser Card
3.5" Floppy Drive
12
Chapter 1: System Introduction
Prodigy P4 User's Manual E1099 for English Version - Page 13

System Assembly
Chapter 2
Step-by-step instructions on how to install basic components.
IMPORTANT: ASUS has designed the Prodigy to accept an ASUS "Flex ATX" motherboard with dimensions between 19.1 x 22.9 cm, (or 7.5 x 9 inches). It is not advisable to install other boards. Before installing any motherboard other than the original supplied by ASUS, make sure that it fits into the case and...
Prodigy P4 User's Manual E1099 for English Version - Page 16

... the chassis while gripping your fingers under both sides of the CD and floppy disk drive assembly. It will come loose. Firmly lift the assembly up and out.
2. Lift out the CD/floppy drive module.
3. Slide the hard disk drive cage from right to left and lift it up to install a hard disk.
16
Chapter 2: System Assemby
Prodigy P4 User's Manual E1099 for English Version - Page 17

... four screw holes are properly aligned. Tighten in the screws.
2. Slide the hard drive cage back into its original place. Connect the IDE cable to the primary IDE connector on the hard disk drive. Locate the P3 power cable and connect it to the hard disk drive.
IDE Cable
Power Cable (P3)
(Red strip to Pin 1)
Prodigy Book Size Barebone System
17
Prodigy P4 User's Manual E1099 for English Version - Page 18

2.4 Install system memory
1. Set the CD and floppy disk drive assemply on the side of the chassis. 2. Locate the two DDR SDRAM DIMM sockets on the ASUS
motherboard.
104 Pins
®
184-Pin DDR DIMM Sockets... snap back in place and the DIMM is properly seated.
6. After installing the DIMM, place the CD and floppy drive assembly back into its original position. Then, replace the front bezel; take...
Prodigy P4 User's Manual E1099 for English Version - Page 19
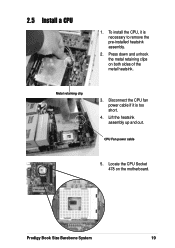
... install the CPU, it is necessary to remove the pre-installed heatsink assembly.
2. Press down and unhook the metal retaining clips on both sides of the metal heatsink.
Metal retaining clip
3. Disconnect the CPU fan power cable if it is too short.
4. Lift the heatsink assembly up and out.
CPU Fan power cable
5. Locate the CPU Socket 478 on the motherboard.
Prodigy...
Prodigy P4 User's Manual E1099 for English Version - Page 23

Chapter 3
How to install optional components.
Optional Procedures
Prodigy Book Size Barebone System
23
Prodigy P4 User's Manual E1099 for English Version - Page 24

... Prodigy chassis accommodates two PCI expansion card through a PCI riser card. Before installing a new PCI card, it is necessary to detach the I/O cover.
1. To remove the I/O cover from the chassis, unfasten the screw with a Philips (cross) screwdriver.
2. After removing the I/O cover, the back panel exposes the external I/O port to permit external access for component connections, like a VGA card...
Prodigy P4 User's Manual E1099 for English Version - Page 25

3.2 Installing a PCI expansion card
1. A PCI card is precisely sized for for easy alignment with both the onboard notches and the external I/O port.
2. Align and firmly plug the PCI card into the slot.
3. For card stability, make sure that the card bracket end goes into the cleft on the slot frame.
Prodigy Book Size Barebone System
25