ViewSonic PJD6352 driver and firmware
Related ViewSonic PJD6352 Manual Pages
Download the free PDF manual for ViewSonic PJD6352 and other ViewSonic manuals at ManualOwl.com
PJD6552LWS User Guide English - Page 1
PJD6350/PJD6351LS/PJD6352/ PJD6352LS/PJD6550LW/ PJD6551LWS/PJD6552LW/ PJD6552LWS DLP Projector
User Guide
IMPORTANT: Please read this User Guide to obtain important information on installing and using your product in a safe manner, as well as registering your product for future service. Warranty information contained in this User Guide will describe your limited coverage from ViewSonic Corporation...
PJD6552LWS User Guide English - Page 3

... undesired operation. This equipment has been tested and found to comply with the limits for a Class B digital device, pursuant to part 15 of the FCC Rules. These limits are designed to provide reasonable protection against harmful interference in a residential installation. This equipment generates, uses, and can radiate radio frequency energy, and if not...
PJD6552LWS User Guide English - Page 5
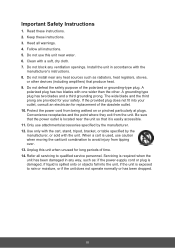
... block any ventilation openings. Install the unit in accordance with the
manufacturer's instructions. 8. Do not install near any heat sources such as radiators, heat registers, stoves,
or other devices (including amplifiers) that produce... 14. Refer all servicing to qualified service personnel. Servicing is required when the unit has been damaged in any way, such as: if the power-supply cord or plug...
PJD6552LWS User Guide English - Page 6

... trademark of the Video Electronics Standards Association. DPMS and DDC are trademarks of VESA. PS/2, VGA and XGA are registered trademarks of International Business Machines Corporation. Disclaimer: ViewSonic Corporation shall not be liable for technical or editorial errors or omissions contained herein; nor for incidental or consequential damages resulting from furnishing this material...
PJD6552LWS User Guide English - Page 8
...
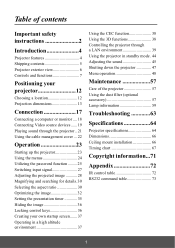
Important safety instructions 2
Introduction 4
Projector features 4 Shipping contents 5 Projector exterior view 6 Controls and functions 7
Positioning your projector 12
Choosing a location 12 Projection dimensions 13
Connection 17
Connecting a computer or monitor .... 18 Connecting Video source devices ...... 19 Playing sound through the projector .. 21 Using the cable management cover...
PJD6552LWS User Guide English - Page 9
... your projector through a power stabilizer, surge protector or uninterruptible power supply (UPS). 6. Do not block the projection lens with any objects when the projector is under operation as this could cause the objects to become heated and deformed or even cause a fire. To temporarily turn off the lamp, press BLANK on the projector or remote control. 7. The...
PJD6552LWS User Guide English - Page 10
... become wet, disconnect it from the power supply's wall socket and call your local service center to have the projector serviced.
18. This product is capable of displaying inverted pictures for ceiling mount installation.
Use only qualified ceiling mount kit for mounting the projector and ensure it is securely installed.
19. When the projector is under operation, you may...
PJD6552LWS User Guide English - Page 13
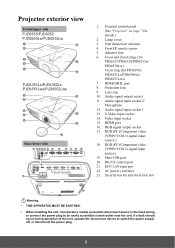
...)/Component video (YPbPr/YCbCr) signal input socket-1 19. Mini USB port 20. RS-232 control port 21. RJ45 LAN input port 22. AC power cord inlet 23. Security bar for anti-theft lock slot
23
Warning • THIS APPARATUS MUST BE EARTHED.
• When installing the unit, incorporate a readily accessible disconnect device in the fixed wiring, or connect the...
PJD6552LWS User Guide English - Page 16
... settings
Displays embedded test pattern.
menu.
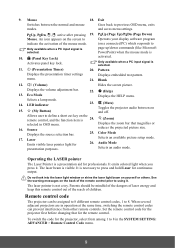
21. Blank
12.
(Volume)
Hides the screen picture.
Displays the volume adjustment bar.
22. (Help)
13. Eco Mode
Displays the HELP menu.
Selects a lamp mode.
14. LED indicator
23.
(Mute)
Toggles the projector audio between on
15.
(My Button)
and off.
Allows user to define a short cut key on the remote control...
PJD6552LWS User Guide English - Page 17

... Mode
Eco Mode
Audio Mode
Color Mode
Using the remote mouse control
The capability of operating your computer with the remote control gives you more flexibility when delivering presentations.
1. Connect the projector to your PC or notebook with a USB cable prior to using the remote control in place of your computer's mouse. See "Connecting a computer" on page 18 for details.
2. Set the input...
PJD6552LWS User Guide English - Page 18
...
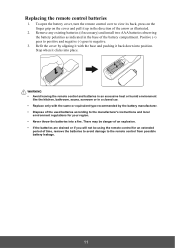
1. To open the battery cover, turn the remote control over to view its back, press on the finger grip on the cover and pull it up in the direction of the arrow as illustrated.
2. Remove any existing batteries (if necessary) and install two AAA batteries observing the battery polarities as indicated in the...
PJD6552LWS User Guide English - Page 19
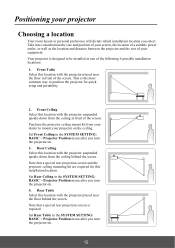
... behind the screen. Note that a special rear projection screen and the projector ceiling mounting kit are required for this installation location. Set Rear Ceiling in the SYSTEM SETTING: BASIC > Projector Position menu after you turn the projector on. 4. Rear Table Select this location with the projector placed near the floor behind the screen. Note that a special rear...
PJD6552LWS User Guide English - Page 23
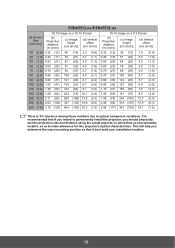
... variations. It is recommended that if you intend to permanently install the projector, you should physically test the projection size and distance using the actual projector in situ before you permanently install it, so as to make allowance for this projector's optical characteristics. This will help you determine the exact mounting position so that it best...
PJD6552LWS User Guide English - Page 41
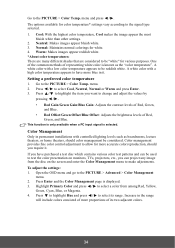
... in permanent installations with controlled lighting levels such as boardrooms, lecture ...TVs, projectors, etc., you can project any image from the disc on the screen and enter the Color Management menu to make adjustments. To adjust the settings...: 1. Open the OSD menu and go to the PICTURE > Advanced > Color Management
menu. 2. Press Enter and the Color Management page is displayed...
PJD6552LWS User Guide English - Page 46
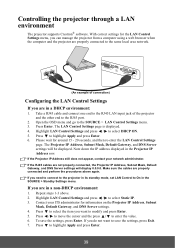
... a LAN environment
The projector supports Crestron® software. With correct settings for the LAN Control Settings menu, you can manage the projector from a computer using a web browser when the computer and the projector are properly connected to the same local area network.
(An example of connection)
Configuring the LAN Control Settings
If you are in a DHCP environment:
1. Take a RJ45 cable...
PJD6552LWS User Guide English - Page 51
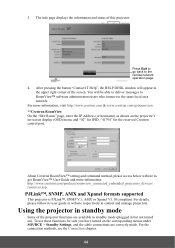
... same local area network. For more information, visit http://www.crestron.com & www.crestron.com/getroomview. **Crestron RoomView On the "Edit Room" page, enter the IP Address (or hostname) as shown on the projector's on-screen display (OSD) menu, and "02" for IPID, "41794" for the reserved Crestron control port.
About Crestron RoomView™ setting and command...
PJD6552LWS User Guide English - Page 57
...
Filter Hours
Remote Control Code
1/2/3/4/5/6/7/8 (All)
Advanced
Security Settings
Change Password Power On Lock
Panel Key Lock Off/On
Reset Settings
Reset/Cancel
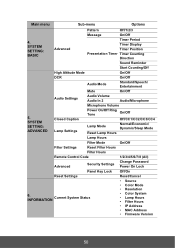
6. INFORMATION
Current System Status
• Source • Color Mode • Resolution • Color System • Lamp Hours • Filter Hours
• IP Address
• MAC Address
• Firmware Version
50
PJD6552LWS User Guide English - Page 62
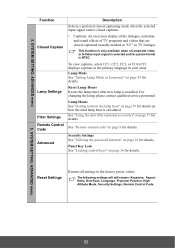
... See "Utilizing the password function" on page 25 for details.
Panel Key Lock See "Locking control keys" on page 36 for details.
Reset Settings
Returns all settings to the factory preset values.
The following settings will still remain: Keystone, Aspect Ratio, OverScan, Language, Projector Position, High Altitude Mode, Security Settings, Remote Control Code.
5. SYSTEM SETTING: ADVANCED menu
55
PJD6552LWS User Guide English - Page 63
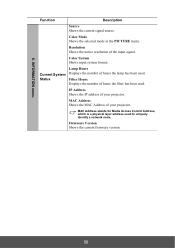
... of hours the lamp has been used.
Filter Hours Displays the number of hours the filter has been used.
IP Address Shows the IP address of your projector.
MAC Address Shows the MAC Address of your projector.
MAC Address stands for Media Access Control Address, which is a physical layer address used to uniquely identify a network node.
Firmware Version Shows the current firmware version.
56
PJD6552LWS User Guide English - Page 64
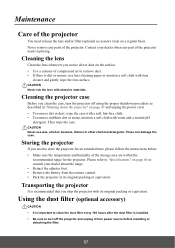
... follow the instructions below: • Make sure the temperature and humidity of the storage area are within the
recommended range for the projector. Please refer to "Specifications" on page 64 or consult your dealer about the range. • Retract the adjuster foot. • Remove the battery from the remote control. • Pack the projector in its...