Toshiba MES60V driver and firmware

Related Toshiba MES60V Manual Pages
Download the free PDF manual for Toshiba MES60V and other Toshiba manuals at ManualOwl.com
Service Manual - Page 5
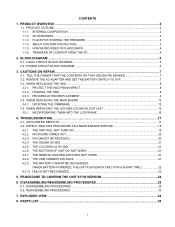
... BUTTONS OF UNIT DO NOT WORK 21 4.2.7. THE REMOTE CONTROLLER DOES NOT WORK 21 4.2.8. THE USB CONNECTION FAILS...21 4.2.9. THE BATTERY CANNOT BE RECHARGED.
(WHEN BATTERY-POWERED, THE UNIT PLAYS BACK ONLY FOR A SHORT TIME 22 4.2.10. HDD IS NOT RECOGNIZED...23
5. PROCEDURE TO CONFIRM THE UNIT'S F/W VERSION 24
6. DISASSEMBLING/REASSEMBLING PROCEDURES 25
6.1. DISASSEMBLING PROCEDURES...
Service Manual - Page 6

1. Product Overview
[TOSHIBA HDD audio player gigabeat S series] is the portable audio player in which the HDD of 30GB/60GB is built. As...Outline 1.1.1. Internal Composition
The gigabeat S series consists of the following main components. • Main board
A part of firmware is stored in the flash ROM on the main board. • HDD
The HDD is partitioned into two partitions. One is for data and the...
Service Manual - Page 7

... as follows. • AC adaptor • Power cord (which varies with destinations.) • USB cable • USB conversion cable • Wired remote controller (Option) • Headphones • Software CD-ROM
Owner's Manual
1.1.3. Place for storing the firmware The firmware is stored in the flash ROM on the main board and on the HDD. The firmware is stored in the system partition on the...
Service Manual - Page 8

... the DAC, which controls the volume level and equalizer levels, using their set data.
1.1.6.
Transfer of content from the PC When the unit is connected to the PC with the USB cable, the PC recognizes the unit as a MTP device (MultiMedia Transfer Protocol device). When transferring the content by using the Windows Media Player on the PC, the...
Service Manual - Page 13

...firmware and the supplied data to the HDD in the procedure below.
[HDD formatting] 1) Set the BATTERY switch to "OFF". 2) Connect the AC adaptor and start up the unit. 3) Format automatically the HDD and display... be transferred are described. Ottoman.exe and the scenario file are provided on the CD-ROM (Material No.: 360058245). Names for the destination-wise stored folder and file are different ...
Service Manual - Page 16
... flash ROM on the main board and on the HDD. Unless the versions of firmware at two locations are matched, the malfunction will occur. Therefore, whenever the main board is replaced, update the firmware in the procedure below to match the versions at two locations. For the procedure when replacing the HDD, see "3.3 When replacing the HDD".
[HDD formatting] 1) Set...
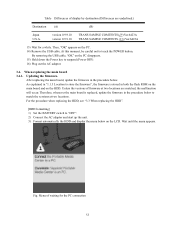
Service Manual - Page 18
5) Wait for a while. Then, "OK" appears on the PC. 6) Remove the USB cable. At this moment, be careful not to touch the POWER button.
By removing the USB cable, "OK" on the PC disappears. 7) The unit is automatically started up.
[T&D Execution]
8) Execute T&D. For procedures, refer to the function test of unit's board.
Service Manual - Page 34
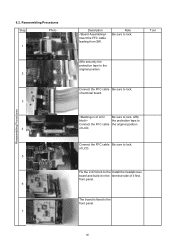
... original position.
Connect the FFC cable Be sure to lock. of terminal board.
Connect the FFC cable of LCD.
Be sure to lock. Affix the protection tape to the original position.
Connect the FFC cable Be sure to lock. of LCD.
Fix the LCD block to the Install the headphones board and build it in the...
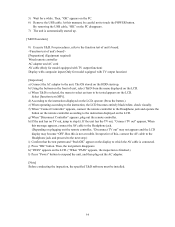
Service Manual - Page 35

... securely the connector.
Tweezers
Sandwich the terminal board fixing bracket as shown and fix it.
Fix the terminal board Install the battery SW bracket with the screw. knob indicated by
arrow.
Philips screwdriver
Fix the terminal board bracket with the screw.
Philips screwdriver
Install the HDD. Insert the FFC cable in the connector.
Be sure to...
Service Manual - Page 36
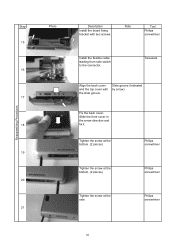
Reassembling Procedures
Step 15 16 17 18 19 20 21
Photo
Description Install the board fixing bracket with two screws.
Note
Tool Philips screwdriver
Install the flexible cable leading from side switch to the connector.
Tweezers
Align the back cover and the top cover with the slide groove.
Slide groove (Indicated by arrow)
...
Service Manual - Page 37

Reassembling Procedures
Step 22 23 24
Photo
Description Tighten the screws at the side.
Note
Tool Philips screwdriver
Install the strap holder.
Philips screwdriver
Assembling is finished.
33
Service Manual - Page 40
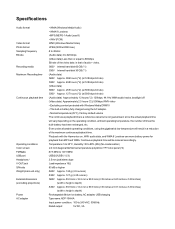
... format Photo format Sampling frequency Bit rate
Recording media Maximum Recording time
Continuous playback time
Operating conditions Color screen FM Radio USB port Headphone / V-OUT jack S/N ratio Weight (main unit only) External dimensions (excluding projections)
Power AC adapter
• WMA (Windows Media Audio)
• WMA 9 Lossless
• MP3 (MEPG-1 Audio Layer3)
• WAV (PCM)
WMV...
Service Manual - Page 41

...computer operating systems, however, calculate storage capacity using powers of 2 for the definition of 1 GB =230 = 1,073,741,824 bytes and therefore show less storage capacity. Available storage capacity is also less as the gigabeat includes a pre-installed operating system, pre-installed software...displays appearing in this manual may differ somewhat from the actual appearance. • The display...
Service Manual - Page 42
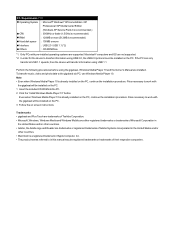
... Edition
(Windows XP Service Pack 2 is recommended.)
Q CPU
: 300MHz or faster (1.5GHz is recommended)
Q RAM
: 128MB or more (512MB is recommended)
Q Hard disk space : 100MB or more
Q Interface
: USB 2.0 / USB 1.1 (*2)
Q Others
: CD-ROM Drive
*1: Only PCs with pre-installed operating systems are supported. Macintosh® computers and OS are not supported. *2: In order for the device to...