Toshiba 32CV100U driver and firmware

Related Toshiba 32CV100U Manual Pages
Download the free PDF manual for Toshiba 32CV100U and other Toshiba manuals at ManualOwl.com
User Manual - Page 1

... 26CV100U 32CV100U
For an overview of steps for setting up your new TV, see page 12.
Note: To display a High Definition picture, the TV must be receiving a High Definition signal (such as an over-the-air High Definition TV broadcast, a High Definition digital cable program, or a High Definition digital satellite program). For details, please contact your TV antenna installer, cable provider...
User Manual - Page 2
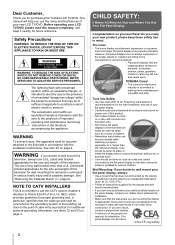
.... Follow the manufacturer's
recommendations for the safe installation and use of your flat panel display. • Carefully read and understand all enclosed instructions for proper use of this product. • Don't allow children to climb on or play with furniture and television sets. • Don't place flat panel displays on furniture that can easily be used...
User Manual - Page 3

.... • The mains plug is used as the disconnect device, and therefore install the TV/DVD near the wall outlet so that the mains plug can be accessed easily at all times.
Installation, Care, and Service
Installation
Follow these recommendations and precautions and heed all warnings when installing your TV:
19) WARNING: NEVER expose batteries to excessive heat...
User Manual - Page 4

... Code).
Ground clamp
Electric service equipment
Power service grounding electrode system (NEC ...power lines or other electrical circuits.
• Never attempt to install any of the following during lightning activity: a) an antenna system; or b) cables, wires, or any home theater component connected to an antenna or phone system.
Care
For better performance and safer operation of your TOSHIBA TV...
User Manual - Page 5

... instructions in item 35 on page 4.
Service
43)
WARNING:
RISK OF ELECTRIC SHOCK!
Never attempt to service the TV yourself. Opening and removing the covers may expose you to dangerous voltage or other hazards. Failure to follow this WARNING may result in death or serious injury. Refer all servicing not specified in this manual to a Toshiba Authorized Service...
User Manual - Page 7

... not be allowed by the player. (In this case, the TV/ DVD will display a message on-screen.). Some DVDs that have no region code label may still be subject to area restrictions and therefore not playable.
On Video CDs
This TV/DVD supports Video CDs equipped with the Playback Control (PBC) function, version 2.0. You can enjoy two...
User Manual - Page 8

..., such as a ring protector, as this may cause trouble with the operation of the TV/DVD.
Because of problems and errors that can occur during the creation of DVD and CD software and/or the manufacture of DVD and CD discs, Toshiba cannot assure that this TV/DVD will successfully play every disc bearing the DVD...
User Manual - Page 9

...: - THIS PRODUCT EMPLOYS A LASER SYSTEM. - TO ENSURE PROPER USE OF THIS PRODUCT,
PLEASE READ THIS OWNER'S MANUAL CAREFULLY AND RETAIN FOR FUTURE REFERENCE. - SHALL THE UNIT REQUIRE MAINTENANCE, CONTACT AN AUTHORIZED SERVICE CENTER. - USE OF CONTROLS, ADJUSTMENTS OR THE PERFORMANCE OF PROCEDURES OTHER THAN THOSE SPECIFIED HEREIN MAY RESULT IN HAZARDOUS RADIATION EXPOSURE...
User Manual - Page 10

..., Cable TV .18 Connecting a camcorder 18 Connecting a DVD player with ColorStream® (component video 19 Connecting a satellite receiver 19 Connecting an HDMI or DVI device to the HDMI™ input 20 REGZA-LINK® connection 21 Connecting a digital audio system 22 Connecting a personal computer (PC) .........23 Chapter 3: Using the remote control 24 Preparing the remote control for...
User Manual - Page 12

... resolution • Two HDMI™ digital, high-definition multimedia interfaces with 1080p input support ( Page 20). • HDMI capabilities • Lip-Sync feature activates an auto audio/video display timing adjustment function that allows HDMI source devices to accurately perform synchronization automatically. • REGZA-LINK® allows control of external devices from the TV remote...
User Manual - Page 22

... on your device. ( "Selecting the optical audio output format" on Page 41).
6 To save the new settings, highlight Done and
then press . To revert to the factory defaults, highlight Reset and then press .
To control the audio:
1 Turn on the TV and the digital audio device. 2 Press on the remote control and open the
Sound menu.
3 Press or to select Audio Setup and then...
User Manual - Page 24

Chapter 3: Using the remote control
Preparing the remote control for use
The remote control can operate your TV/DVD and control the basic functions of connected audio/ video devices if you connect a REGZA-LINK® compatible audio receiver or playback device ( Page 47).
Installing the remote control batteries
1 Remove the battery cover from the back of the
remote control.
Squeeze tab and lift ...
User Manual - Page 27

... (illustrated below), press on the remote control or MENU on the TV
control panel.
Icon
Item
Page
Picture
Mode
38
Picture Settings
38
Noise Reduction
51
Game Mode
51
Theater Settings
35-37
Sound
Audio Settings
41
Advanced Audio Settings 52
Audio Setup
40-42
Preferences CC and Digital Audio Selectors
40
Base CC Mode
39
Digital CC Settings
39
Input Labeling
33
Channel...
User Manual - Page 28

... location setting window will appear.
For normal home use, press or to select Home and then press .
4 Next, ANT/CABLE In setup window will
appear. Press or to select the input source (Cable or Antenna) for the ANT/CABLE input on the TV.
5 If you select Antenna, the Channel Tuning
Mode setup window will appear. To tune only digital channels, select Digital...
User Manual - Page 29

Chapter 5: Setting up your TV
Programming channels into the TV's channel memory
When you press or on the remote control or TV control panel, your TV will stop only on the channels you programmed into the TV's channel memory.
Follow the steps below to program channels into the TV's channel memory.
Programming channels automatically
Your TV can automatically detect all active channels in your area...
User Manual - Page 30
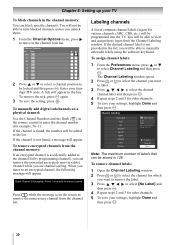
... again.
3 To save the setting, press .
To manually add digital subchannels on a physical channel: Use the Channel Numbers and the Dash ( ) on the remote control to enter the channel number (...TV. You will be able to view and assign these logos from the Channel Labeling window. If the desired channel label is not provided in the list, you will be able to manually enter/edit labels using the software...
User Manual - Page 31

... the deletion confirmation
window and then press .
Setting the HDMITM audio mode
To set the HDMITM audio mode:
1 From the Sound menu, press or to
select Audio Setup and then press .
2 Press or to select HDMI 1 Audio and
then press or to select the HDMI 1 audio mode (Auto is the recommended mode). See "Connecting an HDMI or DVI device to the HDMI™ input"( Page...
User Manual - Page 43
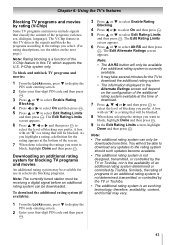
... press .
Note:
• The additional rating system can only be downloaded one time. You will not be able to download any updates to the rating system should such updates become available.
• The additional rating system is not designed, transmitted, or controlled by the TV or Toshiba, nor is the availability of an additional rating system determined...
User Manual - Page 65
.... The technical criteria set forth in this owner's manual are meant only as a guide. Use of CD-RW discs for recording MP3 files is not recommended.
You must obtain any required permission from copyright owners to download or use copyrighted content. Toshiba can not and does not grant such permission.
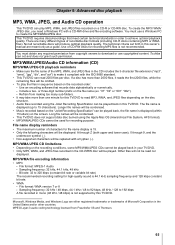
MP3/WMA/JPEG/Audio CD information (CD...
User Manual - Page 83
...definition files, plus the scripts used to control compilation and installation of the executable. However, as a ...Software Foundation may publish revised
and/or new versions of the General Public License from time to time. Such new versions will be similar in spirit to the present version, but may differ in detail to address new problems or concerns.
Each version is given a distinguishing version...