TRENDnet TV-IP344PI driver and firmware
Drivers and firmware downloads for this TRENDnet item
Related TRENDnet TV-IP344PI Manual Pages
Download the free PDF manual for TRENDnet TV-IP344PI and other TRENDnet manuals at ManualOwl.com
Datasheet - Page 1

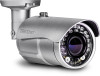
...PoE IR Network Camera
TV-IP344PI (v1.0R)
• 4 MP resolution at 30 fps • Auto-focus / optical zoom • Night vision up to 30 m (100 ft.) • Outdoor IP66 weather rating • Save installation costs with Power over Ethernet (PoE) • Program motion detection recording and email alerts • Digital Wide Dynamic Range image balancing • ONVIF and IPv6 support TRENDnet...
Datasheet - Page 3

... Network an alarm system to Input/Output ports
Audio Support Audio in and out ports for third party microphone and speaker (sold separately)
TV-IP344PI
MicroSD Card Slot Add up to 64 GB memory for on-board video storage
D-WDR Digital Wide Dynamic Range improves video quality in high contrast lighting environments
Motion Detection Create motion detection windows with separate sensitivity settings...
Datasheet - Page 4

... Vista, XP, Windows Server® 2003, 2008
TRENDnetVIEW App • Free iOS™ and Android™ app • View the camera on a mobile device • Take snapshots • Zoom
Certifications • CE • FCC
Warranty • 3 year limited
Package Contents • TV-IP344PI • Quick Installation Guide • CD-ROM (Utility, Software, & User's Guide) • Camera mounting...
Quick Installation Guide - Page 2

Table of Content
1 English
1. Before You Start 2. Hardware Installation and Configuration
Quick Installation Guide - Page 3

... over Ethernet (PoE) devices that follow the IEEE 802.3af standard. Ÿ The TV-IP344PI has a 5.5 mm barrel connector for an optional 12 V DC 1A power adapter. Ÿ Optional power supply not included.
TRENDnetVIEW Pro Requirements
Supported Operating Systems
Windows 10 / Windows 8.1 / Windows 8 / Windows 7 / Windows Server 2008 / Windows Server 2012
1-8 Cameras
CPU
Memory
2 GHz
2 GB RAM...
Quick Installation Guide - Page 4

2. Hardware Installation and Configuration
1. Do not install or mount the IP camera until after you complete the installation steps below. Temporarily place the IP camera next to your computer.
2. Insert the Utility CD-ROM into your CD-ROM drive. 3. Select language from the drop down menu. 4. Click Install Camera.
5. Write down the MAC address of your camera. Then click Next.
Next
2
Quick Installation Guide - Page 7

... network. Click the hyperlink to confirm access to the management page. This will open up a web browser. To resume installation, minimize the web browser and then click Next.
Next 12. Congratulations! Your camera is now ready to be installed in its final location. Scan the QR
code to download a free mobile app to view the camera from your mobile device...
Quick Installation Guide - Page 8

... for more advanced features, please install the TRENDnetVIEW Pro software. Install the software by clicking Install TRENDnetVIEW Pro Software in the Autorun window and refer to the TRENDnetVIEW Pro User's Guide on the CD for more information.
Note Ÿ See User's Guide for advanced management functions Ÿ Two User's Guides are included - one for the camera and one for the complimentary...
Quick Installation Guide - Page 9

14. Install the camera in your desired location. To connect the IP camera to your network with PoE, please use either of the following examples:
Using the TV-IP344PI with a PoE switch (TPE-S50)
TV-IP-344PI
PoE TPE-S50
Internet
Non-PoE
Ÿ Connect the provided network cable from the Power over Ethernet switch (e.g. TPE-S50) to the network port on the IP Camera.
Ÿ...
Quick Installation Guide - Page 11

... camera viewing angle, please refer to the user's guide. 1. Loosen the locking bolts and manually position the camera as...camera wire will be installed through the base plate of the unit, skip to step 6. If the wiring will be routed through the wall, drill a hole for the cable.
5. Pass the camera's cables through the hole.
6. Connect the network cable to the camera. Ensure the camera is not powered...
Quick Installation Guide - Page 15

... inoperable Ÿ If there is damage to the housing of the device
Only operate TRENDnet devices using a mains power supply.
To disconnect devices from the mains supply, remove the device itself or its mains plug from the power outlet. The power outlet and all connected network devices should be easily accessible so that you can pull the mains plug quickly...
Quick Installation Guide - Page 16

... contact our Technical Support. Toll free US/Canada: 1-866-845-3673 Regional phone numbers available at www.trendnet.com/support
TRENDnet 20675 Manhattan Place Torrance, CA 90501 USA
Copyright © 2016. All Rights Reserved. TRENDnet.
Product Warranty Registration Please take a moment to register your product online. Go to TRENDnet's website at: www.trendnet.com/register
TV-IP344PI(V1) /10.07...
Users Guide - Page 2

TRENDnet User's Guide
Contents
Product Overview 1
Package Contents ...1 Features ...1 Product Hardware Features 2
Installation 3
Hardware Installation...3 Camera Installation ...4
Configuration 7
Viewing Camera Basic Function 7 Configuring the Camera Setting 9 SYSTEM ...9 NETWORK ...12 AUDIO/VIDEO SETTING 23 EVENT CONFIGURATION 27 LOGOUT ...33
Accessing the camera with Chrome 34 ...
Users Guide - Page 3

...; TV‐IP344PI Quick Installation Guide CD‐ROM (Utility, Software & User's guide) Network cable (1.5 M/ 5 ft.) RJ‐45 coupler Camera Mounting hardware
© Copyright 2016 TRENDnet. All Rights Reserved.
TV‐IP344PI
Features
TRENDnet's Indoor / Outdoor 4 MP Varifocal PoE IR Network Camera, model TV‐IP344PI, provides powerful...
Users Guide - Page 4

TRENDnet User's Guide
Audio Support Audio in and out ports for third party microphone and speaker (sold separately)
Power Port Save installation costs with Power over Ethernet (IEEE 802.3af)
Micro SD Card Slot Add up to 64 GB memory for on‐board video storage
D‐WDR Digital Wide Dynamic Range improves video quality in high contrast lighting environments
Motion Detection Create motion ...
Users Guide - Page 5

...;spot sound where the camera is installed.
Ethernet/PoE Port: Plugs the network cable to connect to your local area network (LAN). If you are using the PoE, you must have the network cable connect to your PoE switch or PoE Injector.
GPIO Port: Connect external device. Please refer to I/O setting paragraph. It's also used for IP camera reset. Please refer to...
Users Guide - Page 9

...'s Guide is based on the Internet Explorer). In the Address bar, type the IP address you got from "Camera Installation" chapter or found by IP Installer, and then press [Enter].
TV‐IP344PI
After you login into the live screen of the camera, the main page will appear as below:
When the login window appears, enter the User name (admin) and Password...
Users Guide - Page 13
...Tools
TV‐IP344PI
© Copyright 2016 TRENDnet. All Rights Reserved.
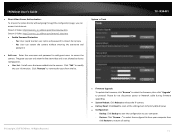
Firmware Upgrade: To update the firmware, click "Browse" to select the firmware, then click "Upgrade" to proceed. Please do not disconnect power or Network cable during firmware upgrading.
System Reboot: Click Reboot to reboot the IP camera. Factory Reset: Click Reset to reset all the settings...
Users Guide - Page 37

... IP address of the camera is 192.168.10.30, do not assign a static IP address of 192.168.10.30 on your computer's network adapter.
b. Open Internet Explorer and enter http://192.168.10.30 into the address bar.
4. I forgot my password. What should I do?
Please follow the steps below to reset to factory default setting a. Remove the power and network cable...
Users Guide - Page 39

TRENDnet User's Guide
Limited Warranty
TRENDnet warrants its products against defects in material and workmanship, under normal use and service, for the following lengths of time from the date of purchase.
TV‐IP344PI - 3 Years Limited Warranty
AC/DC Power Adapter, Cooling Fan, and Power Supply carry 1 year warranty.
If a product does not operate as warranted during the applicable warranty...