TP-Link TL-WR841ND - Wireless N Router Atheros 2T2R 2.4GHz 802.11n 2.0 driver and firmware
Drivers and firmware downloads for this TP-Link item

Related TP-Link TL-WR841ND Manual Pages
Download the free PDF manual for TP-Link TL-WR841ND and other TP-Link manuals at ManualOwl.com
User Guide - Page 7

... 58 4.9.4 Remote Management 59 4.10 Parental Control ...60 4.11 Access Control ...63 4.11.1 Rule ...63 4.11.2 Host ...66 4.11.3 Target...68 4.11.4 Schedule...70 4.12 Advanced Routing ...72 4.12.1 Static Routing 72 4.12.2 System Routing Table 73 4.13 Bandwidth Control ...74 4.13.1 Control Settings 74 4.13.2 Rules List...75 4.14 IP & MAC Binding Setting 76 4.14.1 Binding Settings 76...
User Guide - Page 11

... take TL-WR841ND for example throughout this Guide. The differences between them are: ¾ TL-WR841N Router with 2 fixed antennas. ¾ TL-WR841ND Router with 2 detachable antennas.
1.3 Main Features
¾ Complies with IEEE 802.11n to provide a wireless data rate of up to 300Mbps. ¾ One 10/100M Auto-Negotiation RJ45 WAN port, four 10/100M Auto-Negotiation RJ45 LAN
ports, supporting Auto...
User Guide - Page 16
... Wireless N Router using Quick Setup Wizard within minutes.
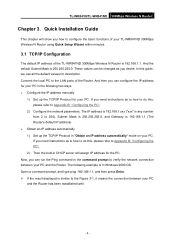
3.1 TCP/IP Configuration
The default IP address of the TL-WR841ND 300Mbps Wireless N Router is 192.168.1.1. And the default Subnet Mask is 255.255.255.0. These values can be changed as you desire. In this guide, we use all the default values for description. Connect the local PC to the LAN ports...
User Guide - Page 18
TL-WR841N/TL-WR841ND 300Mbps Wireless N Router
) Note:
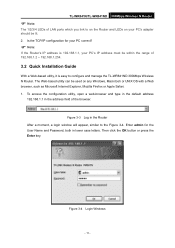
The 1/2/3/4 LEDs of LAN ports which you link to on the Router and LEDs on your PC's adapter should be lit. 2. Is the TCP/IP configuration for your PC correct?
) Note:
If the Router's IP address is 192.168.1.1, your PC's IP address must be within the range of 192.168.1.2 ~ 192.168.1.254.
3.2 Quick Installation Guide
With...
User Guide - Page 91

TL-WR841N/TL-WR841ND 300Mbps Wireless N Router Settings, Diagnostic, Firmware Upgrade, Factory Defaults, Backup & Restore, Reboot, Password, System Log and Statistics. Click any of them, and you will be able to configure the corresponding function. The detailed explanations for each submenu are provided below.
4.16.1 Time Settings
Choose menu "System Tools → Time Settings", you can configure...
User Guide - Page 93

TL-WR841N/TL-WR841ND 300Mbps Wireless N Router
Domain name (such as http://www.tp-link.com). ¾ Pings Count - The number of Ping packets for a Ping connection. ¾ Ping Packet Size - The size of Ping packet. ¾ Ping Timeout - Set the waiting time for the reply of each Ping packet. If there is no reply in
the specified time...
User Guide - Page 94

TL-WR841N/TL-WR841ND 300Mbps Wireless N Router To upgrade the Router's firmware, follow these instructions below: 1. Download a more recent firmware upgrade file from the TP-LINK website
(http://www.tp-link.com). 2. Type the path and file name of the update file into the File field. Or click the Browse button to
locate the update file. 3. Click the Upgrade button.
) Note:
1) New firmware versions ...
User Guide - Page 95
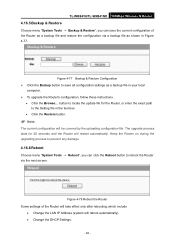
... Configuration ¾ Click the Backup button to save all configuration settings as a backup file in your local
computer. ¾ To upgrade the Router's configuration, follow these instructions.
• Click the Browse... button to locate the update file for the Router, or enter the exact path to the Setting file in the text box.
• Click the Restore button...
User Guide - Page 96

...-WR841N/TL-WR841ND 300Mbps Wireless N Router • Change the Wireless configurations. • Change the Web Management Port. • Upgrade the firmware of the Router (system will reboot automatically). • Restore the Router's settings to factory defaults (system will reboot automatically). • Update the configuration with the file (system will reboot automatically.
4.16.7 Password...
User Guide - Page 106

...-WR841N/TL-WR841ND 300Mbps Wireless N Router
Appendix B: Configuring the PC
In this section, we'll introduce how to install and configure the TCP/IP correctly in Windows XP. First make sure your Ethernet Adapter is working, refer to the adapter's manual if necessary. 1. Configure TCP/IP component
1) On the Windows taskbar, click the Start button, and then click Control Panel. 2) Click the Network...
User Guide - Page 7

4.15.2 Dyndns.org DDNS 78 4.15.3 No-ip.com DDNS 78 4.16 System Tools...79 4.16.1 Time Settings...80 4.16.2 Diagnostic ...81 4.16.3 Firmware Upgrade 82 4.16.4 Factory Defaults 83 4.16.5 Backup & Restore 84 4.16.6 Reboot ...84 4.16.7 Password ...85 4.16.8 System Log...85 4.16.9 Statistics...88 Appendix A: FAQ ...90 Appendix B: Configuring the PC ...95...
User Guide - Page 10

... take TL-WR841ND for example throughout this Guide. The differences between them are: ¾ TL-WR841N Router with 2 fixed antennas. ¾ TL-WR841ND Router with 2 detachable antennas.
1.3 Main Features
¾ Complies with IEEE 802.11n to provide a wireless data rate of up to 300Mbps. ¾ One 10/100M Auto-Negotiation RJ45 WAN port, four 10/100M Auto-Negotiation RJ45 LAN
ports, supporting Auto...
User Guide - Page 15

... your TL-WR841ND Wireless N Router using Quick Setup Wizard within minutes.
3.1 TCP/IP Configuration
The default IP address of the TL-WR841ND Wireless N Router is 192.168.1.1. And the default Subnet Mask is 255.255.255.0. These values can be changed as you desire. In this guide, we use all the default values for description. Connect the local PC to the LAN ports...
User Guide - Page 17

TL-WR841N/TL-WR841ND Wireless N Router The 1/2/3/4 LEDs of LAN ports which you link to on the Router and LEDs on your PC's adapter should be lit. 2. Is the TCP/IP configuration for your PC correct?
) Note:
If the Router's IP address is 192.168.1.1, your PC's IP address must be within the range of 192.168.1.2 ~ 192.168.1.254.
3.2 Quick Installation Guide
With a Web-based...
User Guide - Page 86

TL-WR841N/TL-WR841ND Wireless N Router
Figure 4-69 No-ip.com DDNS Settings To set up for DDNS, follow these instructions: 1. Type the User Name for your DDNS account. 2. Type the Password for your DDNS account. 3. Type the Domain Name you received from dynamic DNS service provider. 4. Click the Login button to log in the DDNS service. Connection Status - The status of...
User Guide - Page 89

...are used for Tracert function.
4.16.3 Firmware Upgrade
Choose menu "System Tools → Firmware Upgrade", you can update the latest version of firmware for the Router on the following screen.
Figure 4-74 Firmware Upgrade ¾ Firmware Version - This displays the current firmware version. ¾ Hardware Version - This displays the current hardware version. The hardware version of the
- 82 -
User Guide - Page 90

TL-WR841N/TL-WR841ND Wireless N Router upgrade file must accord with the Router's current hardware version. To upgrade the Router's firmware, follow these instructions below: 1. Download a more recent firmware upgrade file from the TP-LINK website (www.tp-link.com). 2. Type the path and file name of the update file into the File field. Or click the Browse button to locate the update file. 3. Click...
User Guide - Page 91

... Configuration ¾ Click the Backup button to save all configuration settings as a backup file in your local
computer. ¾ To upgrade the Router's configuration, follow these instructions.
• Click the Browse... button to locate the update file for the Router, or enter the exact path to the Setting file in the text box.
• Click the Restore button...
User Guide - Page 92

TL-WR841N/TL-WR841ND Wireless N Router • Change the Wireless configurations. • Change the Web Management Port. • Upgrade the firmware of the Router (system will reboot automatically). • Restore the Router's settings to factory defaults (system will reboot automatically). • Update the configuration with the file (system will reboot automatically.
4.16.7 Password
Choose...
User Guide - Page 102

.../TL-WR841ND Wireless N Router
Appendix B: Configuring the PC
In this section, we'll introduce how to install and configure the TCP/IP correctly in Windows XP. First make sure your Ethernet Adapter is working, refer to the adapter's manual if necessary. 1. Configure TCP/IP component
1) On the Windows taskbar, click the Start button, and then click Control Panel. 2) Click the Network and Internet...