Sony VPL VW50 - SXRD - Projector driver and firmware
Drivers and firmware downloads for this Sony item

Related Sony VPL VW50 Manual Pages
Download the free PDF manual for Sony VPL VW50 and other Sony manuals at ManualOwl.com
Operating Instructions - Page 2

... any questions about this product, you may call: Sony Customer Information Service Center 1-800-222-7669 or http://www.sony.com/ The number below is for FCC related matters only.
Declaration of Conformity
Trade Name: SONY Model No.: VPL-VW50 Responsible Party: Sony Electronics Inc. Address: 16530 Via Esprillo, San Diego, CA 92127 U.S.A. Telephone Number: 858-942-2230
This device...
Operating Instructions - Page 4
... in Canada This Class B digital apparatus complies with Canadian ICES-003.
Voor de klanten in Nederland
Gooi de batterij niet weg maar lever deze in als klein chemisch afval (KCA).
The socket-outlet should be installed near the equipment and be ... recycling of this product, please contact your local Civic Office, your household waste disposal service or the shop where you purchased the product.
4
Operating Instructions - Page 5

Table of Contents
Precautions 7
Location of Controls
Front/Right Side 8 Rear/Bottom 9 Remote Control 10
Connections and Preparations
Unpacking 11 Step 1: Installing the Projector .........12
Before Setting Up the Projector 12
Positioning the Projector and a screen 14
Step 2: Connecting the Projector .....17 Connecting to a VCR 17 Connecting to a Computer ..........20
Step 3: Adjusting the...
Operating Instructions - Page 6

... and cleaning the Ventilation holes (intake 57 Cleaning the Air Filter 60 Specifications 61
Preset Signals 63 Input Signals and Adjustable/
Setting Items 66 Ceiling Installation 68
When Using the PSS-H10 Projector Suspension Support ......... 68
When Using the PSS-610 Projector Suspension Support ......... 72
Making Fine Adjustments to the Horizontal Picture Position 75 Index 78
6
Operating Instructions - Page 11

...install the projector and screen, how to connect the equipment from which you want to project the picture, etc.
Unpacking
Check the carton to make sure it contains the following items:
• Remote control...you use the projector.
• Operating Instructions (this manual)
• AC power cord (1) • ImageDirector2 CD-ROM (1)
Inserting the batteries into the remote control
Insert the ...
Operating Instructions - Page 12

Step 1: Installing the Projector
The projector displays pictures output from a VCR or other device. The lens shift allows you to have broader options for placing the projector and viewing pictures easily.
Before Setting Up the Projector
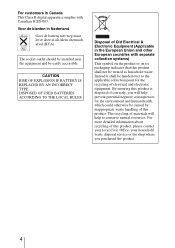
Unsuitable installation Do not place the projector in the following situations, which may cause malfunction or damage to the projector.
Poorly ventilated location...
Operating Instructions - Page 13
... and reducing the reliability of the effects of the lamp.
When installing the unit at altitudes When using the projector at an altitude of 1,500 m or higher, set "Cooling Setting" in the Setup
menu to "High" (1 page 47). Failing to set this mode when using the projector at high altitudes could have adverse effects, such as reducing...
Operating Instructions - Page 14

... in the gray areas in the illustration. Use the values a, b and c in the table on page 15 as a guide.
Ceiling installation
Center of the screen
c
c
Center of projector's lens
a
b
Floor installation
a: Minimum projection distance between the screen and the center of the projector's lens
b: Maximum projection distance between the screen and the center of the...
Operating Instructions - Page 15

... 7/8) (527 5/8) (633 5/8)
c
324 485 647 809 971 1213 1456 1618 2022 2426
(12 7/8) (19 1/8) (25 1/2) (31 7/8) (38 1/4) (47 7/8) (57 3/8) (63 3/4) (79 5/8) (95 5/8)
To calculate the installation measurements (SS: Screen Size) a (minimum) = 31.5 (1 1/4) × SS - 48.2 (1 15/16) b (maximum) = 53.8 (2 1/8) × SS - 46.9 (1 7/8) c = 8.0876 (11/32) × SS
When using the 4:3 aspect...
Operating Instructions - Page 21

Step 3: Adjusting the Picture Position
Project an image on the screen and then adjust the picture position.
1 ON/STANDBY indicator
Connections and Preparations
Remote control detector
4
LIGHT
INPUT
DYNAMIC STANDARD CINEMA PICTURE MODE
USER 1 USER 2 USER 3
2
5,6,7
ENTER
LENS
ADJ PIC
MENU
Tip The ?/1 (ON/STANDBY), INPUT, LENS, MENU, and M/m/
Operating Instructions - Page 22

...projector. The ON/STANDBY indicator flashes in green, and then lights in green. When the ON/STANDBY indicator flashes, "Starting..." appears on the screen.
3 Turn on the equipment
connected to the projector. Refer to the operating instructions...When "Auto Input Search" is set to "On" in the Function menu, the input terminal with effective signals is automatically displayed by pressing INPUT. (1 page...
Operating Instructions - Page 23

... Horizontal Picture Position" on page 75.
ENTER
LENS
ADJ PIC
MENU
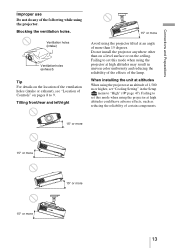
6 Adjust the picture size.
Press the LENS button repeatedly until the Lens Zoom adjustment window (test pattern) appears. Then adjust the size of the picture by pressing the M/m/
Operating Instructions - Page 24
Tip
When "Lens Control" is set to "Off" on the Installation menu, you cannot adjust the picture size and the focus. (1 page 50) When "Test Pattern" is set to "Off" on the Function menu, the test pattern is not displayed. (1 page 49)
ENTER
LENS
ADJ PIC
MENU
7 Adjust the focus.
Press the LENS button repeatedly until...
Operating Instructions - Page 33

...taste by selecting the adjustment items with the remote control. The adjusted data can be stored in ...remote control to adjust the brightness.
1 Press ADJ PIC.
Each time you press the button, the following adjustment windows* are displayed in sequence.
* Some of the above adjustment windows will not be displayed depending on the input signal. For details, see "Input Signals and Adjustable/Setting...
Operating Instructions - Page 35

... 3
ENTER
LENS
ADJ PIC
MENU
WIDE MODE
RCP
RESET
REAL COLOR PROCESSING
BRIGHT CONTRAST
2, 3, 4, 5 1
1 Press RCP on the remote
control.
2 Press M/m to select "User 1,"
"User 2" or "User 3," then press ,. The RCP (Real Color Processing) window appears.
3 Select the target color you want
to adjust.
Repeat steps 1 and 2 described below to specify the target...
Operating Instructions - Page 36

2 Press M/m to select "Position" or "Range," and specify it more delicate color and color range you want to adjust using
Operating Instructions - Page 37

... the menus.
Operation through the Menus
The projector is equipped with an on-screen menu for making various adjustments and settings. Some of the adjustable/setting items are displayed in a pop-up menu, in a setting menu or adjustment menu with no main menu, or in the next menu window. If you select an item name followed...
Operating Instructions - Page 38

LENS
ADJ PIC
MENU
WIDE MODE
RCP
RESET
REAL COLOR PROCESSING
1 Press MENU.
The menu window appears.
2 Press M/m to select a menu item,
and press , or ENTER.
ENTER
The items that can be set or adjusted
with the selected menu appear. The
item presently selected is shown in
yellow.
38
Operating Instructions - Page 39

Using the Menus
ENTER
Pop-up menu Setting items
3 Press M/m to select an item you
want to set or adjust and press , or ENTER.
The setting items are displayed in a pop-up menu, in a setting menu, in an adjustment menu or in the next menu window.
Setting menu
Adjustment menu Next menu window
Setting items
39
Operating Instructions - Page 45
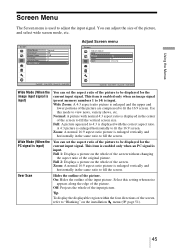
... Scan
Hides the outline of the picture. On: Hides the outline of the input picture. Select this setting when noise
appears along the edge of the picture. Off: Projects the whole of the input picture.
Tip
To display the displayable region within the four directions of the screen, refer to "Blanking" on the installation menu...