Sony TA-E1000ESD driver and firmware

Related Sony TA-E1000ESD Manual Pages
Download the free PDF manual for Sony TA-E1000ESD and other Sony manuals at ManualOwl.com
Limited Warranty (U.S. Only) - Page 1

...Hifi Components/Tape Decks
®
CD Players/Mini Disc Players/Audio Systems
LIMITED WARRANTY
Hifi Audio
ES Products
Sony Electronics Inc. ("Sony") warrants this Product (including any accessories)... equal degree of protection, to any authorized Sony service facility.
This warranty does not cover customer instruction, installation, set up adjustments or signal reception problems.
This warranty...
Primary User Manual - Page 2
... the manufacturer's instructions, may cause interference to radio and television reception. It has been type tested and found to comply with the limits for a Class B computing device in accordance with the specifications In Subpart J of Part 15 of FCC Rules, which are designed to provide reasonable protection against such interference in a residential installation. However, there...
Primary User Manual - Page 3
... effects
30
Table of adjustable parameters
30
5
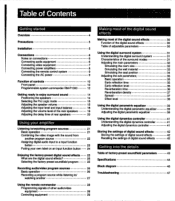
Connections Notes on connections Connecting audio equipment Connecting video equipment Connecting power amplifiers Connecting the remote control system Connecting the AC power
Using the digital surround system
31
6
Understanding the digital surround system
31
6
Characteristics of the surround modes
31
6
Adjusting the main parameters...
Primary User Manual - Page 5

...unit.
On cleaning the cabinet Clean the cabinet, panel and controls with a soft cloth slightly moistened with mild detergent solution....panels To detach the side panels, first disconnect the power cord from the wall outlet. Remove the screws on...leaflet.
If you have any question or problem concerning your unit, please consult your nearest Sony dealer.
Installation
Installing the Unit
Place the unit ...
Primary User Manual - Page 10
...;1
• I=
• I=
6
00
I
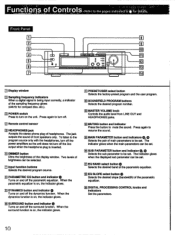
El Display window
El Sampling frequency indicators When a digital signal is being input correctly, a indicator of the sampling frequency glows (44kHz for compact disc, etc.).
El POWER switch Press to turn on the unit. Press again to turn off.
M Remote control sensor
El HEADPHONES jack Accepts the stereo phone plug of headphones. The jack...
Primary User Manual - Page 11
... button
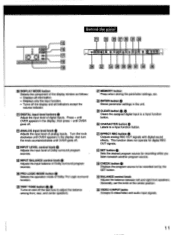
Outputs analog REC OUT signals with digital sound effects. This function does not operate for digital REC OUT signals.
D SET button
Sets the desired program source for recording while you listen to/watch another program source.
g CHECK button
Displays the program source to be recorded set by the SET button.
E BALANCE control knob
Adjusts the balance between left and...
Primary User Manual - Page 12
...of conros
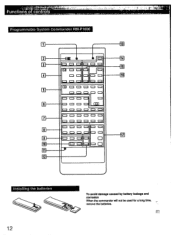
Programmable System Commander FM-P1000
[91
0 0 0 0 0 0 ....f._
a
DJ 0 0 0
0
- 0000 0
16
00000 o
03 0 0 0 0 0
0 0 0 0 0
0 0 0 0
0
0 CI 0 0_ Oil ,
0 0 0 0 0 ol
t ooooo
o o o o =1
.1= 0 0 0 0 0
a =a a o =
o o o a
0
lo ol o La
......9
Installing the batteries
12
To avoid damage caused by battery leakage and corrosion
When the commander will not be used for a long time...
Primary User Manual - Page 14
... toSni4 Surroln Sound-
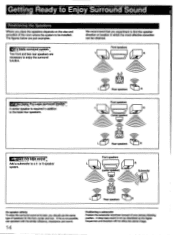
Positioning the Speakers
Where you place the speakers depends on the size and acoustics of the room where the system to be installed. The figures below are just examples.
lior a-biiiie surround systein Two front and two rear speakers are necessary to enjoy the surround function.
We recommend...
Primary User Manual - Page 18
... appears in the display.
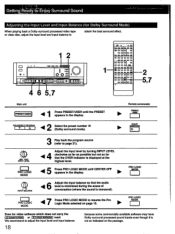
SOUNDFIELD PROGRAM
42 Select the preset number 10 (Dolby surround mode).
Remote commander
►
...display.
6
41
Adjust the input balance so that the audio level is minimized during the scene of conversation (where the sound is monaural).
7 Press PRO LOGIC MODE to resume the Pro Logic Mode selected on page 15.
PRO LOGIC MODE
PRO LOGIC MODE
Even for video software...
Primary User Manual - Page 19
...Ijo oa=ca
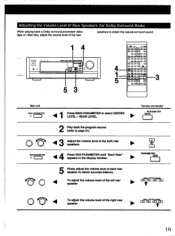
Main unit
MAIN PARAMETER 0
1 Press MAIN PARAMETER to select CENTER LEVEL - REAR LEVEL.
00.
Remote commander
MAINPARAMETER
2 Play back the program source (refer to page 21).
0 VI
3 Adjust the volume level of....
SUB PARAMETER 0
44 Press SUB PARAMETER until "Each Rear" appears in the display window.
PARAMETER
OS"
SUB
5 Finely adjust the volume level of each rear speaker to...
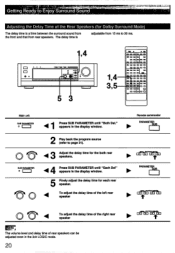
Primary User Manual - Page 20
...O CI
O O
O CI O O
0
OOO= 0
Main unit
SUB PARAMETER
0 MEM
1 Press SUB PARAMETER until "Both Del." appears in the display window.
2 Play back the program source (refer to page 21).
ArmEY 43 Adjust the delay time for the both rear speakers.
SUB PARAMETER
0
4 Press ...display window.
5 Finely adjust the delay time for each rear speaker.
To adjust the delay time of the left rear speaker
Remote...
Primary User Manual - Page 21
...off.
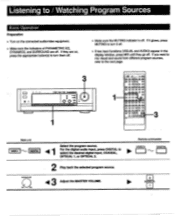
• If two input functions (VISUAL and AUDIO) appear in the display window, press MIX until they go off. If you ...ti
DIGITAL
MASTER VOLUIOE
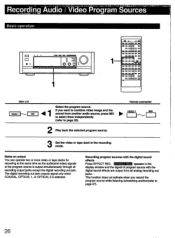
1 Select the program source. For the digital audio input, press DIGITAL to select the desired digital input, COAXIAL, OPTICAL 1, or OPTICAL 2.
2 Play back the selected program source.
3 Adjust the MASTER VOLUME.
Remote commander
VIDEO1
DIGITAL
is...
Primary User Manual - Page 23
...0 0 0
ci 0 0 0
0 0 0 0
O
o 0 0 0
ao
0 o o
0 0 I= 0
O = O
-2
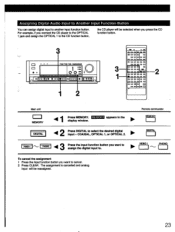
Main unit MEMORY
Press MEMORY. MEMORY appears in the No.
display window.
Remote commander MEMORY
DIGITAL 1
42
Press DIGITAL to select the desired digital poi, input - COAXIAL, OPTICAL 1, or OPTICAL 2.
DIGITAL
VIDEO 1
PHONO
3 Press the input function button you want to assign the digital input to.
io* VIDE01
PHONO
"-Ns ,
To...
Primary User Manual - Page 24

... Press CHARACTER. The name of input function set appears in the display window.
2 Create a name. You might want to label three of video function buttons as VHS, Beta, and 8mm, for example.
To select a letter or number
Remote commander
To move the cursor
MEMORY
3 Press MEMORY. MEMORY appears in the display window.
VIDEO 1
MONO
44
Select the input function...
Primary User Manual - Page 25
... Sound Effects
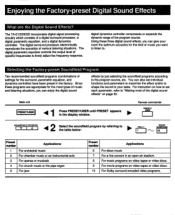
What are the Digital Sound Effects?
The TA-E1000ESD incorporates digital signal processing circuitry which consists of a digital surround processor, a digital parametric equalizer, and a digital dynamics controller. The digital surround processor electronically reproduces the acoustics of various listening situations. The digital parametric equalizer controls the output level of...
Primary User Manual - Page 26
... same time as the audio(and video) signals of the program source is output simultaneously through all recording output jacks except the digital recording out jack. The digital recording out jack outputs signal only when COAXIAL, OPTICAL 1, or OPTICAL 2 is selected.
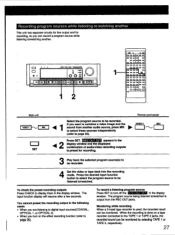
Recording program sources with the digital sound effects Press EFFECT REC. EFFECT REC appears in the display window and the signal...
Primary User Manual - Page 27
... in the following cases • When you are listening to digital input sources(COAXIAL,
OPTICAL 1, or OPTICAL 2). • When you turn on the effect recording function (refer to
page 26).
To record a listening program source Press SET to turn off the REC OUT SET in the display window. The program source being listened to/watched is output from the...
Primary User Manual - Page 30
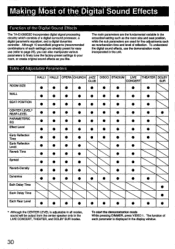
... of the Digital Sound Effects
The TA-E1000ESD incorporates digital signal processing circuitry which consists of a digital surround processor, a digital parametric equalizer, and a digital dynamics controller. Although 10 soundfield programs (recommended combinations of each settings) are already... pressing DIMMER, press VIDEO 1. The function of each parameter is displayed in the display window.
30
Primary User Manual - Page 39
...Digital Parametric Equalizer
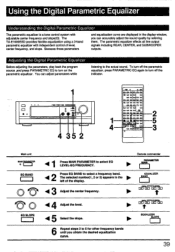
The parametric equalizer is a tone control system with adjustable center frequency and slope(Q). The TA-E1000ESD provides flexible equalization using a 3-band parametric equalizer with independent control of level, center frequency, and slope. Because those parameters
and equalization curve are displayed in the display window...of the display.
Remote commander ...
Primary User Manual - Page 40
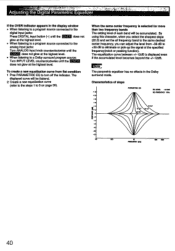
... izer
• r 14.t: . ..
:
If the OVER indicator appears in the display window • When listening to a program source connected to the
digital input jacks: Press DIGITAL input button (-) until the OVER does not glow at the highest level. • When... using this character, when you select the sharpest slope (20.0) and set the all frequency band to the same desired center frequency, you can...