Sony DSCF717 - RMDR1 Wired Remote Control driver and firmware
Drivers and firmware downloads for this Sony item


Related Sony DSCF717 Manual Pages
Download the free PDF manual for Sony DSCF717 and other Sony manuals at ManualOwl.com
Operating Instructions - Page 2

... maintenance (servicing) instructions in the literature accompanying the appliance.
2
CAUTION The use of optical instruments with this product will increase eye hazard. Use of controls or adjustments or performance of procedures other than those specified herein may result in hazardous radiation exposure.
If you have any questions about this product, you may call:
Sony Customer Information...
Operating Instructions - Page 4

... IS SUBJECT TO THE FOLLOWING TWO CONDITIONS: (1) THIS DEVICE MAY NOT CAUSE HARMFUL INTERFERENCE, AND (2) THIS DEVICE MUST ACCEPT ANY INTERFERENCE RECEIVED, INCLUDING INTERFERENCE THAT MAY CAUSE UNDESIRED OPERATION. THIS CLASS B DIGITAL APPARATUS COMPLIES WITH CANADIAN ICES-003.
Before using your camera
Trial recording Before you record one-time events, you may want to make a trial...
Operating Instructions - Page 5

...8226; "MagicGate" and
are
trademarks of Sony Corporation.
• "InfoLITHIUM" is a trademark of Sony
Corporation.
• Microsoft and Windows are registered
trademarks of the U.S. Microsoft Corporation
in the United States and other countries.
• Macintosh, Mac OS, QuickTime, iBook and
Power Mac are trademarks or registered
trademarks of Apple Computer, Inc.
• Pentium is...
Operating Instructions - Page 7

... images on your computer
Copying images to your computer - For Windows users 81
Copying images to your computer - For Macintosh users 90
Troubleshooting
Troubleshooting 92 Warnings and messages 101 Self-diagnosis display 103
Additional information
Number of images that can be saved or shooting time 104
Menu items 106 SET UP items 110 Precautions 113 On "Memory Stick 114...
Operating Instructions - Page 11

...camera when charging the battery pack (page 15).
• Your camera operates only with the "InfoLITHIUM" NP-FM50 battery pack (M series) (supplied) (page 115).
2
b mark
, Install the battery pack, then close the battery/"Memory... up.
3
AC power adaptor
, Open the jack cover and connect the AC-L10A/L10B AC power adaptor (supplied) to the DC IN jack of your camera.
Connect the plug with...
Operating Instructions - Page 21

...will be recorded in the "Memory Stick".
• When operating the camera using a battery pack, if you do not operate the camera for about three minutes during recording or playback, the camera turns off... glass, such as
a window. • A fast-moving subject. • The subject reflects or has a lustrous
finish, such as a mirror or a luminous body. • A flashing subject.
Checking the last ...
Operating Instructions - Page 61

...'s Manual for your e-mail software.
• For the number of images you can record in E-mail mode, see page 104.
Shooting still images with audio files
- Voice Mode dial: / /S/A/M/SCN
In Voice mode, an audio track is also recorded at the same time as recording a normal still image.
MENU
Mode dial Shutter
Advanced still image shooting
Control button
a Set...
Operating Instructions - Page 69

... press z.
• You cannot rotate protected images and images recorded as movies (MPEG MOVIE), Clip Motion and Multi Burst images.
• You may not be able to rotate images shot with other cameras.
• When viewing images on a computer, the image rotation information may not be reflected depending on the application software.
Control button
69
Operating Instructions - Page 81

... not recover at the same time.
When a USB connector is not provided on your computer
When neither a USB connector nor a "Memory Stick" slot is provided, you can copy images using an additional device. See the Sony Website for details. http://www.sony.net/
Contents of the CD-ROM
x USB Driver This driver is needed in order to connect the camera to a computer. • When using Windows...
Operating Instructions - Page 82
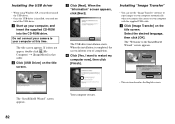
Installing the USB driver
• When using Windows XP, you need not install the USB driver.
• Once the USB driver is installed, you need not install the USB driver.
a Start up your computer, and insert the supplied CD-ROM into the CD-ROM drive.
Do not connect your camera to your computer at this time.
The title screen appears. If it does not appear, double-click (My Computer) t [ImageMixer...
Operating Instructions - Page 83

... checked on the "Image Transfer Settings" screen, then click [Next].
The "InstallShield Wizard" screen closes.
• The USB driver is needed in order to use "Image Transfer". If the necessary driver is not already installed on your computer, a screen that asks if you want to install the driver will appear. Follow the instructions that appear on the screen.
Enjoying...
Operating Instructions - Page 84

....0a or a later version is not installed in your computer, the "Information" screen appears. Follow the procedure on the screen.
d Remove the CD-ROM.
Connecting your camera to your computer
a Insert the "Memory Stick" with the images you want to copy into the camera.
b Turn on your camera and computer. Set [USB CONNECT] to [NORMAL] in the SET UP settings. The factory setting is [NORMAL].
c Open...
Operating Instructions - Page 86

... return to the standard settings, click [Restore
defaults].
Copying images without using "Image Transfer"
- Windows 98/98SE/2000/Me
If you do not set to launch "Image Transfer" automatically, you can copy images as following procedure.
a Double-click [My Computer], then double-click [Removable Disk].
The contents of the "Memory Stick" inserted in your camera appear. • This section...
Operating Instructions - Page 87
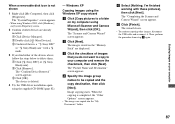
... The device is deleted.
4 Try the USB driver installation again using the supplied CD-ROM (page 82).
- Windows XP
Copying images using the Windows XP copy wizard
a Click [Copy pictures to a folder on my computer using Microsoft Scanner and Camera Wizard], then click [OK].
The "Scanner and Camera Wizard" screen appears.
b Click [Next]. The images stored on the "Memory Stick" are displayed.
c Click...
Operating Instructions - Page 88

... ImageMixer for Sony" software to view and edit images on your computer. For details, see the software's help files.
b Double-click the desired folder and image file. The image is displayed.
Image file storage destinations and file names
Image files recorded with your camera are grouped as folders in the "Memory Stick" by recording modes.
Example: For Windows Me users
Folder...
Operating Instructions - Page 90

... the steps below, according to your OS.
OS
Mac OS 8.5.1/8.6/9.0
Mac OS 9.1/9.2/Mac OS X (v10.0/v10.1)
Steps Steps 1 to 4 Steps 2 to 4
a Installing the USB driver
1 Turn on your computer, and set the supplied CD-ROM into the CD-ROM drive. The "PIXELA ImageMixer for Sony" screen appears.
2 Double-click (Setup Menu). 3 Click (USB Driver).
The "USB Driver" screen appears. 4 Double-click the icon of...
Operating Instructions - Page 91

... to the "Trash" icon, then remove the USB cable or "Memory Stick" or turn off the power.
* If you are using Mac OS X, remove the USB cable, etc., after you have turned your computer off.
c Copying images
1 Double-click the newly recognized icon on the desktop. The contents of the "Memory Stick" inserted in your camera appear.
2 Double-click "DCIM." 3 Double-click...
Operating Instructions - Page 98

... are not using the supplied USB cable. • The USB cable is not connected firmly.
• [USB CONNECT] is set to [PTP] in the SET UP settings (except Windows XP and Mac OS X).
• The USB connectors on your computer are connected to other equipment besides the keyboard, the mouse, and your camera.
• The USB driver is not installed. • The camera is not correctly connected...
Operating Instructions - Page 99

... when you set the supplied CD-ROM in your computer.
• The computer display is not set correctly.
Solution p Copy the file to the hard disk of your computer and then play
back the file from the hard disk (pages 85, 86 and 91).
p Check the printer settings. p Click on the HELP for the "PIXELA ImageMixer for Sony"
application software. p Set the computer display as follows:
Windows: 800...
Operating Instructions - Page 122

...storage destinations 88 image quality 32 image size 19, 32, 104, 106
"InfoLITHIUM" battery pack 115 Installation
Image Transfer 82 ImageMixer 84 USB driver 82 ISO 107
J
Jog dial 43 JPEG 20, 89
L
LCD screen 112
M
Manual exposure mode 45 Memory Stick
formatting a "Memory Stick 40 inserting a "Memory Stick 18 number of shooting images/time ........ 32, 104 Menu settings...your computer 88...