MSI P6NGM driver and firmware


Related MSI P6NGM Manual Pages
Download the free PDF manual for MSI P6NGM and other MSI manuals at ManualOwl.com
User Guide - Page 2
... be obtained from the user's manual, please contact your place of purchase or local distributor. Alternatively, please try the following help resources for further guidance.
Visit the MSI website for FAQ, technical guide, BIOS updates, driver updates, and other information: http://global.msi.com.tw/index.php? func=faqIndex Contact our technical staff at: http://support.msi.com.tw/
ii
User Guide - Page 4
...
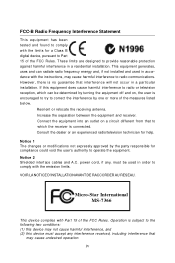
T h is eq uip men t h as been tested and found to comply with the limits for a Class B digital device, pursuant to Part 15 of the FCC Rules. These limits are designed to provide reasonable protection against harmful interference in a residential installation. This equipment generates, uses and can radiate radio frequency energy and, if not...
User Guide - Page 8
... Standard CMOS Features 3-6 Advanced BIOS Features 3-9 Integrated Peripherals 3-11 Power Management Setup 3-13 PNP/PCI Configurations 3-15 H/W Monitor ...3-17 Frequency/Voltage Control 3-18 Load Fail-Safe/ Optimized Defaults 3-21 BIOS Setting Password 3-22 Appendix A Realtek ALC888 Audio A-1 Installing the Realtek HD Audio Driver A-2 Software Configuration A-4 Hardware Setup A-19
viii
User Guide - Page 9
Appendix B nVidia RAID B-1 Introduction ...B-2 RAID Configuration B-3 Installing Driver ...B-7 NVIDIA IDE Drive/ RAID Utility Installation B-9 Using the NVMediaShield Software B-12
Appendix C Dual Core Center C-1 Activating Dual Core Center C-2 Main ...C-3 DOT (Dynamic OverClocking C-5 Clock ...C-6 Voltage ...C-7 FAN Speed ...C-8 Temperature ...C-9 User Profile ...C-10
ix
User Guide - Page 15
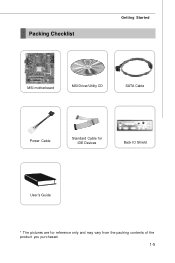
Packing Checklist
Getting Started
MSI motherboard
MSI Driver/Utility CD
SATA Cable
Power Cable
Standard Cable for IDE Devices
Back IO Shield
User's Guide
* The pictures are for reference only and may vary from the packing contents of the product you purchased.
1-5
User Guide - Page 16
Chapter 2
Hardware Setup
This chapter tells you how to install the CPU, memory modules, and expansion cards, as well as how to setup the jumpers on the mainboard. Also, it provides the instructions on connecting the peripheral devices, such as the mouse, keyboard, etc. W hile doing the installation, be careful in holding the components and follow the installation procedures.
User Guide - Page 18
Hardware Setup
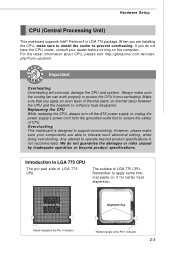
CPU (Central Processing Unit)
This mainboard supports Intel® Pentium 4 in LGA 775 package. When you are installing the CPU, make sure to install the cooler to prevent overheating. If you do not have the CPU cooler, consult your dealer before turning on the computer. For the latest information about CPU, please visit http://global.msi.com.tw/index...
User Guide - Page 19

... to protect the contact from damage. Before you install the CPU, always cover it to protect the socket pin.
2. Remove the cap from lever hinge side (as the arrow shows).
3. The pins of socket reveal.
4. Open the load lever.
Important
1. Confirm if your CPU cooler is firmly installed before turning on your system. 2. Do not...
User Guide - Page 21

MS-7366 Mainboard
9. Press down the load lever lightly onto the load plate, and then secure the lever with the hook under ...mainboard to confirm that the clip-ends are correctly inserted.
locking switch
Important
1. Read the CPU status in BIOS (Chapter 3). 2. Whenever CPU is not installed, always protect your CPU socket pin with the
plastic cap covered (shown in Figure 1) to avoid damaging. 3. ...
User Guide - Page 59
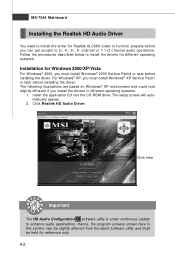
... environment and could look slightly different if you install the drivers in different operating systems.
1. Insert the application CD into the CD-ROM drive. The setup screen will automatically appear.
2. Click Realtek HD Audio Driver.
Click here
Important
The HD Audio Configuration software utility is under continuous update
to enhance audio applications. Hence, the program screens shown here...
User Guide - Page 60
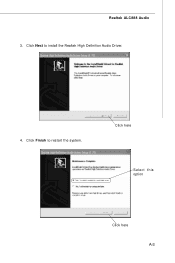
Realtek ALC888 Audio 3. Click Next to install the Realtek High Definition Audio Driver.
4. Click Finish to restart the system.
Click here
Select this option
Click here A-3
User Guide - Page 61

MS-7366 Mainboard
Software Configuration
After installing the audio driver, you are able to use the 2-, 4-, 6- or 8- channel audio feature now. Click the audio icon from the system tray at the lower-right corner of the screen to activate the HD Audio Configuration. It is also available to enable the audio driver by clicking the Realtek HD Audio M anager from the Control Panel.
Double click
a
A-4
User Guide - Page 79
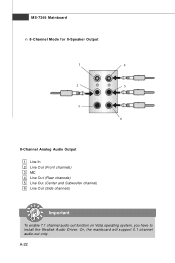
... 8-Speaker Output
1
4
2
5
3 6
8-Channel Analog Audio Output
1 Line In 2 Line Out (Front channels) 3 MIC 4 Line Out (Rear channels) 5 Line Out (Center and Subwoofer channel) 6 Line Out (Side channels)
Important
To enable 7.1 channel audio-out function on Vista operating system, you have to install the Realtek Audio Driver. Or, the mainboard will support 5.1 channel audio-out only.
a
A-22
User Guide - Page 82
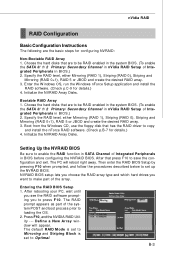
... BIOS. (To enable the SATA 0/ 1/ 2 Primary/ Secondary Channel in nVidia RAID Setup of Integrated Peripherals in BIOS.) 2. Specify the RAID level, either Mirroring (RAID 1), Striping (RAID 0), Striping and Mirroring (RAID 0+1), RAID 5 or JBOD and create the desired RAID array. 3. Boot from the W indows CD, use the floppy disk that has the RAID driver to copy
and install the nForce RAID software...
User Guide - Page 85
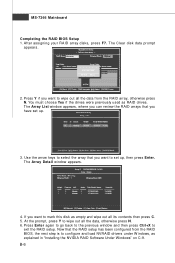
..., press Y to wipe out all the data, otherwise press N. 6. Press Enter again to go back to the previous window and then press Ctrl+X to
exit the RAID setup. Now that the RAID setup has been configured from the RAID BIOS, the next step is to configure and load NVRAID drivers under W indows, as explained in "Installing the NVIDIA RAID Software Under Windows" on C-9. B-6
User Guide - Page 86
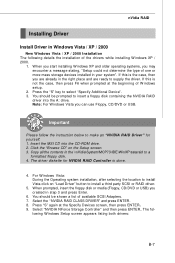
... CD-ROM drive. 2. Click the "Browse CD" on the Setup screen. 3. Copy all the contents in the \\nVidia\System\MCP73\IDE\WinXP\sataraid to a
formatted floppy disk. 4. The driver diskette for NVIDIA RAID Controller is done.
4. For W indows Vista: During the Operating system installation, after selecting the location to install Vista click on "Load Driver" button to install a third party SCSI or RAID...
User Guide - Page 87
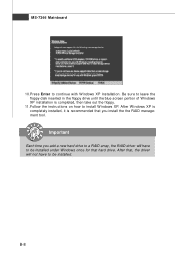
... disk inserted in the floppy drive until the blue screen portion of Windows XP installation is completed, then take out the floppy.
11. Follow the instructions on how to install W indows XP. After W indows XP is completely installed, it is recommended that you install the the RAID management tool.
Important
Each time you add a new hard drive to a RAID array, the RAID driver...
User Guide - Page 88
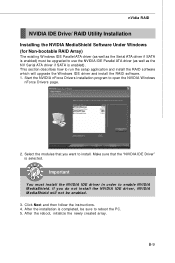
... existing W indows IDE Parallel ATA driver (as well as the Serial ATA driver if SATA is enabled) must be upgraded to use the NVIDIA IDE Parallel ATA driver (as well as the NV Serial ATA driver if SATA is enabled). This section describes how to run the setup application and install the RAID software which will upgrade the W indows IDE driver and install the RAID software. 1. Start the NVIDIA nForce...
User Guide - Page 98
... status of MSI Mainboard & MSI Graphics card in windows, such as CPU/GPU clock, voltage, fan speed and temperature. Before you install the Dual CoreCenter, please make sure the system has meet the following requirements: 1. Intel Pentium4 / Celeron, AMD Athlon XP/ Sempron or
compatible CPU with PCI Express slot. 2. 256MB system memory. 3. CD-ROM drive for software installation. 4. Operation system...
User Guide - Page 100
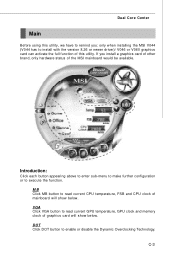
...installing the MSI V044 (V044 has to install with the version 8.26 or newer driver)/ V046 or V060 graphics card can activate the full function of this utility. If you install a graphics card of other brand, only hardware status of the MSI...CPU temperature, FSB and CPU clock of mainboard will show below. VGA Click VGA button to read current GPU temperature, GPU clock and memory clock of graphics card...