LG 34UC89G-B driver and firmware

Related LG 34UC89G-B Manual Pages
Download the free PDF manual for LG 34UC89G-B and other LG manuals at ManualOwl.com
Owners Manual - Page 2
... AV Devices 22 HDMI Connection
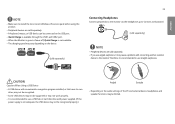
--Connecting Peripherals 22 USB Cable connection Connecting Headphones
--Service only port 24
USER SETTINGS 25
--Activating the Main Menu 25 Main Menu Features
--User Settings 27 Menu Settings Game Mode Game Adjust Picture Adjust Input General
TROUBLESHOOTING 37
PRODUCT SPECIFICATION....... 40
--Factory Support Mode 42 --G-SYNC Monitor 42 --Power LED...
Owners Manual - Page 4
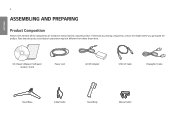
... components, contact the retailer where you purchased the product. Note that the product and related components may look different from those shown here.
CD (Owner's Manual / Software / Guides) / Cards
Power cord
AC/DC Adapter
USB 3.0 Cable
DisplayPort Cable
Stand Base
Cable Holder
Stand Body
Mouse Holder
Owners Manual - Page 5
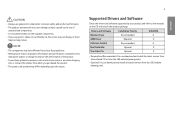
... drivers and software supported by your product and refer to the manuals on the CD enclosed in the product package.
Drivers and Software Monitor Driver ASM Driver
Installation Priority Recommended Required Recommended Optional Optional
34UC89G O X O X X
•• Required and Recommended: You can download and install the latest version from the enclosed CD or from the LGE website (www.lg...
Owners Manual - Page 10
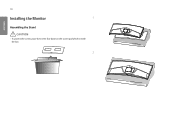
ENGLISH
10
Installing the Monitor
1
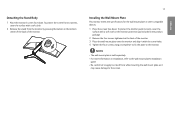
Assembling the Stand
CAUTION
•• To protect the screen, place the screen face down on the screen pad which is inside the box.
2
Owners Manual - Page 12
ENGLISH
12
NOTE
•• Press the stand until the button reaches the top.
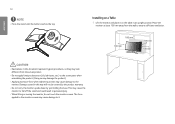
Installing on a Table
1 Lift the monitor and place it on the table in an upright position. Place the monitor at least 100 mm away from the ...
Owners Manual - Page 13
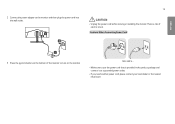
2 Connect the power adapter to the monitor and then plug the power cord into the wall outlet.
13
CAUTION
•• Unplug the power cord before moving or installing the monitor. There is risk of electric shock. Cautions When Connecting Power Cord
ENGLISH
3 Press the joystick button on the bottom of the monitor to turn on the...
Owners Manual - Page 16

... is located at the bottom of the monitor. For more information on installation and usage, refer to the Kensington lock owner's manual or visit the website at http://www.kensington.com. Connect the monitor to a table using the Kensington security system cable.
Cable Holder
NOTE
•• The Kensington security system is optional. You...
Owners Manual - Page 17
... of the back of the monitor.
17
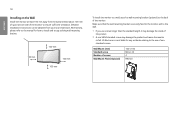
Installing the Wall Mount Plate
This monitor meets the specifications for the wall mount plate or other compatible devices. 1 Place the screen face down. To...wall mount plate is sold separately. •• For more information on installation, refer to the wall mount plate's installation
guide. •• Be careful not to apply too much force while mounting ...
Owners Manual - Page 18
... to ensure sufficient ventilation. Detailed installation instructions can be obtained from your local retail store. Alternatively, please refer to the manual for how to install and set up a tilting wall mounting bracket... A non-VESA standard screw may damage the product and cause the monitor to fall. LG Electronics is not liable for any accidents relating to the use of nonstandard screws.
Wall ...
Owners Manual - Page 19
... specified by VESA standards. •• The wall mount kit includes the installation guide and all necessary parts. •• The wall mounting bracket is optional....please refer to the user manual for the wall mounting
bracket.
CAUTION
•• Unplug the power cord before moving or installing the monitor to avoid electric shock.
•• Installing the monitor on the ...
Owners Manual - Page 20
...
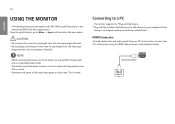
•• This monitor supports the *Plug and Play feature. * Plug and Play: A feature that allows you to add a device to your computer without
having to reconfigure anything or install any manual drivers.
HDMI Connection
Transmits digital video and audio signals from your PC to the monitor. Connect your PC to the monitor using the HDMI cable as shown in the...
Owners Manual - Page 23
...;• Make sure to install the most recent Windows OS service pack before using the product.
•• Peripheral devices are sold separately. •• A keyboard, mouse, or USB device can be connected to the USB port. •• Quick Charge is available through the USB1 and USB2 port. •• When the Monitor is gone to Power off, Quick Charge...
Owners Manual - Page 37
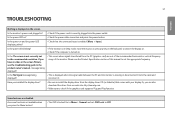
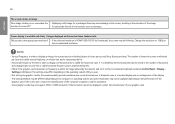
... or disconnected. Check the cable and reconnect it.
Have you installed the display driver?
•• Be sure to install the display driver from the display driver CD (or diskette) that comes with your display. Or, you can also download the driver from our web site: http://www.lg.com.
•• Make sure to check if the graphics card supports Plug and Play function...
Owners Manual - Page 38
...) resolution Control Panel > Display > Settings in Windows. (The settings may differ depending on the operating system (OS) you use.)
•• Not setting the graphics card to the recommended (optimal) resolution may result in blurred text, a dimmed screen, a truncated display area or misalignment of the display. •• The setting methods may be different depending on the computer...
Owners Manual - Page 39
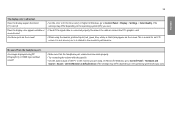
... HDMI input without sound?
•• Make sure that the headphone port connections are made properly. •• Try increasing the volume with the joystick. •• Set the audio output of the PC to the monitor you are using. On Microsoft Windows, go to Control Panel > Hardware and
Sound > Sound > set the Monitor as default device. (The settings...
Owners Manual - Page 42
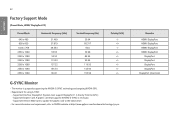
...the GPU.) -- Supported Graphic Card: A graphic card that supports NVIDIA's G-SYNC is necessary. -- Supported Version: Make sure to update the graphic card to the latest driver. •• For more information and requirement, refer to NVIDIA website at http://www.geforce.com/hardware/technology/g-sync.
Remarks
HDMI/ DisplayPort HDMI/ DisplayPort HDMI/ DisplayPort HDMI/ DisplayPort
DisplayPort...