Intel D201GLY - Desktop Board Motherboard driver and firmware
Drivers and firmware downloads for this Intel item


Related Intel D201GLY Manual Pages
Download the free PDF manual for Intel D201GLY and other Intel manuals at ManualOwl.com
Product Guide - Page 2

Revision History
Revision Revision History
-001
First release of the Intel® Desktop Board D201GLY Product Guide
Date March 2007
If an FCC declaration of conformity marking is present on the board, the following statement applies:
FCC Declaration of Conformity
This device complies with Part 15 of the FCC Rules. Operation is subject to the following two conditions...
Product Guide - Page 3

... supported without further evaluation by Intel.
Document Organization
The chapters in this Product Guide are arranged as follows: 1 Desktop Board Features: a summary of product features 2 Installing and Replacing Desktop Board Components: instructions on how to install
the Desktop Board and other hardware components 3 Updating the BIOS: a description of how to update the BIOS A BIOS Error Messages...
Product Guide - Page 4

... (one billion hertz)
KB
Kilobyte (1024 bytes)
MB
Megabyte (1,048,576 bytes)
Mbit
Megabit (1,048,576 bits)
MHz
Megahertz (one million hertz)
Box Contents
• Intel Desktop Board • I/O shield • One ATA-66/100 cable • Quick Reference Guide • Configuration and safety labels • Intel® Express Installer driver CD-ROM
iv
Product Guide - Page 5
...10 Desktop Board Components 11 Processor ...13 Main Memory ...13 Chipset ...14 Graphics Subsystem 14 Audio Subsystem 14 Input/Output (I/O) Controller 15 LAN Subsystem 15
LAN Subsystem Software 16 RJ-45 LAN Connector LEDs 16 Hi-Speed USB 2.0 Support 17 Enhanced IDE Interface 17 Expandability...17 BIOS ...17 IDE Auto Configuration 17 PCI Auto Configuration 18 Security Passwords 18 Power...
Product Guide - Page 6

Intel Desktop Board D201GLY Product Guide
Setting the Desktop Board Jumpers 34 Front Panel Audio Header/Jumper Block 34 BIOS Configuration Jumper 35 Clearing Passwords 36
Replacing the Battery 37
3 Updating the BIOS
Updating the BIOS with the Iflash Memory Update Utility 43 Obtaining the BIOS Update File 43 Updating the BIOS with the Iflash Memory Update Utility 43 Recovering the BIOS 44
...
Product Guide - Page 7

...Summary 9 2. Desktop Boards D201GLY Components 12 3. RJ-45 10/100 Ethernet LAN Connector LEDs 16 4. Front Panel Audio Header Signal Names 30 5. Hi-Speed USB 2.0 Header Signal Names 31 6. Front Panel Header Signal Names 31 7. Front Panel Audio Header/Jumper Block 35 8. Jumper Settings for the BIOS Setup Program Modes 35 9. Front-panel Power LED Blink Codes 45 10. BIOS Error Messages 45 11...
Product Guide - Page 10

Intel Desktop Board D201GLY Product Guide Related Links:
For more information about Desktop Board D201GLY, including the Technical Product Specification (TPS), BIOS updates, and device drivers, go to: http://support.intel.com/support/motherboards/desktop/
Supported Operating Systems
The Desktop Board supports the following operating systems: • Microsoft Windows* XP Professional • ...
Product Guide - Page 12

... 2) Main power connector (2 x 10) Processor DDR 2 DIMM connector IDE connector Front panel header Battery BIOS configuration jumper
Related Links:
Go to the following links for more information about:
• Desktop Board D201GLY
• Audio software and utilities • LAN software and drivers
http://www.intel.com/design/motherbd http://support.intel.com/support/motherboards/desktop http...
Product Guide - Page 13

... customer upgradeable.
Main Memory
NOTE
To be fully compliant with all applicable Intel® SDRAM memory specifications, the board should be populated with DIMMs that support the Serial Presence Detect (SPD) data structure. If your memory modules do not support SPD, you will see a notification to this effect on the screen at power up. The BIOS will attempt to configure the memory controller...
Product Guide - Page 15

... to power headphones or amplified speakers only. Poor audio quality occurs if passive (non-amplified) speakers are connected to this output.
Related Links: Go to the following link or pages for more information about: • Audio drivers and utilities http://support.intel.com/support/motherboards/desktop/ • Installing a front panel audio solution (page 30)
Input/Output (I/O) Controller
The...
Product Guide - Page 16

... Software
For LAN software and drivers, refer to the D201GLY link on Intel's World Wide Web site at: http://support.intel.com/support/motherboards/desktop
RJ-45 LAN Connector LEDs
Two LEDs are built into the RJ-45 LAN connector located on the back panel (see Figure 3).
Figure 3. LAN Connector LEDs
Table 3 describes the LED states when the board is powered up and the 10/100 Ethernet LAN...
Product Guide - Page 17

... the processor and peripheral devices such as hard disks and optical drives inside the computer. The interface supports: • Up to two IDE devices (such as hard drives) • ATAPI-style devices (such as CD-ROM or DVD drives) • Older PIO Mode devices • Ultra DMA-33/66/100 modes
Expandability
The Desktop Board supports one PCI add-in card.
BIOS
The BIOS provides the Power-On...
Product Guide - Page 18

Intel Desktop Board D201GLY Product Guide
PCI Auto Configuration
If you install a PCI add-in card in your computer, the PCI auto-configuration utility in the BIOS automatically detects and configures the resources (IRQs, DMA channels, and I/O space) for that add-in card. You do not need to run the BIOS Setup program after you install a PCI add-in card.
Security Passwords
The BIOS includes security...
Product Guide - Page 21

... Components
This chapter tells you how to: • Install the I/O shield • Install and remove the Desktop Board • Install and remove memory • Connect the IDE cable • Connect internal headers • Connect chassis fan and power supply cables • Set the BIOS configuration and audio jumpers • Clear passwords • Replace the battery
Before You Begin
CAUTIONS...
Product Guide - Page 22

... Desktop Board D201GLY Product Guide
Installation Precautions
When you install and test the Intel Desktop Board, observe all warnings and cautions in the installation instructions. To avoid injury, be careful of: • Sharp pins on connectors or headers • Sharp pins on printed circuit assemblies • Rough edges and sharp corners on the chassis • Hot components (like processors...
Product Guide - Page 23
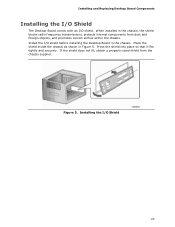
... the chassis, the shield blocks radio frequency transmissions, protects internal components from dust and foreign objects, and promotes correct airflow within the chassis. Install the I/O shield before installing the Desktop Board in the chassis. Place the shield inside the chassis as shown in Figure 5. Press the shield into place so that it fits tightly...
Product Guide - Page 24

... Desktop Board D201GLY Product Guide
Installing and Removing the Desktop Board
CAUTION
Only qualified technical personnel should do this procedure. Disconnect the computer from its power source before performing the procedures described here. Failure to disconnect the power before you open the computer can result in personal injury or equipment damage. Refer to your chassis manual for instructions...
Product Guide - Page 25

... and Replacing Desktop Board Components
Installing and Removing Memory
NOTE
To be fully compliant with all applicable Intel SDRAM memory specifications, the boards require DIMMs that support the Serial Presence Detect (SPD) data structure. You can access the PC Serial Presence Detect Specification at: http://www.intel.com/technology/memory/ddr/specs/dda18c32_64_128x72ag_a.pdf The Desktop Board has...
Product Guide - Page 26

Intel Desktop Board D201GLY Product Guide 1. Observe the precautions in "Before You Begin" on page 21. 2. Turn off all peripheral devices connected to the computer. Turn off the computer and disconnect the AC power cord. 3. Remove the computer's cover and locate the DIMM socket (see Figure 8).
Figure 8. Installing a DIMM 4. Make sure the clips at either end of the DIMM socket are pushed...
Product Guide - Page 35

... of the Desktop Board's BIOS configuration jumper block.
Table 8. Jumper Settings for the BIOS Setup Program Modes
Jumper Setting
Mode Normal (default) (1-2)
Description
The BIOS uses the current configuration and passwords for booting.
Configure (2-3)
After the Power-On Self-Test (POST) runs, the BIOS displays the Maintenance Menu. Use this menu to clear passwords.
Recovery (None)
The...