HP Indigo 30000 driver and firmware
Drivers and firmware downloads for this Hewlett-Packard item

Related HP Indigo 30000 Manual Pages
Download the free PDF manual for HP Indigo 30000 and other HP manuals at ManualOwl.com
CA493-00130 Rev - Page 8
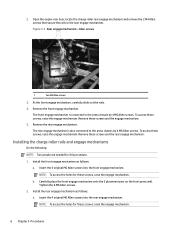
... screws, raise the engage mechanism.
b. Carefully place the front engage mechanism onto the 2 placement pins on the front press wall. Tighten the 4 M6 Allen screws.
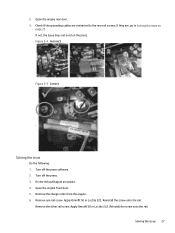
2. Install the rear engage mechanism as follows:
a. Insert the 4 original M6 Allen screws into the rear engage mechanism.
NOTE: To access the holes for these screws...
CA493-00130 Rev - Page 9
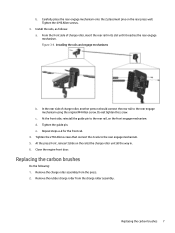
..., insert the rear rail in its slot until it reaches the rear engage mechanism. Figure 3-4 Installing the rails and engage mechanisms
b. In the rear side of charge roller, another person should connect... not tighten this screw.
c. At the front side, reinstall the guide pin to the rear rail, on the front engage mechanism. d. Tighten the guide pin. e. Repeat steps a-d for the front rail. 4. Tighten the...
CA493-00130 Rev - Page 11

6. Insert the new carbon brush into position. Figure 3-8 Carbon brush
7. Install the carbon brush cap. 8. Repeat the above procedure for the second carbon brush. 9. Reinstall the rubber charge roller from the charge roller assembly. 10. Reinstall ...
CA493-00130 Rev - Page 14
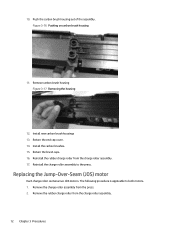
... assembly. Figure 3-16 Pushing on carbon brush housing
11. Remove carbon brush housing Figure 3-17 Removing the housing
12. Install new carbon brush housings 13. Return the end cap cover. 14. Install the carbon brushes. 15. Return the brush caps. 16. Reinstall the rubber charge roller from the charge roller assembly. 17...
CA493-00130 Rev - Page 23
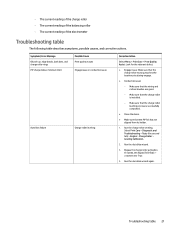
...table describes symptoms, possible causes, and corrective actions.
Symptom / Error Message
Oil pick-up, edge bands, dark dots, and ... carbon brushes are good.
- Make sure that the charge roller is installed.
- Make sure that the charge roller leveling process is successfully completed.... Systab, set BypassTableTopic > crJosActive to True.
4. Run the Auto Bias wizard again.
Troubleshooting table 21
CA493-00130 Rev - Page 24

...Error Message Charge roller leveling failure
Failure of the JOS leveling, edge bands, bouncing, OPU, or poor print quality (dark side at front or rear)
Possible Cause
Corrective Action
Calibration failure due to software...set IO_SDV_PSS_JOS_FORCE:
- Active = -1
- Disable = 0
● After the force calibration, you do not need to manually ...the PIP foil is correctly installed. Make sure that the ...
CA493-00130 Rev - Page 28

Charge roller not secured properly
The charge roller rear guide rails may not be secured correctly. Due to a mistake, the charge roller grounding cables were installed on the rear rail screws. These screws are too short to accommodate the grounding cables. Some possible symptoms are: ● There is a print quality issue from the charge roller...
CA493-00130 Rev - Page 29
.... 3. Check if the grounding cables are connected to the rear rail screws. If they are, go to Solving the issue on
page 27. If not, the issue does not exist on the press. Figure 5-4 Incorrect
Figure 5-5 Correct
Solving the issue
Do the following: 1. Turn off the press software. 2. Turn off the press...
CA493-00130 Rev - Page 30
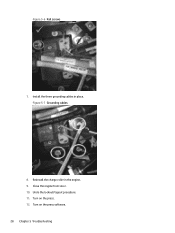
Figure 5-6 Rail screws
7. Install the three grounding cables in place. Figure 5-7 Grounding cables
8. Reinstall the charge roller in the engine. 9. Close the engine front door. 10. Undo the lockout/tagout procedure. 11. Turn on the press. 12. Turn on the press software. 28 Chapter 5 Troubleshooting
Color Pyramid - Press Baseline and Maintenance -- CA493-02110Document P/N: Rev 02Revision number: - Page 2

... Overview ...1 Prerequisites ...1 Estimated installation time ...1 Special jigs and tools ...1
2 Procedures ...2 Press baseline...2 Verifying site conditions ...2 Verifying print quality...2 Color calibration...3 Defining and calibrating an unknown substrate ...3
Appendix A Revision history and confidentiality notice ...7 Revision history...7 Printing instructions...7 Confidentiality notice...7
ii
Color Pyramid - Press Baseline and Maintenance -- CA493-02110Document P/N: Rev 02Revision number: - Page 3
... known and unknown substrate types. This is part of the color pyramid calibration process.
Prerequisites
It lists the prerequisites ● Press software version I42 or later ● High gloss, known substrate
Estimated installation time
4 hours
Special jigs and tools
Special jigs and tools are listed below. ● X-Rite densitometer, defined to work on...
Color Pyramid - Press Baseline and Maintenance -- CA493-02110Document P/N: Rev 02Revision number: - Page 8

3. In the New Calibration Substrate with automatic OD window that appears, do the following:
a. In the Assign Drawer tab, in the Substrate dropdown list, select... the solids on the new unknown substrate with the calibrated values from
the previous step. c. Sets the OD target for all inks for the unknown substrate. d. Sets the gloss level based on the OD of the black result. e. In the next color ...
Standard Operating Procedure for Indigo 30000 Digital PressUser Guide - Page 2
... laws.
The only warranties for HP products and services are set forth in the express warranty statements accompanying such products and services. Nothing herein should be construed as constituting an additional warranty. HP shall not be liable for technical or editorial errors or omissions contained herein.
HP, HP Indigo Press, HP Indigo Press RIP, and HP ElectroInk are trademarks or registered...
Standard Operating Procedure for Indigo 30000 Digital PressUser Guide - Page 5

... (ILP) a. Clean the substrate path and the sensors. b. Verify that the ILP rollers are clean. If not, check that the chamber blades and seals are
installed correctly. c. Clean the chamber catch tray, including the small funnel between that tray and the large
priming drawer catch tray. d. Visually check the level of...