Gigabyte GV-N95TD3-512H driver and firmware
Drivers and firmware downloads for this Gigabyte item


Related Gigabyte GV-N95TD3-512H Manual Pages
Download the free PDF manual for Gigabyte GV-N95TD3-512H and other Gigabyte manuals at ManualOwl.com
Manual - Page 1

GV-N95TD3-512H/512E GV-N95TOC-1GH/512H GV-N95T-512H
NVIDIA® GeForceTM 9500 GT Graphics Accelerator
User's Manual
Rev. 103 12MM-N95TO2H-103R
Copyright © 2008 GIGABYTE TECHNOLOGY CO., LTD Copyright by GIGA-BYTE TECHNOLOGY CO., LTD. ("GBT"). No part of this manual may be reproduced or transmitted in any form without the expressed, written permission of GBT. Trademarks...
Manual - Page 4

... 5
2. Hardware Installation 6 2.1. Board Layout ...6 2.2. Hardware Installation ...8
3. Software Installation 13 3.1. Windows® XP Driver and Utilities Installation 13
3.1.1. Operating System Requirements 13 3.1.2. DirectX Installation ...14 3.1.3. Driver Installation ...15 3.1.4. GIGABYTE Gamer HUD Lite on Driver CD 17 3.1.5. Taskbar Icon ...19 3.1.6. Display Properties Pages 20...
Manual - Page 5
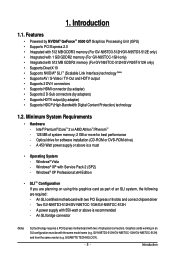
... - Windows® Vista - Windows® XP with Service Pack 2 (SP2) - Windows® XP Professional x64 Edition
• SLI TM Configuration If you are planning on using this graphics card as part of an SLI system, the following are required: - An SLI certified motherboard with two PCI Express x16 slots and correct chipset driver - Two GV-N95TD3-512H/GV-N95TOC-1GH/GV-N95TOC-512H - A power supply...
Manual - Page 10

... into the coaxial S/PDIF out jack on your motheboard.
B-1. Connect the GIGABYTE video adapter to the TVOut port on the graphics card
B-2.Connect the SPDIF coaxial cable (optional) to the video adapter and motherboard
You are now ready to proceed with the installation of the graphics card driver. Please refer to next chapter for detailed instructions.
GV-N95T Series Graphics Accelerator
- 10 -
Manual - Page 13

3. Software Installation
In this manual, we assume that your CD-ROM drive letter to be Drive D: The installation of drivers is very simple. When you insert the driver CD into your CD-ROM drive, you can see the autorun window (if it does not show up, run "D:\setup.exe"). Then you can follow the instructions to setup your graphics card driver. (Please follow the subsection "3.1.3 Driver Installation...
Manual - Page 14

... DirectX to enable 3D hardware acceleration support for Windows XP to achieve better 3D performance.
For software MPEG support in Windows XP, you must install DirectX first. Users who run Windows XP with Service Pack 2 or above do not need to install DirectX separately.
Step 1. When the autorun window shows up, click the Install DirectX 9 item.
Step 2. Choose I accept the agreement...
Manual - Page 15

...-step installation instructions. Step 1: Found New Hardware Wizard: Video Controller (VGA Compatible)
Click the Next button to install the driver. (Insert the driver CD-ROM that came with your graphics card.)
Or click the Cancel button to install the driver from the autorun window. Step 2: Found New Hardware Wizard: Searching and Installing The wizard will search for the driver and install it...
Manual - Page 16

... Window) Insert the driver CD-ROM into your CD-ROM drive. The autorun window will appear. If it does not show up, please run "D:\setup.exe".
Step 1. When the autorun window shows up, click the Install Display Driver item.
Step 2. Click the Next button.
The system is installing the components.
Step 3. Click the Finish button to restart the computer. Then the driver installation is completed.
GV...
Manual - Page 17

... on Driver CD
Insert the driver CD-ROM into your CD-ROM drive. The autorun window will appear. If it does not show up, please run "D:\setup.exe". (If D is not your CD-ROM drive, substitute D with the correct drive letter.)
Step 2. Choose the language for the installation and click the OK button.
Step 1. When autorun window shows up, click the GIGABYTE Gamer...
Manual - Page 19

3.1.5. Taskbar Icon
After installing the graphics card driver, you will find an NVIDIA icon in your system tray. Click this icon to open the control panel.
Right click the NVIDIA icon to enter the NVIDIA Control Center.
You can adjust the properties of the graphics card here.
- 19 -
Software Installation
Manual - Page 21

... for you. Standard Settings Advanced Settings The following pages provide details on configuring advanced settings.
In the NVIDIA Control Panel, select a category to alter specific NVIDIA display settings. The categories are: 3D Settings Display Video & Television
In the NVIDIA Control Panel, change a view if you want. The supported modes are: ...
Manual - Page 23

...; Manage custom resolutions (Note 1) • Run multiple display wizard (Note 2) • Set up multiple displays
Run Display Optimization Wizard This wizard helps you adjust your displays for optimal viewing and repersentation of colors.
(Note 1) This item is present only in Advanced view mode. (Note 2) This item will show up when you connect two monitors.
- 23 -
Software Installation
Manual - Page 25

... card in order to support a variety of different display timings for ultimate flexibility for analog CRT and DVI connections. You can use the advanced Change Resolution Attributes page to view custom display modes you have saved in the Create Custom Resolutions page.
Run Multiple Display Wizard (Note 2) This wizard will help you enable and customize your multi-display setup...
Manual - Page 27

... function as one virtual desktop. Unlike Horizontal Span or Vertical Span mode, Dualview treats each display as a separate device. This means that the taskbar will not be stretched across displays and 3D applications are not accelerated as efficiently as when the application spans displays.
Display Matrix
Model CRT+TV CRT+DVI DVI+TV DVI+TV+CRT DVI +DVI CRT+CRT
GV-N95TD3-512H/512E Yes Yes Yes...
Manual - Page 29

... to the corresponding color. (Y= Green, Pr= Red, Pb= Blue). Connect the TV Out cable from the adapter to the TV Out port on your graphics card.
Step 2: Go to NVIDIA Control Panel. Select the Run television setup wizard (Note) item in the Video & Television page.
Step 3: When the Television Setup Wizard appears, click Next.
Step 4: Select Component in the Connector Type screen...
Manual - Page 31

...card. With nView you can set up multiple desktops to work with your applications. Multiple desktops give you extra desktop areas on which to run your applications so you won't have to crowd several open application windows on one desktop.
Enabling the nView Desktop... page, you can click the NVIDIA icon nView Properties under nView Desktop Manager.
in your system tray and select
Click the item to ...
Manual - Page 32

...tab contains information about the nView Desktop Manager. The Setup Wizard can also be accessed from this tab.
nView Profiles properties
This tab contains a record of all nView display settings for easy software setup.
nView Windows properties
This tab allows you to control window and dialog box placement when using multiple monitors.
GV-N95T Series Graphics Accelerator
- 32...
Manual - Page 33

nView Applications properties This tab allows you to control nView settings depending on different applications.
nView Desktops properties This tab allows you to create up to 32 unique desktops.
nView User Interface properties This tab allows for customization of the nView user interface.
- 33 -
Software Installation
Manual - Page 35

nView Mouse properties
This tab can modify and extend mouse behavior with kinematic actions.
nView Tools properties
This tab can improve nView functionality for mobile and desktop users.
- 35 -
Software Installation
Manual - Page 36

... power. If necessary, disable any built-in graphics capabilities on your motherboard. For more
information, consult your computer's manual or manufacturer. (NOTE: Some manufacturers do not allow the built-in graphics to be disabled or to become the secondary display.) Make sure you selected the appropriate display device and graphics card when you install the graphics driver...