Gigabyte GA-Q77M-D2H driver and firmware
Drivers and firmware downloads for this Gigabyte item


Related Gigabyte GA-Q77M-D2H Manual Pages
Download the free PDF manual for Gigabyte GA-Q77M-D2H and other Gigabyte manuals at ManualOwl.com
User Guide - Page 1
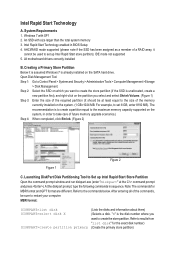
... memory 3. Intel Rapid Start Technology enabled in BIOS Setup 4. AHCI/RAID mode supported (please note if the SSD has been assigned as a member of a RAID array, it
cannot be used to set up Intel Rapid Start store partition); IDE mode not supported 5. All motherboard drivers correctly installed
B. Creating a Primary Store Partition Below it is assumed Windows 7 is already installed on the SATA...
User Guide - Page 2
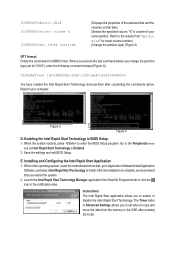
... restarts, press to enter the BIOS Setup program. Go to the Peripherals menu
and set Intel Rapid Start Technology to Enabled. 2. Save the settings and exit BIOS Setup.
E. Installing and Configuring the Intel Rapid Start Application 1. While in the operating system, insert the motherboard driver disk, go to Application Software\Install Application
Software, and select Intel Rapid Start Technology...
User Guide - Page 3
... is waked up.
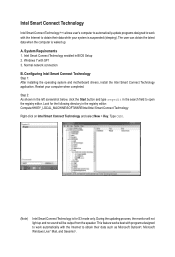
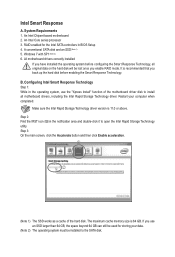
A. System Requirements 1. Intel Smart Connect Technology enabled in BIOS Setup 2. Windows 7 with SP1 3. Normal network connection
B. Configuring Intel Smart Connect Technology Step 1: After installing the operating system and motherboard drivers, install the Intel Smart Connect Technology application. Restart your computer when completed.
Step 2: As shown in the left screenshot below...
User Guide - Page 4
... computer when completed.
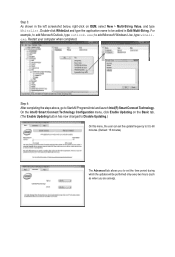
Step 4: After completing the steps above, go to Start\All Programs\Intel and launch Intel(R) Smart Connect Technology. On the Intel® Smart Connect Technology Configuration menu, click Enable Updating on the Basic tab. (The Enable Updating button has now changed to Disable Updating.)
On this menu, the user can set the update...
User Guide - Page 5
Intel Smart Response
A. System Requirements 1. An Intel Chipset-based motherboard 2. An Intel Core series processor 3. RAID enabled for the Intel SATA controllers in BIOS Setup 4. A conventional SATA disk and an SSD (Note 1) 5. Windows 7 with SP1 (Note 2) 6. All motherboard drivers correctly installed
If you have installed the operating system before configuring the Smart Response Technology, all ...
User Guide - Page 6

... SSD to be used if more than one SSD is installed.
Select the size allocated for the cache memory (maximum 64 GB).
Select the acceleration mode: •• Enhanced mode
(default) •• Maximized mode
Select the disk or volume to accelerate (system disk recommended).
• Enhanced mode (default) In this mode, data is...
Manual - Page 3

...carefully read the User's Manual. „„ For product-related information, check on our website at: http://www.gigabyte.com
Identifying Your Motherboard Revision The revision number on your motherboard looks like this: "REV: X.X." For example, "REV: 1.0" means the revision of the motherboard is 1.0. Check your motherboard revision before updating motherboard BIOS, drivers, or when looking for...
Manual - Page 4

Table of Contents
GA-Q77M-D2H Motherboard Layout 5 GA-Q77M-D2H Motherboard Block Diagram 6
Chapter 1 Hardware Installation 7 1-1 Installation Precautions 7 1-2 Product Specifications 8 1-3 Installing the CPU 11 1-4 Installing the Memory 12 1-5 Installing an Expansion Card 12 1-6 Back Panel Connectors 13 1-7 Internal Connectors 15
Chapter 2 BIOS Setup 24 2-1 Startup Screen 24 2-2 The ...
Manual - Page 5

... R_USB USB30_LAN
F_USB30 LPT
AUDIO Intel GbE LAN
BAT
CPU_FAN
PCIEX16
GA-Q77M-D2H
PCIEX1
PCI
CODEC
PCIEX4
Intel® Q77
BIOS SATA3 01
SATA2
23 45
F_AUDIO DEBUG_PORT
F_USB1
F_PANEL
SPDIF_O
F_USB2
CLR_CMOS
COMA COMB
iTE Super I/O
TPM IC (Note)
Box Contents GA-Q77M-D2H motherboard Motherboard driver disk User's Manual
Two SATA cables I/O Shield
The box contents...
Manual - Page 7

... a motherboard, CPU or memory. If you do not have an ESD wrist strap, keep your hands dry and first touch a metal object to eliminate static electricity. •• Prior to installing the motherboard, please have it on top of an antistatic pad or within an electrostatic shielding container. •• Before unplugging the power supply cable from...
Manual - Page 8

... Support for DDR3 1600/1333/1066 MHz memory modules Support for non-ECC memory modules (Go to GIGABYTE's website for the latest supported memory speeds and memory modules.) Integrated Graphics Processor: - 1 x D-Sub port - 1 x DVI-D port, supporting a maximum resolution of 1920x1200
* The DVI-D port does not support D-Sub connection by adapter. - 1 x HDMI port, supporting a maximum resolution...
Manual - Page 10

... fan speed control function is supported will depend on the CPU/system cooler you install.
1 x 64 Mbit flash Use of licensed AMI EFI BIOS PnP 1.0a, DMI 2.0, SM BIOS 2.6, ACPI 2.0a Support for @BIOS Support for Xpress Install Support for Xpress Recovery2 Support for eXtreme Hard Drive (X.H.D) Support for Auto Green Support for ON/OFF Charge Support for Q-Share Support for EZ Setup Support for Smart...
Manual - Page 13

... default sound playback device to HDMI. (The item name may differ depending on your operating system. The screenshot below is from Windows 7.)
In Windows 7, select Start>Control Panel>Hardware and Sound>Sound>Playback, set Intel(R) Display Audio to the default playback device.
(Note)
The DVI-D port does not support D-Sub connection by adapter. •• When removing the cable connected to...
Manual - Page 14

...: D-Sub, DVI-D, HDMI, and DisplayPort. Dual monitor confgurations are supported in operating system environment only, but not during the BIOS Setup or POST process. USB 2.0/1.1 Port
The USB port supports the USB 2.0/1.1 specification. Use this port for USB devices such as a USB keyboard/mouse, USB printer, USB flash drive and etc.
RJ-45 LAN Port
The Gigabit Ethernet LAN port provides Internet...
Manual - Page 24

... the power is turned on. To upgrade the BIOS, use either the GIGABYTE Q-Flash or @BIOS utility. •• Q-Flash allows the user to quickly and easily upgrade or back up BIOS without entering the operating system. •• @BIOS is a Windows-based utility that searches and downloads the latest version of BIOS from the Internet
and updates the BIOS.
•• Because BIOS flashing...
Manual - Page 34

... partitioning such as Windows 7 64-bit, select the optical drive that contains the Windows 7 64-bit installation disk and is prefixed with "UEFI:" string.
&& Hard Drive/CD/DVD ROM Drive/Floppy Drive/Network Device BBS Priorities Specifies the boot order for a specific device type, such as hard drives, optical drives, floppy disk drives, and devices that support Boot from LAN function, etc. Press...
Manual - Page 35

... make changes to certain BIOS settings but not all.
To cancel the password, press on the password item and when requested for the password, enter the correct one first. When prompted for a new password, press without entering any password. Press again when prompted to confirm.
(Note)
This item is present only when you install a CPU that supports this feature. For...
Manual - Page 37

... the storage driver to enable advanced
Serial ATA features such as Native Command Queuing and hot plug.
RAID Enables RAID for the SATA controller.
&& xHCI Pre-Boot Driver
Enabled The USB 3.0 ports are routed to the xHCI controller before booting to OS. (Default)
Disabled The USB 3.0 ports are routed to the EHCI controller before booting to OS.
When this item is set to Enabled...
Manual - Page 39

... isolating assigned memory through this hardwarebased protection, it allows the system to protect data in each virtual partition from unauthorized access from software in another partition. (Default: Disabled) `` PCH-FW Configuration
This section provides information on the firmware of the Intel Management Engine (Intel ME) and allows you to enable/disable the firmware update function...
Manual - Page 45

... the optical drive and execute the Run.exe program.)
3-1 Installing Chipset Drivers
After inserting the driver disk, "Xpress Install" will automatically scan your system and then list all the drivers that are recommended to install. You can click the Install All button and "Xpress Install" will install all the recommended drivers. Or click Install Single Items to manually select the drivers you...