Gigabyte GA-N680SLI-DQ6 driver and firmware
Drivers and firmware downloads for this Gigabyte item


Related Gigabyte GA-N680SLI-DQ6 Manual Pages
Download the free PDF manual for Gigabyte GA-N680SLI-DQ6 and other Gigabyte manuals at ManualOwl.com
Manual - Page 5

...61 3-1 Install Chipset Drivers 61 3-2 SoftwareApplications 62 3-3 Driver CD Information 62 3-4 Hardware Information 63 3-5 Contact Us ...63
Chapter 4 Appendix 65 4-1 Unique Software Utilities 65
4-1-1 EasyTune 5 Introduction 65 4-1-2 Xpress Recovery2 Introduction 66 4-1-3 Flash BIOS Method Introduction 68 4-1-4 Configuring SATA Hard Drive(s 75 A. nVIDIA® nForce 680i SLI Southbridge...
Manual - Page 12

... to 150 MHz
- Adjustable CPU, DDRII frequencies
Form Factor
Š ATX form factor; 30.5cm x 24.4cm
(Note 1) To use a DDR II 800/667 memory module on the motherboard, you must install a 1333/1066/ 800 MHz FSB processor.
(Note 2) EasyTune functions may vary depending on different motherboards. (Note 3) The adjustable range is dependent on CPUs.
GA-N680SLI-DQ6 Motherboard
- 12 -
Manual - Page 17

... card. 6. Replace your computer's chassis cover. 7. Power on the computer, if necessary, configure required settings for the expansion card in system
BIOS Setup. 8. Install related driver in the operating system.
For example: Installing a PCI Express x16 VGA card: To install the VGA card: Please align the VGA card with the PCI Express x16 slot and press down on the card. Make sure the VGA card...
Manual - Page 22

... Dolby Digital Decoder via an optical cable.
IEEE 1394 Port (4 Pins Connector) Serial interface standard set by Institute of Electrical and Electronics Engineers, which has features like high speed, high bandwidth and hot plug.
LAN Port The provided Internet connection is Gigabit Ethernet , providing data transfer speeds of 10/100/ 1000 Mbps.
USB Port Before you connect your device(s) into USB...
Manual - Page 35

... during the BIOS POST (Power-On Self Test) will take you to the CMOS SETUP screen. You can enter the BIOS setup screen by pressing "Ctrl + F1". If you wish to upgrade to a new BIOS, either Gigabyte's Q-Flash or @BIOS utility can be used. Q-Flash allows the user to quickly and easily update or backup BIOS without entering the operating system. @BIOS is a Windows-based...
Manual - Page 61

... the "Xpress Install" will continue to install other drivers. System will reboot automatically after install the drivers, afterward you can install others application.
For USB2.0 driver support under Windows XP operating system, please use Windows Service Pack. After install Windows Service Pack, it will show a question mark "?" in "Universal Serial Bus controller" under "Device Manager". Please...
Manual - Page 62

English
3-2 Software Applications
This page displays all the tools that Gigabyte developed and some free software, you can choose anyone you want and press "install" to install them.
3-3 Driver CD Information
This page lists the contents of software and drivers in this CD-title.
GA-N680SLI-DQ6 Motherboard
- 62 -
Manual - Page 66

... bytes of system memory 3. VESA-supported VGA cards
How to use the Xpress Recovery2 Initial access by booting from CD-ROM and subsequent access by pressing the F9 key: Steps: After entering BIOS Setup, go to Advanced BIOS Feature and set to boot from CD-ROM. Save
the settings and exit the BIOS Setup. Insert the provided driver CD into your CD-ROM drive. Upon system...
Manual - Page 67

... hard disks installed with Windows operating systems including DOS and Windows XP/2000/NT/9x/Me. 5. USB hard disks are currently not supported. 6. Does not support RAID/AHCI (class code 0104/0106) hard disks. 7. Capable of backing up and restoring only the first physical hard disk. Hard disks detection sequence is as follows: a. PATA IDE primary channel b. PATA IDE secondary channel c . SATA IDE...
Manual - Page 70

... if you wish to use hard drives in RAID/AHCI mode or hard drives attached to the independent IDE/SATA controller.
Award Modular BIOS v6.00PG, An Energy Star Ally Copyright (C) 1984-2007, Award Software, Inc.
GA-N680SLI-DQ6 FAa . . . .
:BIOS Setup/Dual BIOS : Xpress Recovery2 : Boot Menu : Qflash 4/12/2007-NF68-6A61IG01C-00
: Qflash
Because BIOS flashing is potentially risky, please do it with...
Manual - Page 73

... a DOS startup disk, we recommend that you use the new @BIOS utility. @BIOS allows users to update their BIOS under Windows. Just select the desired @BIOS server to download the latest version of BIOS.
Fig 1. Installing the @BIOS utility
Fig 2. Installation Complete and Run @BIOS
Click Sart/ Programs/ GIGABYTE/@BIOS
Select @BIOS item than click Install
Fig 3. The @BIOS Utility
Fig 4. Select...
Manual - Page 75

... of the user's manual to identify the SATA controller for the connectors. (For example, on the GA-N680SLI-DQ6 motherboard, the SATAII0, SATAII1, SATAII2, SATAII3, SATAII4 and SATAII5 connectors are supported by the nVIDIA® nForce 680i SLI Southbridge.) Then connect the power connector from your power supply to the hard drive.
(Note 1) Required for setting up RAID array. (Note 2) Required...
Manual - Page 81

... OS installation. Without the driver, the hard disk may not be recognized during the Windows setup process. Skip this step if you do not want to create RAID. First of all, copy the driver for the SATA controller from the motherboard driver CD-ROM to a floppy disk. See the instructions below about how to copy the driver in MS-DOS mode(Note). Prepare a startup disk that has CD-ROM support...
Manual - Page 82

... the floppy disk containing the SATA driver and press S (Figure 14).
Windows Setup
Setup could not determine the type of one or more mass storage devices installed in your system, or you have chosen to manually specify an adapter. Currently, Setup will load support for the following mass storage devices(s)
* To specify additional SCSI adapters, CD-ROM drives, or special disk controllers for use...
Manual - Page 84

... the SATA driver installation from the floppy disk.
Windows Setup
Setup will load support for the following mass storage device(s): NVIDIA RAID CLASS DRIVER (required) NVIDIA nForce Storage Controller (required)
* To specify additional SCSI adapters, CD-ROM drives, or special disk controllers for use with Windows, including those for which you have a device support disk from a mass storage device...
Manual - Page 86

... Windows installation CD-ROM disk, set First Boot Device under the Advanced BIOS Features menu to CDROM (Figure 2).
CMOS Setup Utility-Copyright (C) 1984-2007 Award Software Advanced BIOS Features
Hard Disk Boot Priority First Boot Device Second Boot Device Third Boot Device Password Check HDD S.M.A.R.T. Capability CPU Hyper-Threading Limit CPUID Max. to 3 No-Execute Memory Protect CPU Enhanced...
Manual - Page 93

... for AHCI and RAID Mode)
To install operating system onto a serial ATA hard disk successfully, you need to install the SATA controller driver during OS installation. Without the driver, the hard disk may not be recognized during the Windows setup process. First of all, copy the driver for the SATA controller from the motherboard driver CD-ROM to a floppy disk. See the instructions below about how...
Manual - Page 94
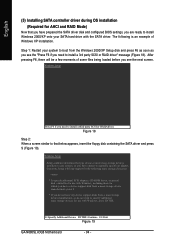
... the floppy disk containing the SATA driver and press S (Figure 19).
Windows Setup
Setup could not determine the type of one or more mass storage devices installed in your system, or you have chosen to manually specify an adapter. Currently, Setup will load support for the following mass storage devices(s)
* To specify additional SCSI adapters, CD-ROM drives, or special disk controllers for use...
Manual - Page 95

... the SATA driver installation from the floppy disk.
Windows Setup
Setup will load support for the following mass storage device(s):
GIGABYTE GBB363 RAID Controller (Windows 2K/XP/2003)
* To specify additional SCSI adapters, CD-ROM drives, or special disk controllers for use with Windows, including those for which you have a device support disk from a mass storage device manufacturer, press...
Manual - Page 97

....
Stereo Speakers Connection and Settings: We recommend that you use the speaker with amplifier to acquire the best sound effect if the stereo output is applied.
STEP 1 : After installation of the audio driver, you should find an Audio Manager icon in your system tray (you can also find the icon in Control Panel). Doubleclick the icon...