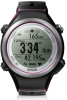
Epson SF-810V driver and firmware
Related Epson SF-810V Manual Pages
Download the free PDF manual for Epson SF-810V and other Epson manuals at ManualOwl.com
User Manual - Epson Run Connect for Android - Page 2
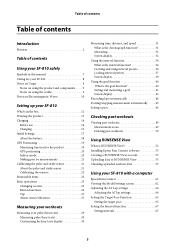
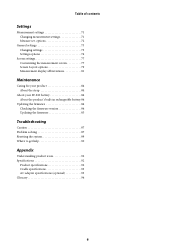
Table of contents
Introduction
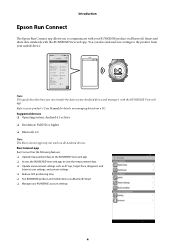
Epson Run Connect 4
Setup
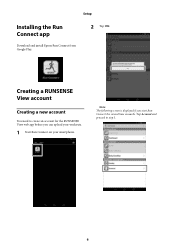
Installing the Run Connect app 6 Creating a RUNSENSE View account 6
Creating a new account 6 Linking an existing account 7 Enabling Bluetooth on your mobile device 8 Pairing your RUNSENSE product 9
Uploading and checking workouts
Uploading workouts 13 Viewing uploaded workouts 15
About RUNSENSE View 16
Reducing GPS positioning time...
User Manual - Epson Run Connect for Android - Page 4
... can also send and save settings to the product from your mobile device.
Note: This guide describes how you can transfer the data to your Android device and manage it with the RUNSENSE View web app. Refer to your product's User Manual for details on managing data from a PC. Supported devices O Operating system: Android 4.3 or later O Resolution: Full HD or higher...
User Manual - Epson Run Connect for Android - Page 5

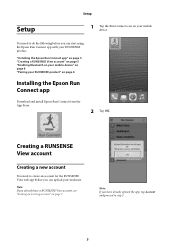
Setup
Setup
You need to do the following before you can start using the Epson Run Connect app with your RUNSENSE product. "Installing the Run Connect app" on page 6 "Creating a RUNSENSE View account" on page 6 "Enabling Bluetooth on your mobile device" on page 8 "Pairing your RUNSENSE product" on page 9
5
User Manual - Epson Run Connect for Android - Page 6
Setup
Installing the Run Connect app
Download and install Epson Run Connect from Google Play.
2 Tap OK.
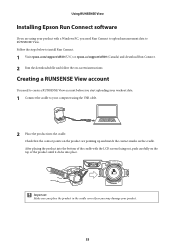
Creating a RUNSENSE View account
Creating a new account
You need to create an account for the RUNSENSE View web app before you can upload your workouts.
1 Start Run Connect on your smartphone.
Note: The following screen is displayed if you start...
User Manual - Epson Run Connect for Android - Page 18
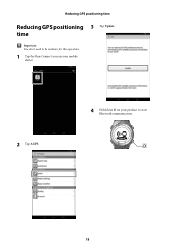
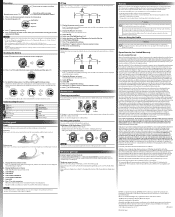
Reducing GPS positioning time
Reducing GPS positioning 3 Tap Update. time
c Important:
You don't need to be outdoors for this operation.
1 Tap the Run Connect icon on your mobile device.
2 Tap AGPS.
4 Hold down D on your product to start Bluetooth communication.
18
User Manual - Epson Run Connect for Android - Page 20
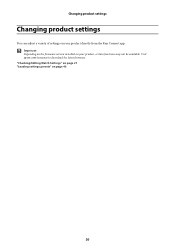
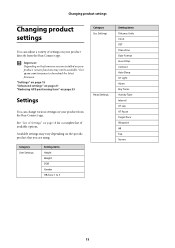
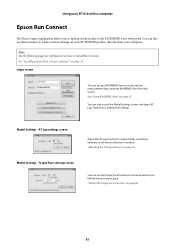
Changing product settings
Changing product settings
You can adjust a variety of settings on your product directly from the Run Connect app.
c Important:
Depending on the firmware version installed on your product, certain functions may not be available. Visit epson.com/runsense to download the latest firmware. "Checking/Editing Watch Settings" on page 21 "Loading settings presets" on page 40
20
User Manual - Epson Run Connect for iOS - Page 3
... a registered logomark, and Runsense is a trademark of the Seiko Epson Corporation.
iPhone is a trademark of Apple Inc. registered in the U.S.A. and other countries.
App Store is the name of a service provided by Apple Inc. that allows iPhone users to download application software.
The trademark iOS is used according to the Cisco's licence in the U.S.A. and...
User Manual - Epson Run Connect for iOS - Page 5
Setup
Setup
1 Tap the Run Connect icon on your mobile device.
You need to do the following before you can start using the Epson Run Connect app with your RUNSENSE product.
"Installing the Epson Run Connect app" on page 5 "Creating a RUNSENSE View account" on page 5 "Enabling Bluetooth on your mobile device" on page 8 "Pairing your RUNSENSE product" on page 8
Installing the...
User Manual - Epson Run Connect for iOS - Page 15
... from the Run Connect app.
c Important:
Depending on the firmware version installed on your product, certain functions may not be available. Visit epson.com/runsense to download the latest firmware.
"Settings" on page 15 "Advanced settings" on page 21 "Reducing GPS positioning time" on page 33
Settings
You can change various settings on your product from the Run Connect app.
See...
Quick Start and Warranty - Page 1
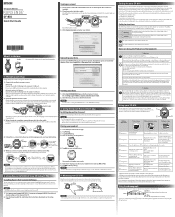
... your Windows PC and connect to the Internet.
NOTE Install Epson Run Connect before connecting the product to your PC.
1. Visit epson.com/support/sf810 (U.S.) or epson.ca/support/sf810 (Canada) and download Epson Run Connect for PC.
2. Run the downloaded file and follow the instructions displayed on the setup screen.
Your product displays a passcode. 6. Enter the 6-digit passcode on your mobile...
Quick Start and Warranty - Page 2
...screen settings to view and keep track of your progress. For more details, see the online User Manual.
Where to get help
Internet support and user manuals Visit epson.com/support/sf810 (U.S.) or epson.ca/support/sf810 (Canada) for solutions to common problems. You can get tips, usage information, and FAQs, download utilities, view the user manuals, or e-mail Epson.
Telephone support services Call...
User Manual - Page 6
...What is the goal function 40 Setting and measuring a goal 41 Screen display 43
Recording laps automatically 44 Starting/stopping measurement automatically . . . . .45 Setting a pace 46
Checking past workouts
Viewing past workouts 49 Measurement icons 49 Deleting past workouts 50
Using RUNSENSE View
What is RUNSENSE View 52 Installing Epson Run Connect software 53 Creating a RUNSENSE View...
User Manual - Page 7
... 73 Changing settings 73 Settings options 74
Screen settings 77 Customizing the measurement screen 77 Screen Layout options 79 Measurement display abbreviations 81
Maintenance
Caring for your product 84 About the strap 84
About your SF-810 battery 84 About the product's built-in rechargeable battery 84
Updating the firmware 84 Checking the firmware version 84 Updating the firmware 85...
User Manual - Page 52

... a RUNSENSE View account" on page 53. O You can also manage the measurement data using the Run Connect mobile app. See the Runsense iOS or AndroidTM
manuals for details. "What is RUNSENSE View?" on page 52 "Installing Epson Run Connect software" on page 53 "Creating a RUNSENSE View account" on page 53 "Checking uploaded workout data" on page...
User Manual - Page 54
... steps below to install Run Connect.
1 Visit epson.com/support/sf810 (U.S.) or epson.ca/support/sf810 (Canada) and download Run Connect. 2 Run the downloaded file and follow the on-screen instructions.
Creating a RUNSENSE View account
You need to create a RUNSENSE View account before you start uploading your workout data.
1 Connect the cradle to your computer using the USB cable.
2 Place the...
User Manual - Page 62
... web portal. You can also use Run Connect to adjust various settings on your RUNSENSE product directly from your computer.
Note: See the following pages for information on how to install Run Connect. See "Installing Epson Run Connect software" on page 53.
Login screen
You can set up a RUNSENSE View account, upload measurement data, and start RUNSENSE...
User Manual - Page 78
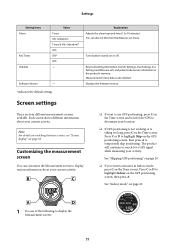
... to 10 minutes). You can also set this from the Measure set. menu.
Turns button sounds on or off.
Resets all setting information (Comm. Settings, User Settings, Sys. Settings and Measure set.) and pulse/stride sensor information in the product's memory. Measurement history data is also deleted. Displays the firmware version.
Screen settings
There are four different measurement screens available...
User Manual - Page 84
Maintenance
Maintenance
Follow the instructions in this section to care for your product, replace its battery, and update its firmware. "Caring for your product" on page 84 "About your SF-810 battery" on page 84 "Updating the firmware" on page 84
83
User Manual - Page 85
...dry.
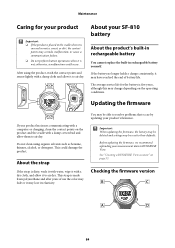
About your SF-810 battery
About...service life for the battery is five years, although this may change depending on the operating conditions.
Updating the firmware
If your product has issues communicating with a computer...updating your product's firmware.
c Important:
When updating the firmware, the history may be deleted and settings may be reset to their defaults.
Before updating the firmware...
User Manual - Page 86
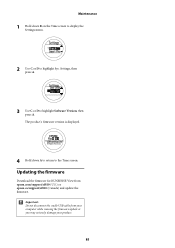
... Settings, then press A.
3 Use C or D to highlight Software Version, then press A. The product's firmware version is displayed.
4 Hold down A to return to the Time screen.
Updating the firmware
Download the firmware for RUNSENSE View from epson.com/support/sf810 (U.S.) or epson.ca/support/sf810 (Canada) and update the firmware.
c Important:
Do not disconnect the cradle USB cable from your computer...