Epson PowerLite 9100NL driver and firmware
Drivers and firmware downloads for this Epson item


Related Epson PowerLite 9100NL Manual Pages
Download the free PDF manual for Epson PowerLite 9100NL and other Epson manuals at ManualOwl.com
Technical Brief (Multimedia Projectors) - Page 1
...controls M ELP Link IV software M Flexible installation M EasyMP and EasyMP.net
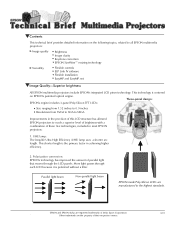
Image Quality-Superior brightness
All EPSON multimedia projectors include EPSON's integrated LCD prism technology. This technology is centered
on EPSON's patented optical engine.
Three-panel design:
EPSON's engine includes 3-panel Poly-Silicon TFT LCD's:
LL
Size ranging from 1.32 inches to 0.9 inches Resolutions...
Technical Brief (Multimedia Projectors) - Page 5
... copies of preselected images Change the cursor shape Play a selected sound effect Create a spotlight effect on the screen Clear previous effects Create a macro for a specific sequence of key strokes
2. Control the following projector features: Change projector settings Change the test pattern Specify an image gamma Create a user logo
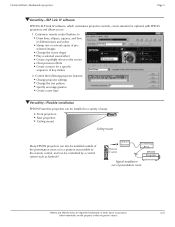
Versatility-Flexible installation
EPSON PowerLite projectors...
Technical Brief (Multimedia Projectors) - Page 6
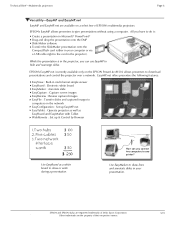
... presentation onto the CompactFlash card (either in your computer or via a USB cable right to the card in the projector.)
While the presentation is in the projector, you can use EasyMP to hide and rearrange slides.
EPSON's EasyMP.net (currently available only on the EPSON PowerLite 8150i) allows presenters to download presentations and control the projector over a network. EasyMP.net offers...
RS-232 Reference Manual (ESC/VP) - Page 7

...)
Grou p
Code
0x00
Screen Control (Screen)
0x01
Audio Control (Audio)
0x02
PC Control (PC) 0x03
Function
Item
Functional
Code classification
Power Communication rate Initialize all Lamp on Cursor Speed Password Error Information Administrator Log on Administrator Log off Key code Serial command Max/Min Alert Product ID Software version Protocol version Input source Input mode Freeze...
RS-232 Reference Manual (ESC/VP) - Page 8

...
Locked Not available for stack
Error condition An attempt was made to communicate with the projector via a network connection, but another computer was already communicating with the projector. Parameter is outside the setting range and FromTo is incorrect. Command is not supported, or unknown command. Insufficient EasyMP.net resources. Projector is in download mode. The apply command received...
User Manual - Lens Options - Page 3

... sure to disconnect the power cable before installation, because there is danger of electrical shock.
Memo
Always mount and dismount the lens in a clean room, to minimize the amount of dust. Excessive dust inside the lens could cause damage.
• Note that the illustrations below may not match your particular projector model.
2-1 Removing the...
User Manual - Lens Options - Page 5

(2) Mounting the front case 1. Set the front case into position and tighten the two screws.
This completes installation.
• Turn on the power and verify that the projector operates normally.
Memo
Be sure to remove the front lens cap before turning on the power, or it may melt from the heat.
13
User Manual - Lens Options - Page 9

... sure to disconnect the power cable before installation, because there is danger of electrical shock.
Memo
Always mount and dismount the lens in a clean room, to minimize the amount of dust. Excessive dust inside the lens could cause damage.
• Note that the illustrations below may not match your particular projector model.
2-1 Remove the...
User Manual - Lens Options - Page 11

(2) Mounting the front case 1. Set the front case into position and tighten the two screws.
This completes installation.
• Turn on the power and verify that the projector operates normally.
Memo
Be sure to remove the front lens cap before turning on the power, or it may melt from the heat.
13
User Manual - Lens Options - Page 15

... sure to disconnect the power cable before installation, because there is danger of electrical shock.
Memo
Always mount and dismount the lens in a clean room, to minimize the amount of dust. Excessive dust inside the lens could cause damage.
• Note that the illustrations below may not match your particular projector model.
2-1 Removing the...
User Manual - Lens Options - Page 17

(2) Adjusting the wide lens for a rear projector • This lens must be adjusted to match the screen size. Adjust the lens as follows, before installing the front case. 1. Turn the lens shift button...
Warning
Turn the power only when adjusting the lens. Always disconnect the power cable at other times. When adjusting the lens, take care not to touch any other parts of the projector or lens, as...
User Manual - Lens Options - Page 18

(3) Mounting the front case 1. Set the front case into position and tighten the two screws.
This completes installation. • Turn on the power and verify that the projector operates nor-
mally.
16
User Manual - Lens Options - Page 22

... sure to disconnect the power cable before installation, because there is danger of electrical shock.
Memo
Always mount and dismount the lens in a clean room, to minimize the amount of dust. Excessive dust inside the lens could cause damage.
• Note that the illustrations below may not match your particular projector model.
2-1 Removing the...
User Manual - Lens Options - Page 24

(2) Mounting the front case 1. Set the front case into position and tighten the two screws.
This completes installation.
• Turn on the power and verify that the projector operates normally.
Memo
Be sure to remove the front lens cap before turning on the power, or it may melt from the heat.
13
Warranty Statement - Page 2

... serial number be removed or should the product fail to be properly maintained or fail to function properly as a result of misuse, abuse, improper installation, neglect, improper shipping, damage caused by disasters such as fire, flood, and lightning, improper electrical current, software problems, interaction with non-EPSON products, or service other than by an EPSON Authorized Servicer...
User Manual - Page 9

... Contains your Quick Setup sheet, warranty brochure, CD-ROMs, and EPSON PrivateLine® Support card. Store this User's Guide in the envelope and keep the envelope with your projector at all times.
I Quick Setup sheet Gives you all the instructions you need to get your projector set up and connected to a laptop or PowerBook computer.
I CD-ROMs The PowerLite 8200i/9100i CD-ROM lets you register...
User Manual - Page 10

... services. You can register through the Internet, by e-mail or 800-number modem connection, or by printing out the form to fax or mail.
note
The EMP Link V program is optional; you do not need to install it to use the projector.
Controlling Your Projector from a Computer
If you want to be able to control the projector's settings from your computer, you can install...
User Manual - Page 95

... SXGA (1280 × 1024) for the PowerLite 8200i. Also make sure the frequency is supported by the projector. (See page 95.) If necessary, change your computer's resolution setting as described below.
Only part of the computer image is displayed.
I Press the Resize button on the control panel or remote control.
I Make sure the image Position setting is correct on the Video menu...
User Manual - Page 114

... serial number be removed or should the product fail to be properly maintained or fail to function properly as a result of misuse, abuse, improper installation, neglect, improper shipping, damage caused by disasters such as fire, flood, and lightning, improper electrical current, software problems, interaction with non-EPSON products, or service other than by an EPSON Authorized Servicer...
Product Support Bulletin(s) - Page 1

... have that setting not retained the next time power is applied to the projector.
Projectors starting with the following serial numbers have already received the firmware update:
PowerLite 8100i
PowerLite 8100NL PowerLite 9100i
PowerLite 9100NL
CXA0120020K and N/A later
CY80130002K and N/A later
If you have a projector needing the firmware update, please contact Epson Support for assistance...