Epson ActionPrinter 3250 - ActionPrinter-3250 Impact Printer driver and firmware
Drivers and firmware downloads for this Epson item

Related Epson ActionPrinter 3250 Manual Pages
Download the free PDF manual for Epson ActionPrinter 3250 and other Epson manuals at ManualOwl.com
Product Information Guide - Page 1
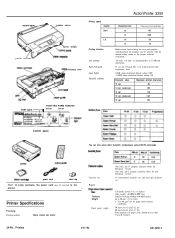
... printed characters 80 137 96
160 120
Control panel
You can also select other font/pitch combinations using ESC/P2 commands.
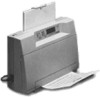
power cord
CD
cable dip
Note: In some locations, the power cord may be attached to the
printer.
I
Printer Specifications
Printing Printing method:
24-pin impact dot matrix
Character sets:
Paper
Thickness Weight
Input paper supply
One...
Product Information Guide - Page 3

...: Connector:
STROBE pulse BUSY and ACKNLG signals
TTL compatible
36-pin 57-30360 Amphenol connector or equivalent
Default settings
ActionPrinter 3250
Character Tables
These character tables are selected with the default-setting mode or by wing a software command. AU the tables are the same for hex codes 00 through 7F. Therefore, only first table is...
Product Information Guide - Page 4

ActionPrinter 3250
The Control Panel
You can control the basic printer operations--form feeding, paper
loading and ejecting, and font selection-with the buttons on the
control panel. The indicator lights help you monitor the status of the
printer.
FONT/YES
button
FORM FEED/NO button
rim
Lights The two panel lights provide information on certain printer conditions and settings. READY...
Product Information Guide - Page 5

... take full advantage of the printer's features. Many programs provide an installation or setup m&u that presents a list of printers.
ActionPrinter 3250
To take full advantage at your printer's features, including ESC/P2,
choose one of the first three printers on the list below. If none of
these is listed, contact your software manufacturer for an update
that includes one of...
Product Information Guide - Page 6

... using your application software or printer commands, if necessary.
l You can switch to manual insertion or to the optional push tractor without removing the paper cassette.
Loading paper manually
You can load single sheets of paper from the rear manual insertion slot. (If you've installed the optional push tractor, remove it before loading paper manually.)
1. Place the printer in the...
Product Support Bulletin(s) - Page 2

...: P-0084A Page: 2 of 6
3. Q. What is the Epson ESC/P 2 command set?
A. As the leading impact printer vendor, the Epson Standard Codes for Printers (ESC/P) has become a de facto standard for most dot matrix printers. Epson Standard Codes are featured by most other vendors as an immediate entry into a wide range of third party software. As the market continues to develop...
Product Support Bulletin(s) - Page 4

...-2500
LQ-800
LQ-1500
Generic Epson WORST
To take full advantage of the AP-3250's features, including ESC/P 2, choose one of the first three printers listed above. If none of these printer selections are available from within your application software, contact your software manufacturer to determine whether they offer a printer driver update or if they plan to make...
User Manual - Page 6

... and Service Centers. Epson also provides the following support services through the Epson Consumer Resource Center at (800) 922-8911:
Assistance in locating your nearest Authorized Epson Reseller or Service Center Technical assistance with the installation, configuration, and operation of Epson products Information on ESC/P 2 drivers for your software Sales of the ESC/P Reference manual, which...
User Manual - Page 10

... 2 Warnings, Cautions, and Notes 2
Chapter 1 Setting Up the Printer
1-1
Unpacking the Printer 1-2 Choosing a Place for the Printer 1-4 Installing the Ribbon Cartridge 1-5 Attaching the Output Guide 1-7 Plugging in the Printer 1-8 Running the Self Test 1-8 Connecting the Printer to Your Computer 1-11 Setting Up Your Application Software 1 -13
Chapter 2 Paper Handling
2-1
Printing on...
User Manual - Page 14

...Setting Up the Printer
Unpacking the Printer 1-2 Removing the protective materials 1-3
Choosing a Place for the Printer 1-4 Installing the Ribbon Cartridge 1-5 Attaching the Output Guide 1-7 Plugging in the Printer 1-8 Running the Self Test 1-8
Loading paper into the paper cassette 1-9 Running the test 1-10 Connecting the Printer to Your Computer 1-11 Setting Up Your Application Software...
User Manual - Page 26

... want the power cord or interface cable to be on the
opposite side, route it through the slot on the back.
Setting Up Your Application Software
Most application programs let you specify the type of printer you use so that the program can take full advantage of the printer's features. Many programs provide an installation or setup menu...
User Manual - Page 27

... the list below. If none of these is listed, contact your software manufacturer for an update that includes one of the four. Until you receive an update, choose another printer as close to the top of the list as possible.
LQ-100 ActionPrinter 3250 LQ-570 LQ-870 LQ-510/550 LQ-860 LQ-850 LQ...
User Manual - Page 30

... removing the paper cassette. For instructions, see "Loading paper manually" or "Switching Between Continuous Paper and Single Sheets" later in this chapter.
Loading paper manually You can load single sheets of paper from the rear manual insertion slot. (If you've installed the optional push tractor, remove it before loading paper manually.) 1. Place the printer in the upright position and turn...
User Manual - Page 57

...feature only if your program does not provide them. This feature is active only if you install the optional push tractor.
Tear-off position
When you use continuous paper with the optional ...feed command, the printer loads paper to the top-of-form (TOF) position. The TOF position is factory set to the ±0 position (8.5 mm .33 inches - from the top edge of paper). You can set this position from -3...
User Manual - Page 62

... Check that the software is installed properly for your printer. Check the software's printer settings. Check both ends of the interface cable between the printer and the computer. Make sure this cable is a shielded twistedpair parallel cable that meets both the printer and computer specifications.
l The READY light is-flashing. The printer may be out of paper. Load paper in the printer.
Using the...
User Manual - Page 64

... expected.
l The typestyles or characters you sent with your software are not printed. Check that the software is correctly configured for your printer. For instructions, see Chapter 1.
l The font selected on the control panel does not print. Your software may be overriding your control panel setting. Check the font setting in your application program.
l The wrong characters are printed...
User Manual - Page 66

... right, and the problem probably lies in the computer, the software, or the cable. If the self test does not work, contact your dealer or a qualified service person.
Paper handling
Single sheets do not feed properly from the paper cassette.
l When the optional push tractor is installed, the platen does not rotate and paper does...
User Manual - Page 70

... graphics can be selected with the default-setting mode or the proper software command.)
l/6 inch, l/8 inch, or programmable in l/360-inch increments
91 ms per l/6-inch line; 2.22 inches/second with continuous feed
1l KB when download default setting OFF 1.75KB when download default setting ON
Character sizes IO cpi IO cpi condensed 12 cpi 12 cpi condensed...
User Manual - Page 80

... tab positions Font selection Special printing effects Download character set
Default setting
Current paper position or setting in the defaultsetting mode.
Single sheets: 65 lines for A4-size paper, 61 lines for letter-size paper, 22 inches for manual insertion
Continuous paper: Subject to control panel setting in the default-setting mode
Cancelled
1/6-inch line spacing
10.5 point...
User Setup Information - Page 4

... off and paper is loaded.
Remove the narrow cover from the printer.
To enter the default settings
mode, hold down the YES
button while you turn on the
printer.
IYEIS
4. The printer prints a series of questions about your printer
settings. Press the YES and NO buttons to respond and make
your changes. All new settings remain in effect until...