Edimax EdiView32 driver and firmware

Related Edimax EdiView32 Manual Pages
Download the free PDF manual for Edimax EdiView32 and other Edimax manuals at ManualOwl.com
Datasheet - Page 1

... Digital Zoom In Live View / Play Back •Supports e-Map With Camera Live View •Self-Defined Window Layout (Up To 400 Windows) •Graphical Motion-Trigger Level Adjustment •Video Loss Alarm •Self Rotation Multi-Windows Display •3 Live View Modes - No Decode; Decode All Frames; Decode I Frame Only, Save CPU Computing Power •Intuitive Schedule Recording Setup...
Datasheet - Page 2

...Notification Motion Detection Video Loss E-Mail Notification Alarm Pop-up Camera Integration Device Discovery Video Format Audio Format Network Protocol Streaming Configuration Camera Control DIDO OS Support
OS
*Remark: Under no live view decode
EdiView32
Yes 32 (Depends on PC performance) 19 Templates, Add/Delete Available Yes, Maximum 400 Windows Yes Yes Full Decode/I Frame Decode/No Decode Yes...
Manual - Page 2

... Add Camera ...14 1-3-3. Remove Camera...15 1-3-4. Edit Camera...15 1-3-5. Activate/Stop Camera...16 1-3-6. Manual Recording...16 1-3-7. Checklist or Thumbnail Display 16 1-3-8. Show/Hide Camera Information 17 1-4. Monitor Layout ...17 1-4-1. Add/Remove Monitor...18 1-4-2. Custom Monitor Frame ...18 1-4-3. Sequential Monitor Frame 19 1-4-4. Multi-Window Support...21 1-5. Aspect Controller (Pan...
Manual - Page 5
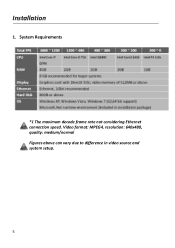
Installation
1. System Requirements
*1 The maximum decode frame rate not considering Ethernet connection speed. Video format: MPEG4, resolution: 640x480, quality: medium/normal Figures above can vary due to difference in video source and system setup.
5
Manual - Page 8

Select the installation destination location. It is recommended to select the default location.
If the installation is a software update, please select the destination location used in the last installation.
8
Manual - Page 10

Installation complete. Click 'Close' to complete the installation process.
10
Manual - Page 11

EdiView 32
1. Monitoring When the program starts up, a window will appear requesting user name and password. The default username is 'admin'and password is '1234'.
You should change the password immediately after your first login, please refer to Settings for instructions. Navigate the software using the main menu across the top of the screen, as shown below.
Hover...
Manual - Page 12

..." icon to toggle the on-screen display on/off in the main screen on the right side. Please refer to Settings for advanced OSD settings.
1-2-4. Screen Lock Click the "Lock" icon to immediately logout of the software and return to the login screen. The correct username and password is required to login.
The default username...
Manual - Page 13

...Name given to the camera.
Active (C): Green indicates the camera is active. Grey means camera is not active.
Link (D): Green indicates software is linked to the camera. Grey means it is not.
Event Recording (E): Red indicates the camera is currently executing event recording. Grey means it is not.
Manual Recording (F): Red indicates the camera is currently executing manual recording. Grey means it...
Manual - Page 14

... the check box(es) (shown in 1-3-1. Camera Status).
1-3-3. Add Camera Click to add a new camera. A new window will open:
Camera Name:
Enter a reference name for the camera
HTTP Address:
Displays the IP address of the camera
HTTP Port:
The default port value is 80
Username:
Username used to login
User Password:
Password used to login.
Camera Vender/Model: Click 'Search...' to search for...
Manual - Page 15

...need
to be entered manually.
Live View &
Recording Channel: If the IP Camera supports
multiple video streaming, you can set 'Live View
Channel' and 'Recoding Channel' as independent
streaming. For example, you want to reduce your
computer resource loading; you can set the 'Live
View Channel' to MJPEG/MPEG4 video stream at a
lower resolution, while setting the 'Recording
Channel' to MJPEG...
Manual - Page 18

...'s needs. This can be done in Add Monitor Frame Window as shown below:
You can customize monitor frame layout if required (see next section). 1-4-2. Custom Monitor Frame There are many circumstances that require customized monitor frames, for example, when the screen has a display ratio of 16:9/16:10 or some other special...
Manual - Page 19

new pop up window select the number of new rows and columns of customizable monitor frames that you want to add. Click 'OK' to commence customizing your monitor frame .... Cancel a Merge: Select the monitor frames that you want to undo merge, and click 'Cancel a Merge' button. 1-4-3. Sequential Monitor Frame Inside the 'Add Monitor Frame' window, select the sequential icon and
19
Manual - Page 20

click 'Add' button. A setup window will appear as shown below:
Add Sequential Monitor Frame In the image above, the left frame (Source) represents the monitor frames that was previously setup, all these frames can become the
20
Manual - Page 21
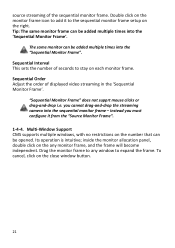
... the order of displayed video streaming in the 'Sequential Monitor Frame'. "Sequential Monitor Frame" does not supprt mouse clicks or drag-and-drop i.e. you cannot drag-and-drop the streaming camera into the sequential monitor frame - instead you must configure it from the "Source Monitor Frame".
1-4-4. Multi-Window Support CMS supports multiple windows, with no restrictions...
Manual - Page 25

... drag the same streaming camera to a different monitor frame and use digital zoom control to achieve multi-view with a single camera. 1-8-2. Switch Streaming Use your mouse to drag and drop two different monitor frames to switch video streaming. 1-8-3. Remove Video Streaming Click the right mouse button on a monitor frame, and a window will appear. Choose 'Remove...
Manual - Page 43

... image, a 'save-as' window will pop up, allowing user to determine the storage location and the file name of the captured image. 5-1-2. Computer - Screen Saver Configures screen saver activity. For example, you might prefer the system not entering screen saver mode when the monitoring software is running. 5-1-3. Computer - Screen Shutdown This configures computer monitor activation status...
Manual - Page 44

... computer sleep mode status. For example, you might prefer the system not entering sleep mode when the monitoring software is running. 5-1-5. Language Set up the monitoring software user interface language. 5-1-6. Account - Change Password Change the password used to activate this monitoring software. Click 'Change Password' and enter the old password, along with a new password in the new password...
Manual - Page 51

... the allocated storage capacity, the video recording service will be stopped without any video clips stored.
If there is no special requirement, please select "Recycle Recording (recommended) option.
Manual Recording - Start Recording Before: Configures the number of seconds of video clip being emotively recorded when the user activates manual video recording.
5-3. Screen Setup Click 'Setting' on...
Manual - Page 58

.... The product you have purchased and the setup screen may appear slightly different from those shown in this QIG. The software and specifications are subject to change without notice. Please visit our website www.edimax.com for updates. All brand and product names mentioned in this manual are trademarks and/or registered trademarks of their...