Biostar M7VIG D driver and firmware

Related Biostar M7VIG D Manual Pages
Download the free PDF manual for Biostar M7VIG D and other Biostar manuals at ManualOwl.com
M7VIG-D user's manual - Page 1
...digital device, pursuant to Part 15 of the FCC Rules. These limits are designed to provide reasonable protection against harmful interference in a residential installation. This equipment generates, uses and can radiate radio frequency energy and, if not installed and used in accordance with the instructions...'s manual. All the brand and product names are trademarks of their respective companies.
i
M7VIG-D user's manual - Page 3
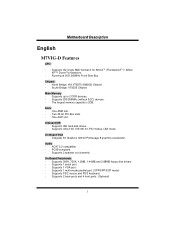
...: VT8235 Chipset.
Main Memory - Supports up to 2 DDR devices. - Supports 200/266MHz (without ECC) devices. - The largest memory capacity is 2GB.
Slots - One AMR slot. - Two 32-bit PCI Bus slots. - One AGP slot.
Onboard IDE - Supports IDE hard disk drives. - Supports Ultra 133/ 100/ 66/ 33, PIO modes, LBA mode.
On Board VGA - Integrate S3 Graphics 128-bit ProSavage 8 graphics accelerator.
Audio...
M7VIG-D user's manual - Page 4

... legal Bios. - Supports APM1.2. - Supports ACPI. - Supports USB Function. Operating System - Offers the highest performance for Windows 98, Windows NT, Windows
2000, Windows Me, Windows XP, LINUX and SCO UNIX. Dimensions - Micro ATX Form Factor: 22.9cm X 21.3cm (W X L)
Package contents
- HDD Cable X 1, FDD Cable X 1, Fully Setup Driver CD X 1 - Flash Memory Writer for BIOS update X 1 - USB Cable...
M7VIG-D user's manual - Page 6
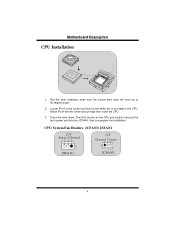
... the white dot or cut edge in the CPU. Match Pin A with the white dot/cut edge then insert the CPU.
3. Press the lever down. Then Put the fan on the CPU and buckle it and put the fan's power port into the JCFAN1, then to complete the installation.
CPU/ System Fan Headers: JCFAN1/ JSFAN1
12V Sense...
M7VIG-D user's manual - Page 7
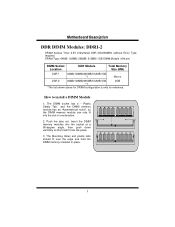
...Type: 64MB/ 128MB/ 256MB/ 512MB/ 1GB DIMM Module (184 pin)
DIMM Socket Location
DDR Module
Total Memory Size (MB)
DDR 1
64MB/128MB/256MB/512MB/1GB *1
Max is
DDR 2
64MB/128MB/256MB/512MB/...is only for reference.
How to install a DIMM Module
1. The DIMM socket has a " Plastic Safety Tab", and the DIMM memory module has an "Asymmetrical notch", so the DIMM memory module can only fit into the ...
M7VIG-D user's manual - Page 11
...
1
Normal
No jumper installed
Operation (default)
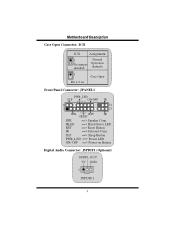
1 Case Open
Pin 1-2 on
Front Panel Connector: JPANEL1
PWR_LED SLP ON/OFF IR
2
24
1
23
SPK (+) (-) RST
IR
HLED
SPK
==> Speaker Conn.
HLED ==> Hard Driver LED
RST
==> Reset Button
IR
==> Infrared Conn.
SLP
==> Sleep Button
PWR_LED ==> Power LED
ON/ OFF ==> Power-on Button
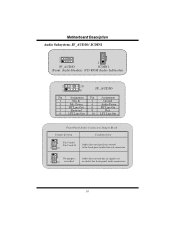
Digital Audio Connector: JSPDIF1 (Optional...
M7VIG-D user's manual - Page 12
... Out
JF_AUDIO
Pin Assignment
2
Ground
4
Audio Power
6
RT Line Out
8
Key
10 LFT Line Out
Front Panel Audio Connector/ Jumper Block
Jumper Setting
12
3 5 7
46
Pin 5 and 6 Pin 9 and 10
9 10
1 3 5
462
No jumpers
7 9
10
installed
Configuration
Audio line out signals are routed to the back panel audio line out connector.
Audio line out and mic in signals...
M7VIG-D user's manual - Page 37
.... Also, in the About panel, you can get detail descriptions about BIOS model and chipsets. In addition, the frequency status of CPU, memory, AGP and PCI along with the CPU speed are synchronically shown on our main panel.
Moreover, to protect users' computer systems if the setting is not appropriate when testing and results in system fail or...
M7VIG-D user's manual - Page 38
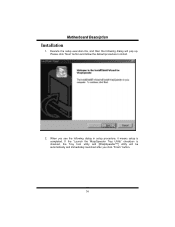
... file, and then the following dialog will pop up. Please click "Next" button and follow the default procedure to install.
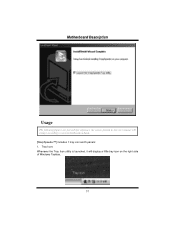
2. When you see the following dialog in setup procedure, it means setup is completed. If the "Launch the WarpSpeeder Tray Utility" checkbox is checked, the Tray Icon utility and [WarpSpeeder™] utility will...
M7VIG-D user's manual - Page 39
MMootthheerrbbooaarrdd DDeessccrriippttiioonn
Usage
The following figures are just only for reference, the screen printed in this user manual will change according to your motherboard on hand. [WarpSpeeder™] includes 1 tray icon and 5 panels: 1. Tray Icon: Whenever the Tray Icon utility is launched, it will display a little tray icon on the right side of Windows Taskbar.
37
M7VIG-D user's manual - Page 40
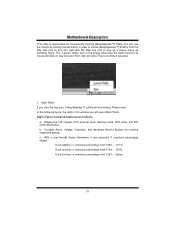
..., [ WarpSpeeder™ ] utility will be invoked. Please refer to the following figure; the utility's first window you will see is Main Panel.
Main Panel contains features as follows:
a. Display the CPU Speed, CPU external clock, Memory clock, AGP clock, and PCI clock information. b. Contains About, Voltage, Overclock, and Hardware Monitor Buttons for invoking respective panels. c. With...
M7VIG-D user's manual - Page 47

... the
power indicator lights are lit, hard drive is DIMM, press down firmly until the module
spinning.
snaps into place.
PROBABLE
SOLUTION
System does not boot from hard disk drive, can * Check cable running from disk to disk
be booted from CD-ROM drive.
controller board. Make sure both ends are
securely plugged in; check the drive type in
the standard CMOS setup...
M7VIG-D BIOS setup guide - Page 2
... it retains the Setup information when the power is turned off.
The Award BIOS™ installed in your computer system's ROM (Read Only Memory) is a custom version of an industry standard BIOS. This means that it supports Intel Pentium ® 4 processor input/output system. The BIOS provides critical low-level support for standard devices such as disk drives and serial and parallel ports.
Adding...
M7VIG-D BIOS setup guide - Page 4
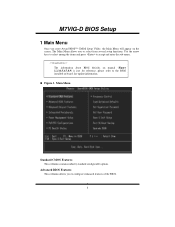
... Menu allows you to select from several setup functions. Use the arrow keys to select among the items and press to accept and enter the sub-menu.
!! WARNING !! The information about BIOS defaults on manual (Figure 1,2,3,4,5,6,7,8,9) is just for reference, please refer to the BIOS installed on board, for update information.
Figure 1. Main Menu
Standard CMOS Features...
M7VIG-D BIOS setup guide - Page 6
M7VIG-D BIOS Setup
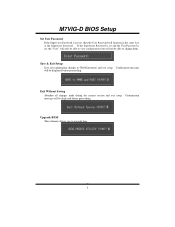
Set User Password If the Supervisor Password is not set, then the User Password will function in the same way as the Supervisor Password. If the Supervisor Password is set and the User Password is set, the "User" will only be able to view configurations but will not be able to change them.
Save & Exit Setup Save all configuration changes to CMOS...
M7VIG-D BIOS setup guide - Page 8
....
IDE Secondary Slave Options are in its sub Press to enter the
menu.
sub menu of detailed
options.
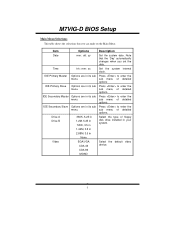
Drive A Drive B
360K, 5.25 in 1.2M, 5.25 in 720K, 3.5 in
Select the type of floppy disk drive installed in your system.
1.44M, 3.5 in
2.88M, 3.5 in
None
Video
EGA/VGA CGA 40
Select the default video device.
CGA 80
MONO
7
M7VIG-D BIOS setup guide - Page 13
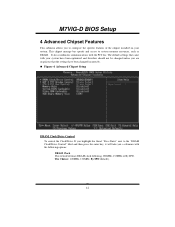
... installed on your system. This chipset manage bus speeds and access to system memory resources, such as DRAM. It also coordinates communications with the PCI bus. The default settings that came with your system have been optimized and therefore should not be changed unless you are suspicious that the settings have been changed incorrectly.
Figure 4. Advanced Chipset Setup
DRAM Clock/Drive Control...
M7VIG-D BIOS setup guide - Page 14
M7VIG-D BIOS Setup
DRAM Timing This item determines DRAM clock/ timing follow SPD or not. The Choices: By SPD (default), Manual.
DRAM CAS Latency When DRAM is installed, the number of clock cycles of ... the depths of the memory. the better is this function. The Choices: 4 level (default), 2 level, 3 level.
The deeper the depth is,
DRAM Command Rate This item controls clock cycle that must occur...
M7VIG-D BIOS setup guide - Page 18

.../100 functionality can be implemented if it is supported by the IDE hard drives in your system. As well, your operating environment requires a DMA driver (Windows 95 OSR2 or a third party IDE bus master driver). If your hard drive and your system software both support Ultra DMA/100, select Auto to enable BIOS support. The Choices: Auto (default), Disabled.
IDE HDD...
M7VIG-D BIOS setup guide - Page 26
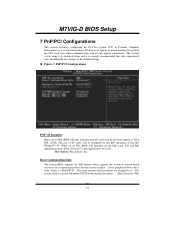
... changes to the default settings. Figure 7. PnP/PCI Configurations
PNP OS Installed When set to YES, BIOS will only initialize the PnP cards used for the boot sequence (VGA, IDE, SCSI). The rest of the cards will be initialized by the PnP operating system like Window™ 95. When set to NO, BIOS will initialize all the PnP cards. For non-PnP operating...