Biostar M7NCG 400 driver and firmware

Related Biostar M7NCG 400 Manual Pages
Download the free PDF manual for Biostar M7NCG 400 and other Biostar manuals at ManualOwl.com
M7NCG 400 user's manual - Page 1
M7NCG 400
FCC Statement and Copyright
This equipment has been tested and found to comply with the limits of a Class B digital device, pursuant to Part 15 of the FCC Rules. These limits are designed to provide reasonable protection against harmful interference in a residential installation... taken every care in the preparation of this user's manual, no guarantee is given as to the correctness of its ...
M7NCG 400 user's manual - Page 4

...and Asia)
On Board Peripherals - Supports 360K, 720K, 1.2MB, 1.44MB and 2.88MB floppy disk drivers. - Supports 2 serial ports. - Supports 1 multi-mode parallel port. (SPP/EPP/ECP mode) - Supports PS/2 mouse and PS/2 keyboard. - Supports 2 back USB2.0 ports and 4 front USB2.0 ports. - Supports S/PDIF Out connector. BIOS - AWARD legal Bios. - Supports APM1.2. - Supports ACPI. - Supports USB Function...
M7NCG 400 user's manual - Page 6
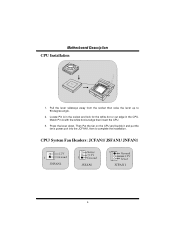
... the white dot or cut edge in the CPU. Match Pin A with the white dot/cut edge then insert the CPU.
3. Press the lever down. Then Put the fan on the CPU and buckle it and put the fan's power port into the JCFAN1, then to complete the installation.
CPU/ System Fan Headers: JCFAN1/ JSFAN1/ JNFAN1
12V...
M7NCG 400 user's manual - Page 7
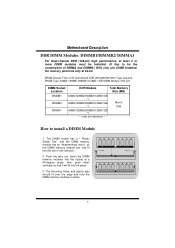
.../ DIMMA1
For Dual-channel DDR (128-bit) high performance, at least 2 or more DIMM modules must be installed. (It has to be the combination of DIMMA and DIMMB.) With only one DIMM installed, the memory performs only at 64-bit.
DRAM Access Time: 2.5V Unbuffered DDR 200/266/333 MHz Type required. DRAM...
M7NCG 400 user's manual - Page 10
... use for S3 Mode.
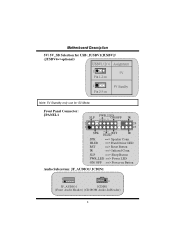
Front Panel Connector: JPANEL1
PWR_LED SLP ON/OFF IR
2
24
1
23
SPK (H+)L(E-)DRST
IR
SPK HLED RST IR
==> Speaker Conn. ==> Hard Driver LED ==> Reset Button ==> Infrared Conn.
SLP
==> Sleep Button
PWR_LED ==> Power LED
ON/ OFF ==> Power-on Button
Audio Subsystem: JF_AUDIO1/ JCDIN1
2
1
1
JFJA_AUUDDIOIO11
JCDIN1
(Front Audio Header) (CD-ROM Audio-In Header)
8
M7NCG 400 user's manual - Page 11
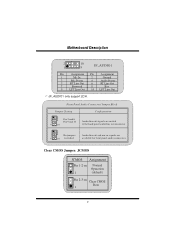
...
Assignment Pin Assignment
1
Mic In
2
Ground
3
Mic Power
4
Audio Power
5
RT Line Out
6
RT Line Out
7
Reserved
8
Key
9
LFT Line Out
10 LFT Line Out
JF_AUDIO1 only support 2CH.
Front Panel Audio Connector/ Jumper Block
Jumper Setting
12
3 5 7
4 6
Pin 5 and 6 Pin 9 and 10
9 10
1 3 5 7 9
246
No jumpers
10 installed
Configuration
Audio line out signals are routed to the...
M7NCG 400 user's manual - Page 14
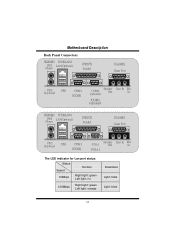
...)
JCOM2 (optional)
JKBMS1 JUSBLAN1 PS/2 LAN(Optional) Mouse
JPRNT1 Parallel
JGAME1 Game Port
PS/2
USB
Keyboard
COM1
JCOM1
VGA1 JVGA1
Speaker Out
Line In Mic In
The LED indicator for Lan port status:
Status Speed
Normal
10Mbps
Right light: green Left light: no
100Mbps
Right light: green Left light: orange
Download Light: blink Light: blink
12
M7NCG 400 user's manual - Page 43
... nor to prepare the utility. Just simply enter CMOS and do it.
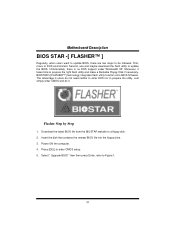
Flasher Step by Step
1. Download the latest BIOS file from the BIOSTAR website to a floppy disk. 2. Insert the disk that contains the newest BIOS file into the floppy drive. 3. Power ON the computer. 4. Press [DEL] to enter CMOS setup. 5. Select " Upgrade BIOS " item then press Enter, refer to Figure 1.
41
M7NCG 400 user's manual - Page 46
MMootthheerrbbooaarrdd DDeessccrriippttiioonn
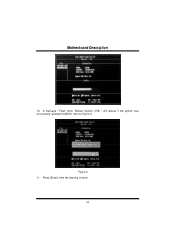
10. A message " Flash done, Restart System (Y/N) " will appear if the system was successfully updated the BIOS, refer to Figure 6.
Figure 6 11. Press [Enter], then the flashing is done!
44
M7NCG 400 user's manual - Page 48
... support
PROBABLE
SOLUTION
System inoperative. Keyboard lights are on, power * Using even pressure on both ends of the
indicator lights are lit, hard drive is spinning.
DIMM, press down firmly until the module
snaps into place.
PROBABLE
SOLUTION
System does not boot from hard disk drive, can be * Check cable running from disk to disk controller
booted from CD-ROM drive.
board...