Belkin F1U126-KIT - Bitronics AutoSwitch Kit Switch driver and firmware
Drivers and firmware downloads for this Belkin item

Related Belkin F1U126-KIT Manual Pages
Download the free PDF manual for Belkin F1U126-KIT and other Belkin manuals at ManualOwl.com
User Manual - Page 5
... timeout
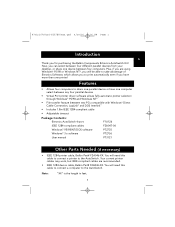
Package Contents: Bitronics AutoSwitch 4-port IEEE 1284-compliant cables Windows® 95/98/NT/DOS software Windows® 3.x software User manual
F1U126 F2A047-06 P72735 P72736 P73121
Other Parts Needed (if necessary)
• IEEE 1284 printer cable, Belkin Part# F2A046-XX. You will need this cable to connect a printer to the AutoSwitch. Your current printer cables may work, but...
User Manual - Page 8
P73121/F1U126-KIT/EU/man.qxd 4/28/00 1:06 PM Page 4
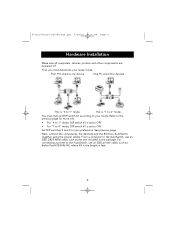
Hardware Installation
Make sure all computers, devices, printers and other components are powered off.
First, you must determine your setup mode:
Four PCs sharing one device
One PC using four devices
This is "4 to 1" mode.
This is "1 to 4" mode.
You must then set DIP switch #1 according to your mode. Refer to the...
User Manual - Page 9

... printer port on your computer is set to ECP mode. To do this, you must go into your computer's BIOS or CMOS setup. Instructions on how to do this differ from one computer to the next. Please consult your computer manufacturer's manual, tech support, or website for information regarding how to do this. Please do not call Belkin Tech Support regarding this because each computer's BIOS setup...
User Manual - Page 10

.../F1U126-KIT/EU/man.qxd 4/28/00 1:06 PM Page 6
Software Installation
There are two driver disks included with the package. Make sure you put in the correct disk in your computer depending on your operating system. When the setup program asks you what model switch you have, make sure you select F1U126. • For Windows® 95/98 and Windows NT® (disk...
User Manual - Page 11

P73121/F1U126-KIT/EU/man.qxd 4/28/00 1:06 PM Page 7
File Transfer Function
En
When two PCs are connected to the AutoSwitch, they can exchange files through any standard file transfer program such as Windows® Direct Cable Connection, Interlink™ or LapLink®.
NOTE:
Port A can only file transfer to Port B and Port C to Port D only. If a pair...
User Manual - Page 12
P73121/F1U126-KIT/EU/man.qxd 4/28/00 1:06 PM Page 8
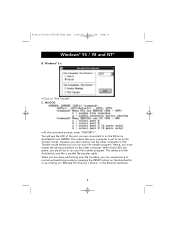
Windows® 95 / 98 and NT®
B. Windows® 3.x:
• Click on "File Transfer". C. MS-DOS:
• At the command prompt, enter "SWPORT f". You will see the LED of the port you are connected to on the Bitronics AutoSwitch turn GREEN. This means that your computer is set to...
User Manual - Page 13

.../F1U126-KIT/EU/man.qxd 4/28/00 1:06 PM Page 9
Windows® 95 / 98 and NT® (continued)
En
Setting up the Bitronics Software for use with 1 PC to 4 Devices Before anything else, make sure that the drivers of the four devices are installed on the computer already, and that each device has been tested and works on its own. When one computer...
User Manual - Page 14

... system (like a
Zip® Drive, CD-ROM, LS-120, etc...), use the "Mass Storage Device" setting. • If you are using a printer, use the printer driver used for that particular
printer on that port of the Bitronics switch. If it does not show up in this menu, that means the printer drivers have not been installed. (In that case, reinstall the printer drivers and repeat this step...
User Manual - Page 15
P73121/F1U126-KIT/EU/man.qxd 4/28/00 1:06 PM Page 11
Windows® 95 / 98 and NT® (continued)
En
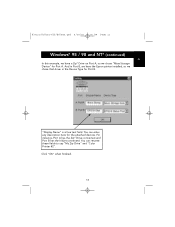
In this example, we have a Zip® Drive on Port A, so we chose "Mass Storage Device" for Port A. And in Port B, we have the Epson printer installed, so we chose that driver in the Device Type for Port B.
"Display Name" is a free text field. You...
User Manual - Page 16
P73121/F1U126-KIT/EU/man.qxd 4/28/00 1:06 PM Page 12
Windows® 95 / 98 and NT® (continued)
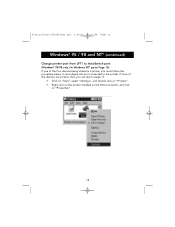
Change printer port from LPT1 to AutoSwitch port: (Windows® 95/98 only, for Windows NT® go to Page 15) If one of the four devices being shared is a printer, you must follow the procedure below to reconfigure the port connected to...
User Manual - Page 17

.../F1U126-KIT/EU/man.qxd 4/28/00 1:06 PM Page 13
Windows® 95 / 98 and NT® (continued)
En
Click on the "Details" tab. In the pull-down menu "Print to the following port:", select the correct port this printer is connected to on the Bitronics switch:
• LPx1 - PA (autoswitch) - Select this if the printer is connected to Port...
User Manual - Page 18
P73121/F1U126-KIT/EU/man.qxd 4/28/00 1:06 PM Page 14
Windows® 95 / 98 and NT® (continued)
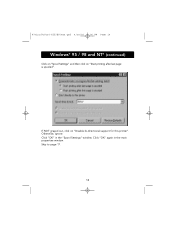
Click on "Spool Settings" and then click on "Start printing after last page is spooled".
If NOT grayed out, click on "Disable bi-directional support for this printer". Otherwise, ignore. Click "OK" in the "Spool Settings" window. Click "OK" again in the main properties window. Skip to page 17.
14
User Manual - Page 19
P73121/F1U126-KIT/EU/man.qxd 4/28/00 1:06 PM Page 15
Windows NT®
En
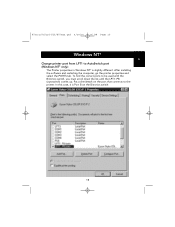
Change printer port from LPT1 to AutoSwitch port (Windows NT® only):
The Printer properties in Windows NT® is slightly different. After installing the software and restarting the computer, go the printer properties and select the PORTS tab. To find the correct ports to be used with the Bitronics switch, you must...
User Manual - Page 20
P73121/F1U126-KIT/EU/man.qxd 4/28/00 1:06 PM Page 16
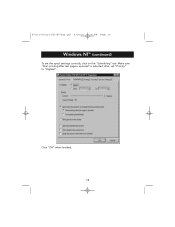
Windows NT® (continued)
To set the spool settings correctly, click on the "Scheduling" tab. Make sure "Start printing after last page is spooled" is selected. Also, set "Priority" to "Highest":
Click "OK" when finished.
16
User Manual - Page 21

P73121/F1U126-KIT/EU/man.qxd 4/28/00 1:06 PM Page 17
Using the Bitronics Software
En
Example: Four Printers Used by One Computer The Bitronics Software automatically handles printing chores by directing your print jobs to the correct port on the Bitronics switch based on the settings you set in the "Printer Properties" and the "Settings" in the steps shown in the last 6 pages. When...
User Manual - Page 22

... everything else. But remember, ALL THE SETTINGS MUST BE CORRECT, otherwise you may print garbage out of the wrong printer! Below, the user has chosen the LaserJet™ printer. Here, this printer is connected to Port A of the AutoSwitch. When the print job is sent, the Bitronics software tells the Bitronics switch to switch to Port A, then lets the print job go...
User Manual - Page 23

P73121/F1U126-KIT/EU/man.qxd 4/28/00 1:06 PM Page 19
Using the Bitronics Software (continued)
En
EXAMPLE: Sharing One Printer and a Zip® Drive (or any other mass storage device)
When dealing with a mass storage device (devices that add a drive letter to your system like E:) such as a Zip® Drive, the Bitronics Software in the system tray must be configured so that the Bitronics switch is...
User Manual - Page 24

P73121/F1U126-KIT/EU/man.qxd 4/28/00 1:06 PM Page 20
Using the Bitronics Software (continued)
2. Click on the port that has the mass storage device connected. In this case, it is a Zip® Drive on Port A. As you can see, the "Display Name" entered above appears below as you had entered it. Click "OK".
Now, the Bitronics switch will always keep...
User Manual - Page 25

P73121/F1U126-KIT/EU/man.qxd 4/28/00 1:06 PM Page 21
Using the Bitronics Software (continued)
En
Using any other parallel device (not printers or mass storage devices) with a printer
When dealing with other parallel port devices, they are set as "Scanners" in the "Settings" (page 10). Examples of these are scanners, parallel port cameras, and tape drives. When you need access to this device, ...
User Manual - Page 26
...", select "Belkin Bitronics Switch", and select "AutoSwitch-Multi PCs". ADVANCED USER TIP: If you are using devices with pass-through ports (like Zip® Drives and scanners), you can connect a printer to the pass-through port and use the other device port on the Bitronics switch to connect to another device. Just be sure that the printer driver has its Port set to the correct device port. For...