Asus P9X79 driver and firmware

Related Asus P9X79 Manual Pages
Download the free PDF manual for Asus P9X79 and other Asus manuals at ManualOwl.com
User Manual - Page 4

... Control 3-19
3.4.3 CPU Performance Settings 3-22
3.5 Advanced menu 3-26
3.5.1 CPU Configuration 3-27
3.5.2 CPU Power Management Configuration 3-28
3.5.3 PCH Configuration 3-29
3.5.4 SATA Configuration 3-29
3.5.5 USB Configuration 3-32
3.5.6 Onboard Devices Configuraton 3-33
3.5.7 APM 3-35
3.6 Monitor menu 3-36
3.7 Boot menu 3-39
3.8 Tools menu 3-41
3.8.1 ASUS EZ Flash...
User Manual - Page 5
... Sensor Recorder 4-12 4.3.7 Probe II 4-13 4.3.8 USB 3.0 Boost 4-14 4.3.9 ASUS Update 4-15 4.3.10 MyLogo2 4-16 4.3.11 Audio configurations 4-18
4.4 RAID configurations 4-19 4.4.1 RAID definitions 4-19 4.4.2 Installing Serial ATA hard disks 4-20 4.4.3 Setting the RAID item in BIOS 4-20 4.4.4 Intel® Rapid Storage Technology Option ROM utility 4-20
4.5 Creating a RAID driver disk 4-24...
User Manual - Page 8
... motherboard package and the software. • Chapter 5: Multiple GPU technology support This chapter describes how to install and configure multiple AMD® CrossFireX™ and NVIDIA® SLI™ graphics cards.
Where to find more information
Refer to the following sources for additional information and for product and software updates. 1. ASUS websites
The ASUS website provides updated...
User Manual - Page 12

.../Mouse combo port 4 x USB 3.0/2.0 ports (blue) 6 x USB 2.0/1.1 ports (white port can be switched to USB BIOS
Flashback) 1 x IEEE1394a port 1 x USB BIOS Flashback button 1 x LAN (RJ-45) port 1 x Optical S/PDIF Out port 1 x eSATA 6Gb/s port (red) 1 x Power eSATA 6Gb/s port (green) 8-channel Audio I/O
4 x USB 2.0/1.1 connectors support additional 8 USB ports 2 x SATA 6Gb/s connectors 4 x SATA 3Gb...
User Manual - Page 17
... cable connections.
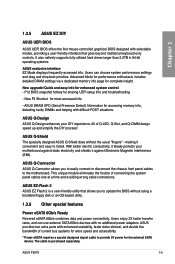
ASUS EZ-Flash 2 ASUS EZ Flash 2 is a user-friendly utility that allows you to update the BIOS without using a bootable floppy disk or an OS-based utility.
1.3.6 Other special features
Power eSATA 6Gb/s Ready Powered eSATA 6Gb/s combines data and power connectivity. Users enjoy 2X faster transfer rates, and can use external SATA 6Gb/s devices with no additional power adapters...
User Manual - Page 24

... is recommended to protect the CPU.
• Always install DIMMs with the same CAS latency. For optimum compatibility, we recommend that you obtain memory modules from the same vendor.
• Due to the memory address limitation on 32-bit Windows OS, when you install 4GB or more memory on the motherboard, the actual usable memory for the OS can be...
User Manual - Page 35

... fail to boot due to BIOS overclocking, press the MemOK! switch to boot and load BIOS default settings. A messgae will appear during POST reminding you that the BIOS has been restored to its default settings.
• We recommend that you download and update to the latest BIOS version from the ASUS website at www.asus.com after using the MemOK! function.
ASUS P9X79
2-17
User Manual - Page 41
...a RAID driver disk".
• Windows 7 & Vista: When [SATA Mode] is set to [RAID Mode], you must load IRST Driver during Windows 7 or Vista installation for the system to detect the Optical Disk Drive (the ODD should be connected to the Intel SATA ports), or else the ODD will not run. We strongly recommend you save the IRST Driver from SCD to the USB Flash Drive before OS installation.
ASUS P9X79...
User Manual - Page 42
... in the motherboard support DVD.
• When using NCQ, set the SATA Mode in the BIOS to [AHCI Mode]. Refer to section 3.5.4 SATA Configuration for details.
• You must install Windows® XP Service Pack 3 or later versions before using Serial ATA hard disk drives. The Serial ATA RAID feature is available only if you are using Windows® XP SP3 or later versions.
IRST driver note for...
User Manual - Page 111

... the instructions of this chapter to update your BIOS if necessary.
Visit the ASUS website (www.asus.com) to download the latest BIOS file for this motherboard.
The following utilities allow you to manage and update the motherboard BIOS setup program.
1. ASUS Update: Updates the BIOS in Windows® environment. 2. ASUS EZ Flash 2: Updates the BIOS using a USB flash drive. 3. ASUS CrashFree BIOS...
User Manual - Page 119

... drivers, software applications, and utilities that you can install to avail all motherboard features.
The contents of the support DVD are subject to change at any time without notice. Visit the ASUS website at www.asus.com for updates.
4.2.1 Running the support DVD
Place the support DVD into the optical drive. The DVD automatically displays the Drivers menu if Autorun is enabled in your computer...
User Manual - Page 121

...
To install AI Suite II on your computer 1. Place the support DVD to the optical drive. The Drivers installation tab appears if your
computer has enabled the Autorun feature. 2. Click on the Utilities tab, then click AI Suite II. 3. Follow the onscreen instructions to complete installation.
Using AI Suite II AI Suite II automatically starts when you enter the Windows®...
User Manual - Page 136
... Minimize button
Control settings
Analog and digital connector status
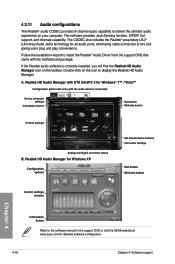
B. Realtek HD Audio Manager for Windows XP
Configuration options
Set default device buttons Connector settings
Exit button Minimize button
Control settings window
Chapter 4
Information button
Refer to the software manual in the support DVD or visit the ASUS website at www.asus.com for detailed software configuration.
4-18...
User Manual - Page 137
...
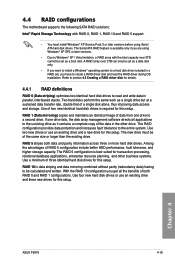
The motherboard supports the following SATA RAID solutions:
Intel® Rapid Storage Technology with RAID 0, RAID 1, RAID 10 and RAID 5 support.
• You must install Windows® XP Service Pack 3 or later versions before using Serial ATA hard disk drives. The Serial ATA RAID feature is available only if you are using Windows® XP SP3 or later versions.
• Due to Windows®...
User Manual - Page 142

...your computer. 2. Press during POST to enter the BIOS setup utility. 3. Set the optical drive as the primary boot device. 4. Insert the support DVD into the optical drive. 5. Save changes and exit BIOS. 6. When the Make Disk menu appears, press to create a RAID driver disk. 7. Insert a formatted floppy disk into the USB floppy disk drive, then press . 8. Follow the succeeding screen instructions...
User Manual - Page 143

...then insert the floppy disk with RAID driver into the USB floppy disk drive. 3. When prompted to select the SCSI adapter to install, select the RAID driver for the
corresponding OS version. 4. Follow the succeeding screen instructions to complete the installation.
To install the RAID driver for Windows® Vista or later OS: 1. During the OS installation, click Load Driver to allow you to select...
User Manual - Page 144

... floppy disk containing the RAID driver. Refer to the steps below: 1. Using another computer, plug the USB floppy disk drive, and insert the floppy disk
containing the RAID driver.
2. Right-click My Computer on the Windows® desktop or start menu, and then select Manage from the pop-up window.
or
3. Select Device Manager. From the Universal Serial Bus controllers, right-click xxxxxx USB Floppy...
User Manual - Page 147

... graphics cards to your system.
To uninstall existing graphics card drivers:
1. Close all current applications. 2. For Windows XP, go to Control Panel > Add/Remove Programs.
For Windows Vista, go to Control Panel > Programs and Features. 3. Select your current graphics card driver/s. 4. For Windows XP, select Add/Remove.
For Windows Vista, select Uninstall. 5. Turn off your computer.
ASUS P9X79...
User Manual - Page 149

... Engine Control Center Advanced View window.
Enabling Dual CrossFireX technology
1. In the Catalyst Control Center window,
click Graphics Settings > Performance > AMD CrossFireXTM Configuration.
2. From the Graphics Adapter list, select the graphics card to act as the display GPU.
3. Select Enable CrossFireXTM.
4.
Click Apply, and then click OK to exit the window.
1
ASUS P9X79
2 3
4
5-3
User Manual - Page 151

... the power supply to the two graphics cards separately.
6. Connect a VGA or a DVI cable to the graphics card.
SLI bridge
Goldfingers
5.2.3 Installing the device drivers
Refer to the documentation that came with your graphics card package to install the device drivers.
Ensure that your PCI Express graphics card driver supports the NVIDIA® SLI™ technology. Download the latest driver from...