Asus P5W driver and firmware

Related Asus P5W Manual Pages
Download the free PDF manual for Asus P5W and other Asus manuals at ManualOwl.com
User Manual - Page 5
...18 4.4.1 JumperFree Configuration 4-18 4.4.2 LAN Cable Status 4-22 4.4.3 USB Configuration 4-23 4.4.4 CPU Configuration 4-24 4.4.5 Chipset 4-26 4.4.6 Onboard Devices Configuration 4-28 4.4.7 PCI PnP 4-30 4.5 Power menu 4-32 4.5.1 Suspend Mode [Auto 4-32 4.5.2 Repost Video on S3 Resume [No 4-32 4.5.3 ACPI 2.0 Support [No 4-32 4.5.4 ACPI APIC Support [Enabled 4-32 4.5.5 APM Configuration...
User Manual - Page 6
....... 5-64 5.5.2 Creating a RAID driver disk in Windows 5-64
Chapter 6: ATI® CrossFire™ technology support 6.1 Overview 6-1
6.1.1 Requirements 6-1 6.1.2 Before you begin 6-1 6.2 Installing CrossFire™ graphics cards 6-2 6.3 Software information 6-5 6.3.1 Installing the device drivers 6-5 6.3.2 Using the Catalyst™ Control Center 6-7
Appendix: CPU features A.1 Intel®...
User Manual - Page 77

... package.
ASUS Update requires an Internet connection either through a network or an Internet Service Provider (ISP).
Installing ASUS Update To install ASUS Update:
1. Place the support CD in the optical drive. The Drivers menu appears. 2. Click the Utilities tab, then click ASUS Update. See page 5-3 for the Utilities
screen menu. 3. The ASUS Update utility is copied to your system.
ASUS P5W
4-
User Manual - Page 81

... the floppy disk drive or the USB port.
Press + during POST to display the following.
ASUSTek EZ Flash 2 BIOS ROM Utility B312
FLASH TYPE: Winbond W39V080A 8Mb LPC
Current ROM
BOARD: P5W VER: 0014 [0100] DATE: 05/19/2006
Update ROM BOARD: Unknown VER: Unknown DATE: Unknown
PATH: C:\
A:
WIN98SE
C:
NETTERM
DRIVERS
RECYCLED
WUTEMP
NEWFOL~1
INSTALL
TEST_REB
MSDOWNLD...
User Manual - Page 86
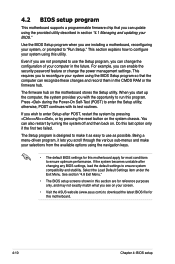
... can enable the security password feature or change the power management settings. This requires you to reconfigure your system using the BIOS Setup program so that the computer can recognize these changes and record them in the CMOS RAM or the firmware hub.
The firmware hub on the motherboard stores the Setup utility. When you start up the computer, the system provides you...
User Manual - Page 125
... time without notice. Visit the ASUS website (www.asus.com) for updates.
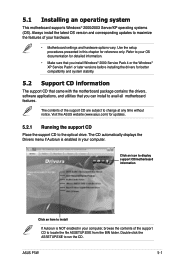
5.2.1 Running the support CD
Place the support CD to the optical drive. The CD automatically displays the Drivers menu if Autorun is enabled in your computer.
Click an icon to display support CD/motherboard information
Click an item to install
If Autorun is NOT enabled in your computer, browse the contents of the...
User Manual - Page 126

... came with the utility for details.
Realtek Audio Driver Installs the Realtek® ALC882M audio driver and application. See section "5.3.3 Audio configurations" for details.
JMicron JMB36X RAID Controller Driver Installs the JMicron® JMB363 RAID controller driver.
Marvell Yukon Gigabit Ethernet Driver Installs the Marvell Yukon Gigabit Ethernet LAN driver.
5-
Chapter 5: Software support
User Manual - Page 127

USB 2.0 Driver Installs the USB 2.0 driver.
5.2.3 Utilities menu
The Utilities menu displays the software applications and utilities that the motherboard supports. Click on an item to install.
ASUS InstAll - Installation Wizard for Utilities Launches the ASUS InstallAll utilities installation wizard.
Marvell Yukon VCT Application Installs the Marvell® Yukon Virtual Cable Tester™ (VCT) ...
User Manual - Page 134

... automatically installed when you install the ASUS Update utility from the support CD. See section "5.2.3 Utilities menu" for details.
• Before using the ASUS MyLogo 2, use the AFUDOS utility to make a copy of your original BIOS file, or obtain the latest BIOS version from the ASUS website. See section "4.1.2 AFUDOS utility."
• Make sure that the BIOS item Full Screen Logo is set...
User Manual - Page 137
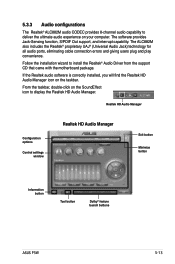
... software is correctly installed, you will find the Realtek HD Audio Manager icon on the taskbar.
From the taskbar, double-click on the SoundEffect icon to display the Realtek HD Audio Manager.
Realtek HD Audio Manager
Configuration options
Control settings window
Realtek HD Audio Manager
Exit button
Minimize button
Information button
Tool button
Dolby® feature launch buttons
ASUS P5W...
User Manual - Page 144
... a healthy operating condition.
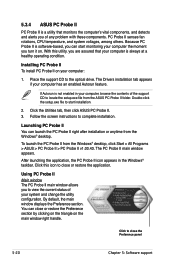
Installing PC Probe II To install PC Probe II on your computer:
1. Place the support CD to the optical drive. The Drivers installation tab appears if your computer has an enabled Autorun feature.
If Autorun is not enabled in your computer, browse the contents of the support CD to locate the setup.exe file from the ASUS PC Probe II...
User Manual - Page 154

...RAID driver disk" for details.
5.4.1 Installing Serial ATA hard disks
The motherboard supports Serial ATA hard disk drives. For optimal performance, install identical drives of the same model and capacity when creating a disk array. To install the SATA hard disks for a RAID configuration:
1. Install the SATA hard disks into the drive bays. 2. Connect the SATA signal cables. 3. Connect a SATA power...
User Manual - Page 164
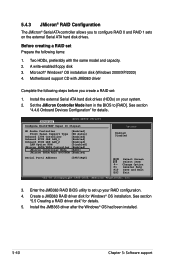
... a RAID set:
1. Install the external Serial ATA hard disk drives (HDDs) on your system. 2. Set the JMicron Controller Mode item in the BIOS to [RAID]. See section
"4.4.6 Onboard Devices Configuration" for details.
Advanced
BIOS SETUP UTILITY
Configure Win627EHF Super IO Chipset
HD Audio Controller [Enabled] Front Panel Support Type [HD Audio]
Onboard 1394 Controller [Enabled] Onboard PCIE...
User Manual - Page 176

... the EZ-Backup Manager utility to view the status of hard disks installed on the EZ_RAID1 and EZ_RAID2 connectors.
Status window
The ASUS EZ-Backup Manager status window allows you to monitor the devices connected to the host computer.
Event log Specify firmware
Configure pop-ups Serial number
Drive status and information
Capacity information
Volume information
Refresh button
Quit button...
User Manual - Page 178
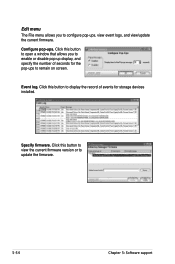
... this button to open a window that allows you to enable or disable pop-up display, and specify the number of seconds for the pop-ups to remain on screen.
Event log. Click this button to display the record of events for storage devices installed.
Specify firmware. Click this button to view the current firmware version or to update the firmware.
5-54
Chapter 5: Software support
User Manual - Page 188
...Safe, Big, or Fast RAID set through the ASUS EZ-Backup.
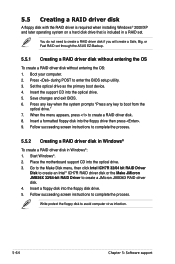
5.5.1 Creating a RAID driver disk without entering the OS
To create a RAID driver disk without entering the OS: 1. Boot your computer. 2. Press during POST to enter the BIOS setup utility. 3. Set the optical drive as the primary boot device. 4. Insert the support CD into the optical drive. 5. Save changes and exit BIOS. 6. Press any key when...
User Manual - Page 193

... the ASUS P5W motherboard. • Make sure that your power supply unit (PSU) can provide at least the
minimum power required by your system. See "14. Power connectors" on page 2-40 for details.
• Visit the ATI website or download the Radeon® X850 Crossfire™ Edition User's Guide from the support CD for detailed hardware requirements and installation procedures...
User Manual - Page 197

... with administrator rights. 2. Windows® auto-detects the
CrossFire™ graphics cards and displays the Found New Hardware Wizard window. Click Cancel. 3. Place the CrossFire™ installation CD in your optical drive and install drivers from the opening menu.
4. Click Next to continue from the installation window that appears.
5. Read the License Agreement, then click Yes.
ASUS P5W
6-
User Manual - Page 198
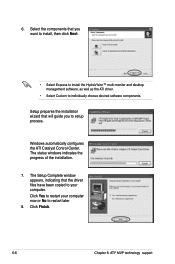
... Custom to individually choose desired software components.
Setup prepares the installation wizard that will guide you to setup process.
Windows automatically configures the ATI Catalyst Control Center. The status windows indicates the progress of the installation.
7. The Setup Complete window appears, indicating that the driver files have been copied to your computer. Click Yes to restart your...
User Manual - Page 207
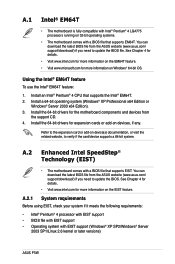
...Intel® Pentium® 4 CPU that supports the Intel® EM64T. 2. Install a 64-bit operating system (Windows® XP Professional x64 Edition or
Windows® Server 2003 x64 Edition). 3. Install the 64-bit drivers for the motherboard components and devices from
the support CD. 4. Install the 64-bit drivers for expansion cards or add-on devices, if any.
Refer to the expansion card or add-on...