Asus H81M-A driver and firmware

Related Asus H81M-A Manual Pages
Download the free PDF manual for Asus H81M-A and other Asus manuals at ManualOwl.com
H81M-A User's Manual - Page 2
.... Copies of these licenses are included in this product. Where the applicable license entitles you to the source code of such software and/or other additional data, you may obtain it for a period of three years after our last shipment of the product, either (1) for free by downloading it from http://support.asus.com/download or...
H81M-A User's Manual - Page 3

... guide...iv Package contents...vi H81M series specifications summary vi Product introduction 1.1 Before you proceed 1-1 1.2 Motherboard overview 1-1 1.3 Central Processing Unit (CPU 1-4 1.4 System memory 1-7 1.5 Expansion slots 1-9 1.6 Jumpers...1-11 1.7 Connectors 1-13 1.8 Onboard LEDs 1-20 1.9 Software support 1-21 BIOS information 2.1 Managing and updating your BIOS 2-1 2.2 BIOS setup...
H81M-A User's Manual - Page 4

... try to fix it by yourself. Contact a qualified service technician or your retailer.
Operation safety
• Before installing the motherboard and adding devices on it, carefully read all the manuals that came with the package.
• Before using the product, ensure all cables are correctly connected and the power cables are not damaged. If you detect any damage...
H81M-A User's Manual - Page 5

... updates. 1. ASUS websites
The ASUS website provides updated information on ASUS hardware and software products. Refer to the ASUS contact information. 2. Optional documentation Your product package may include optional documentation, such as warranty flyers, that may have been added by your dealer. These documents are not part of the standard package.
Conventions used in this guide
To ensure...
H81M-A User's Manual - Page 6

... Graphics Processor - Intel® HD Graphics support
Multi-VGA output support: HDMI/DVI-D/RGB port (H81M-A model)
Multi-VGA output support: DVI-D/RGB port (H81M-E model) - Supports HDMI with max. resolution up to 4096x2160@24Hz / 2560x1600@60Hz (H81M-A model) - Supports DVI-D with max. resolution up to 1920 x1200@60Hz - Supports RGB with max. resolution 1920x1200@60Hz - Maximum shared memory of...
H81M-A User's Manual - Page 8
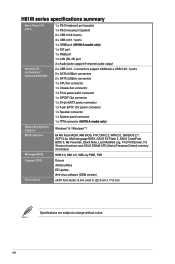
... 4 x USB 2.0/1.1 ports 1 x HDMI port (H81M-A model only) 1 x DVI port 1 x RGB port 1 x LAN (RJ-45) port 3 x Audio jacks support 8-channel audio output
2 x USB 2.0/1.1 connectors support additional 4 USB 2.0/1.1 ports 2 x SATA 6.0Gb/s connectors 2 x SATA 3.0Gb/s connectors 1 x CPU fan connector 1 x Chassis fan connector 1 x Front panel audio connector 1 x S/PDIF Out connector 1 x 24-pin EATX power...
H81M-A User's Manual - Page 9

... before installing or removing the motherboard. Failure to do so can cause you physical injury and damage motherboard components.
1.2.1 Placement direction
When installing the motherboard, ensure that you place it into the chassis in the correct orientation. The edge with external ports goes to the rear part of the chassis as indicated in the image below.
ASUS H81M...
H81M-A User's Manual - Page 12

... (7-pin SATA3G_1~2 [dark brown]) 9. Intel® H81 Serial ATA 6.0Gb/s connector (7-pin SATA6G_1~2 [yellow]) 10. USB device wake-up (3-pin USBPWF) 11. USB 2.0 connectors (10-1 pin USB910, 1112) 12. Clear RTC RAM (3-pin CLRTC) 13. Digital audio connector (4-1 pin SPDIF_OUT) 14. TPM connector (20-1 pin TPM) *H81M-A model only 15. Front panel audio connector (10-1 pin AAFP) 16. Onboard LED...
H81M-A User's Manual - Page 13

1.3.1 Installing the CPU 1
2
3
A B
4
C
5
A
B
ASUS H81M Series
1-5
H81M-A User's Manual - Page 14

1.3.2 CPU heatsink and fan assembly installation
Apply the Thermal Interface Material to the CPU heatsink and CPU before you install the heatsink and fan if necessary.
To install the CPU heatsink and fan assembly
1
A
B
2
B
A
3
4
1-6
Chapter 1: Product introduction
H81M-A User's Manual - Page 15

... memory module to the DDR3 slot.
According to Intel® CPU spec, DIMM voltage below 1.65V is recommended to protect the CPU.
DIMM_A1 DIMM_B1
Channel
Sockets
Channel A
DIMM_A1
H81M-A
Channel B
DIMM_B1
H81M-A 240-pin DDR3 DIMM sockets
1.4.2 Memory configurations
You may install 1GB, 2GB, 4GB, and 8GB unbuffered non‑ECC DDR3 DIMMs into the DIMM sockets.
ASUS H81M...
H81M-A User's Manual - Page 16

... than 2133 MHz and its corresponding timing or the loaded X.M.P. Profile is not the JEDEC memory standard. The stability and compatibility of these memory modules depend on the CPU's capabilities and other installed devices.
• The maximum 16GB memory capacity can be supported with 8GB or above DIMMs. ASUS will update the memory QVL once the DIMMs are available in the...
H81M-A User's Manual - Page 17
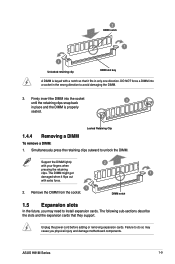
... press the retaining clips outward to unlock the DIMM.
Support the DIMM lightly
2
with your fingers when
pressing the...install expansion cards. The following sub‑sections describe the slots and the expansion cards that they support.
Unplug the power cord before adding or removing expansion cards. Failure to do so may cause you physical injury and damage motherboard components.
ASUS H81M...
H81M-A User's Manual - Page 18
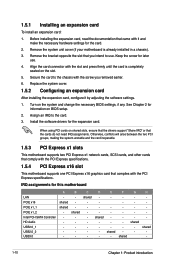
... motherboard supports two PCI Express x1 network cards, SCSI cards, and other cards that comply with the PCI Express specifications.
1.5.4 PCI Express x16 slot
This motherboard supports one PCI Express x16 graphics card that complies with the PCI Express specifications.
IRQ assignments for this motherboard
LAN PCIE x16 PCIE x1_1 PCIE x1_2 Intel PCH SATA Controller HD Audio USB2.0_1 USB2.0_2 USB3...
H81M-A User's Manual - Page 22

... and 2. These two 9-pin Universal Serial Bus (USB) ports connect to USB 3.0/2.0 devices.
• Due to USB 3.0 controller limitations, USB 3.0 devices can only be used under a Windows® OS environment and after USB 3.0 driver installation.
• The plugged USB 3.0 device may run on xHCI or EHCI mode, depending on the operating system's setting.
• USB 3.0 devices can only be used for...
H81M-A User's Manual - Page 23

... is set to [HD].
2. Digital audio connector (4-1 pin SPDIF_OUT)
This connector is for an additional Sony/Philips Digital Interface (S/PDIF) port. Connect the S/PDIF Out module cable to this connector, then install the module to a slot opening at the back of the system chassis.
+5V SPDIFOUT GND
H81M-A
SPDIF_OUT
H81M-A Digital audio connector
The S/PDIF module is purchased separately.
ASUS H81M...
H81M-A User's Manual - Page 29
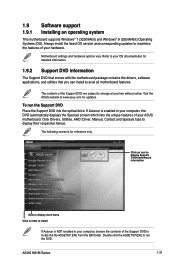
... without notice. Visit the ASUS website at www.asus.com for updates.
To run the Support DVD Place the Support DVD into the optical drive. If Autorun is enabled in your computer, the DVD automatically displays the Specials screen which lists the unique features of your ASUS motherboard. Click Drivers, Utilities, AHCI Driver, Manual, Contact and Specials tabs to display their respective menus.
The...
H81M-A User's Manual - Page 31
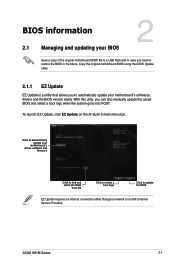
... your BIOS
2
Save a copy of the original motherboard BIOS file to a USB flash disk in case you need to restore the BIOS in the future. Copy the original motherboard BIOS using the ASUS Update
utility.
2.1.1 EZ Update
EZ Update is a utility that allows you to automatically update your motherboard's softwares, drivers and the BIOS version easily. With this utlity, you can also manually update the...
H81M-A User's Manual - Page 32
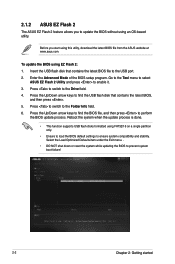
... utility, download the latest BIOS file from the ASUS website at www.asus.com.
To update the BIOS using EZ Flash 2: 1. Insert the USB flash disk that contains the latest BIOS file to the USB port. 2. Enter the Advanced Mode of the BIOS setup program. Go to the Tool menu to select
ASUS EZ Flash 2 Utility and press to enable it. 3. Press to switch to the Drive field...
H81M-A User's Manual - Page 33

... the motherboard support DVD or a USB flash drive that contains the updated BIOS file.
• Before using this utility, rename the BIOS file in the removable device to H81MA.CAP (for H81M-A), H81ME.CAP (for H81M-E).
• The BIOS file in the support DVD may not be the latest version. Download the latest BIOS file from the ASUS website at www.asus.com.
Recovering the BIOS To recover the BIOS...