Acer DV433 driver and firmware

Related Acer DV433 Manual Pages
Download the free PDF manual for Acer DV433 and other Acer manuals at ManualOwl.com
User Manual - Page 2
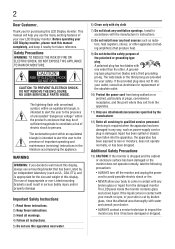
...Display monitor. This manual will help you use the many exciting features of your new LCD Display monitor. Before operating your LCD Display monitor, please read this manual... NO USER-SERVICIBLE PARTS INSIDE.
The lightning flash with arrowhead ...ventilation openings. Install in accordance with the manufacturer's instructions.
8) Do not install near any....
10) Protect the power cord from being walked ...
User Manual - Page 3

... lifetime or result in fire.
Installation, Care, and Service Installation
Follow these recommendations and precautions and heed all warnings when installing your LCD Display monitor: 18) When operating the LCD display with its AC 220-
240V power supply in Europe, use the power supply provided with this display. If a power cord is not supplied with this display, please contact your supplier...
User Manual - Page 4

...Setting.
39) Use non-interlaced signals.
40) Do not use primary color blue on a dark background, as it is difficult to see and may produce eye fatigue due to insufficient contrast.
41) Adjust the display's brightness, contrast, and sharpness controls to enhance readability.
42) Position the display at a 90° angle to windows...month.
51) When installing the remote control batteries; • ...
User Manual - Page 6
... all the connected devices...33 Power Management Function ...36 Selecting the video input ...37 Select using the INPUT button on the infrared remote control 37 Select using the SOURCE button on the LCD display 37 Controlling the external devices ...37 Selecting the OSD language...38 Initial Setting ...39 Selecting the picture mode ...40 Picture adjustment...41 Audio settings...42 Treble...
User Manual - Page 9
... a computer via a LAN network. See pages 31.
Others Built-in Speakers - This display offers built-in stereo speakers to deliver audio messages. External stereo
speakers can also be used. The user can switch between external or built-in speakers from the menu. Remote Control - An infrared remote control is supplied to control the various functions of this display,
including power...
User Manual - Page 18

... it dry immediately. • Avoid exposure to heat and steam. • Other than to install the batteries, do not open the infrared remote control.
Installing and removing the infrared remote control batteries The infrared remote control is powered by two 1.5 V AAA batteries.
How to install the batteries
1 Unlock and pull up the cover.
2 Align the batteries according to the (+) and...
User Manual - Page 20

... 2 Preparation for use
Chapter 2
Preparation for use
Preparation for installation
Determine the installation location
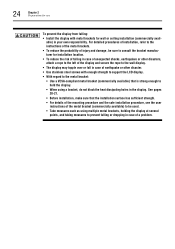
CAUTION
DO NOT ATTEMPT TO INSTALL THE LCD DISPLAY BY YOURSELF. Installing your LCD display must be done by a qualified technician. Contact your dealer for more information.
NOTE
Proper operation of the display is not guaranteed when it is mounted upside down or...
User Manual - Page 22

... the screen face down
Lay the protective sheet on a table, which was wrapped around the display when it was packaged, beneath the screen surface so as not to scratch the screen surface.
This device cannot be used or installed without a mounting accessory. Failure to follow the correct mounting procedures can result in damage...
User Manual - Page 24
... with enough strength to support the LCD display. • With regard to the metal bracket: • Use a VESA-compliant metal bracket (commercially available) that is strong enough to
hold the display. • When using a bracket, do not block the heat dissipating holes in the display. See pages
20-21. • Before installation, make sure that...
User Manual - Page 25

... lifetime of the backlight is shorter than when in landscape orientation.
Installation in the portrait position The buttons should be on the bottom side when viewed from the front of the display. This display doesn't have a function to rotate displayed images. To display images in the portrait orientation, use already rotated images
buttons
Landscape
Portrait...
User Manual - Page 26

... and face down (between 0° and 15°) installation
buttons 0~15°
0~15°
The following operation environment details apply when the display is installed in portrait and face up orientations. • Temperature 0 - 40°C / 32 - 104°F • Humidity 20 - 80% (without condensation)
Power connection instructions
1 Confirm Main Switch is off before making any...
User Manual - Page 29
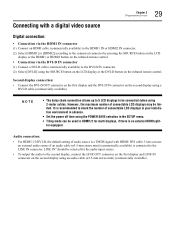
... of connectable LCD displays in your installation environment in advance.
• Set the power off time using the POWER SAVE selection in the SETUP menu. • Tiling mode can be used in HDMI1/2 for multi displays, if there is an external HDMI split-
ter equipped.
Audio connection:
• For HDMI 1/2/DVI-D, the default setting of audio source is a TMDS signal with HDMI/ DVI cable. Users can...
User Manual - Page 31

...; When you use a cross type LAN cable (commercially available), you can connect the display and the computer one-to-one without using a LAN hub, however, the computer may not be supported. It is recommended to check the operation in advance.
• If "LAN" control is selected, set "Standby Mode" to "Normal"; the power-on function with LAN control will not work when Standby...
User Manual - Page 53
...Display Monitor
53
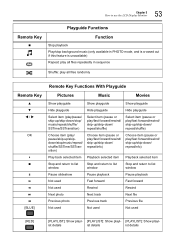
Remote Key
Playguide Functions
Function
Stop playback Play/stop background music (only available in PHOTO mode, and is crossed out if this feature is unavailable) Repeat: play all files repeatedly in sequence
Shuffle: play all files randomly
Remote Key
OK
BLUE]
Remote...to list window
Stop and return to list window
Stop and return to list window
Pause ...
User Manual - Page 54

... Display Monitor
Remote Key
[GREEN]
Remote Key Functions With Playguide
Pictures
Music
Movies
[INFO]: Show details of current file
[INFO]: Show details of current file
[INFO]: Show details of current file
[YELLOW]
[OPTION]: Slide show options
Not used
Not used
Info
Show/hide playguide
Show/hide playguide
Show/hide playguide
Return to list window...
User Manual - Page 56
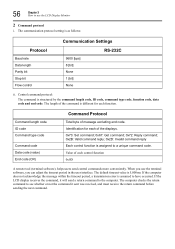
...
A remote tool (terminal software), helps users send control commands more conveniently. When you use the terminal software, you can adjust the timeout period in the user interface. The default timeout value is 5,000ms. If the computer does not acknowledge the message within the timeout period, a transmission error is assumed to have occurred. If the LCD display receives...
User Manual - Page 66

66
Chapter 3 How to use the LCD Display Monitor
Software Update (USB) Restore Default
Setup Menu Screen
Update software through the USB port. Reset settings to factory defaults.
Initial Setting Menu Screen
OSD Rotation Menu Language Time Format Clock Light Sensor Remote Operation Keyboard Operation Anti-Image Retention
Initial Setting Menu Screen
Selects portrait or landscape orientation for...
User Manual - Page 67

... other highimpact signage.
Set the number of displays used for the horizontal and vertical display.
For installations when Tiling mode is setup for a video wall, to decide the display area by screen position
Set the monitor ID number that is used for identification, especially when the "SET ID" key of the infrared remote controller and the control function by RS-232C...
User Manual - Page 68

... ID is set to 5, the
power supply is turned on after 1.5 seconds.
Controlling Multiple Displays Use these instructions to set a display's ID number with the infrared remote control.
1 Press [MENU]. 2 Use the DOWN button (▼), to move to the option "Multi Display Control", and press [OK]. 3 Use the LEFT (), and RIGHT (), buttons to select the display's two digit ID. 4 Exit...
User Manual - Page 69

System Information Menu Screen
Chapter 3 How to use the LCD Display Monitor
69
Model Name SW Version LAN Version IP Address
System Information Menu Screen
Shows the display's model name and number. Shows the display's current software version. Shows the display's current LAN firmware version. Shows the display's current IP address.