Acer Aspire 5560G driver and firmware
Drivers and firmware downloads for this Acer Computers item


Related Acer Aspire 5560G Manual Pages
Download the free PDF manual for Acer Aspire 5560G and other Acer manuals at ManualOwl.com
Acer Desktop User's Guide - Page 3

... device
Observe the following guidelines when connecting and disconnecting power to the power supply unit: Install the power supply unit before connecting the power cord to the AC power outlet. Unplug the power cord before removing the power supply unit from the computer. If the system has multiple sources of power, disconnect power from the system by unplugging all power cords from the power...
Acer Desktop User's Guide - Page 8

... a piece of cardboard extended from the
display's top front edge
• Avoid adjusting your display to an awkward viewing angle. • Avoid looking at bright light sources, such as open windows, for extended
periods of time.
Developing good work habits
Develop the following work habits to make your computer use more relaxing and productive...
Acer Desktop User's Guide - Page 11

... setup
2
Selecting a location
2
Opening the package
2
Connecting peripherals
3
Starting your computer
3
Shutting down your computer
3
System upgrade
4
Opening the computer
4
Setting up new components
4
Frequently asked questions
5
Taking care of your computer
7
Important tips
7
Cleaning and servicing
7
To clean your computer and keyboard
7
To clean your pointing device...
Acer Desktop User's Guide - Page 14
....
Setting up your computer
The AcerSystem is a versatile and powerful system, supporting a mainstream performance CPU. The computer uses a state-of-the-art bus architecture, which improves system efficiency and helps the system support varied multimedia and software applications.
Your AcerSystem has standard I/O (input/output) interfaces such as a parallel port, PS/2 keyboard and mouse ports, USB...
Acer Desktop User's Guide - Page 15

... function • Remote control for Microsoft® Windows® Vista / Microsoft®
Windows® XP Media Center Edition
Note: Mouse, keyboard, wireless keyboard or remote control configuration may vary by selected models
• User's Guide and Starter poster Other user documentation and third-party software.
Connecting peripherals
After everything is connected, plug the power cord into...
Acer Desktop User's Guide - Page 16
... proper setup and installation, please refer to the instructions provided with your new components.
Probable upgrades are: • Upgrade to high-capacity HDD • Expand high-level memory • Upgrade from a CD-ROM drive to CD-RW, DVD-ROM, DVD/CDRW combo or DVD write (selected models only)r • Install additional interface cards in empty PCI slots, e.g., PCI fax/modem card (selected...
Acer Desktop User's Guide - Page 17
... or missing. Insert the startup disk you created during Windows setup into the floppy drive and press Ctrl + Alt + Del to restart your computer. This will automatically diagnose your system and make necessary fixes. However, if the diagnostic utility still reports a problem, then you may have to perform the recovery process to restore your system to...
Acer Desktop User's Guide - Page 20

... not listed in the "Frequently asked questions" section on page 5 • If you want to replace or upgrade any of your computer's internal components
Asking for technical assistance
For technical assistance, contact your local dealer or distributor. You may also access the Web site (http://global.acer.com/support/index.htm) for information on how...
User Manual - Page 10
...• avoid tensing your muscles or shrugging your shoulders • install the external display, keyboard and mouse properly and within
comfortable reach
• if you view your ...graphics clarity.
• Eliminate glare and reflections by: • placing your display in such a way that the side faces the window or
any light source
• minimizing room light by using drapes, shades ...
User Manual - Page 17

...71
Fax/data modem
71
Built-in network feature
72
Fast Infrared (FIR) (for selected models)
72
Universal Serial Bus (USB)
73
IEEE 1394 port (for selected models)
73
PC Card slot
74
ExpressCard (for selected models)
75
Installing memory
76
BIOS utility
77
Boot sequence
77
Enable disk-to-disk recovery
77
Password
77
Using software
78
Playing DVD movies
78
Power management...
User Manual - Page 31
Empowering Technology
13
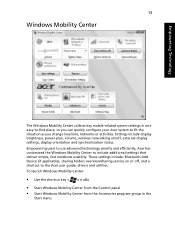
Windows Mobility Center
The Windows Mobility Center collects key mobile-related system settings in one easy-to-find place, so you can quickly configure your Acer system to fit the situation as you change locations, networks or activities. Settings include display brightness, power plan, volume, wireless networking on/off, external display settings, display orientation and...
User Manual - Page 39
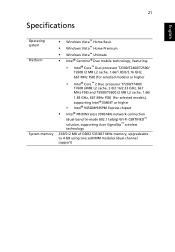
... MHz FSB) (for selected models), supporting Intel® EM64T or higher
• Intel® 945GM/945PM Express chipset
• Intel® PRO/Wireless 3945ABG network connection
(dual-band tri-mode 802.11a/b/g) Wi-Fi CERTIFIED™ solution, supporting Acer SignalUp™ wireless technology 256/512 MB of DDR2 533/667 MHz memory, upgradeable to 4 GB using two soDIMM modules...
User Manual - Page 64

... the tray. (If your computer's optical drive is a slot-load model, it will not have an eject hole.)
The keyboard does not respond.
Try attaching an external keyboard to a USB port on the computer. If it works, contact your dealer or an authorized service center as the internal keyboard cable may be loose.
The infrared port does not work.
Check...
User Manual - Page 65
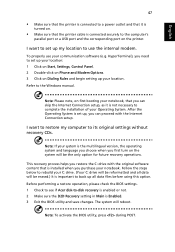
... software (e.g. HyperTerminal), you need to set up your location: 1 Click on Start, Settings, Control Panel. 2 Double-click on Phone and Modem Options. 3 Click on Dialing Rules and begin setting up your location. Refer to the Windows manual.
Note: Please note, on first booting your notebook, that you can skip the Internet Connection setup, as it is not necessary to complete the installation...
User Manual - Page 69
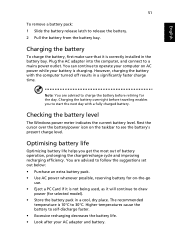
...sure that it is correctly installed in the battery bay. Plug the AC adapter into the computer, and connect to a mains power outlet. You can continue to operate your computer on AC power while your battery is ...to follow the suggestions set out below: • Purchase an extra battery pack. • Use AC power whenever possible, reserving battery for on-the-go
use. • Eject a PC Card if it is ...
User Manual - Page 96
English
78
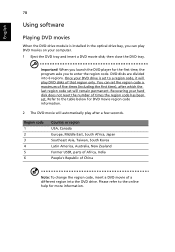
Using software
Playing DVD movies
When the DVD drive module is installed in the optical drive bay, you can play DVD movies on your computer. 1 Eject the DVD tray and insert a DVD movie disk; then close the DVD tray.
Important! When you launch the DVD player for the first time, the program asks you to enter the...
User Manual - Page 98

... save a backup of the current system configuration to hard disk, CD or DVD. You can also backup/restore the factory default image, and reinstall applications and drivers. Acer eRecovery Management consists of the following functions: 1 Create backup 2 Burn backup disc 3 Restore and recovery This chapter will guide you through each process.
Note: This feature is...
User Manual - Page 99

... toolbar to start Acer eRecovery Management. 2 Switch to the restore and recovery page by selecting the Restore button. 3 Select the backup point you would like to restore from. You can also
choose to recover the system from a factory default image, recover from a previously created CD/DVD or reinstall applications and drivers.
Follow the instructions on screen...
User Manual - Page 115
... 49 charging 51 checking charge level 51 installing 50 low conditions 52 maximizing life 49 optimizing 51 removing 51 using the first time 49
BIOS utility 77 brightness
hotkeys 36
C
caps lock 33 on indicator 27
care AC adapter xiii battery pack xiv computer xiii
CD-ROM ejecting manually 46 troubleshooting 46
charging checking level 51...
User Manual - Page 116

...
on indicator 27 memory
installing 76 messages
error 83 modem 71
N
network 72 Notebook Manager
hotkey 35 num lock 33
on indicator 27 numeric keypad
embedded 33
P
password 69 types 69
PC Card 74 ejecting 74 inserting 74
ports 71 printer
troubleshooting 46 problems 45
CD-ROM 46 display 45 keyboard 46 printer 46 startup 45 troubleshooting 83
Q
questions setting location for modem use 47...